
Introduction
Video editing is an art form that skillfully transforms simple clips into compelling stories, captivating the audience's attention and conveying a narrative in a visually dynamic manner. A pivotal element in this artistic process is the use of transitions. These are not just mere tools to stitch clips together; they are the paintbrushes of the video editor, enabling the creation of a seamless and engaging visual story.


DaVinci Resolve application thumbnail for article on DaVinci Resolve transitions.
In this guide, we delve into the intricacies of adding transitions in DaVinci Resolve, an industry-standard software renowned for its robust editing capabilities and versatility. Whether you're crafting a dramatic montage, a fast-paced commercial, or a documentary, understanding how to effectively use transitions can significantly enhance the storytelling impact of your projects.
Through step-by-step instructions and practical tips, we aim to empower you to master the art of transition in your video projects. This guide is designed to cater to both beginners and intermediate users, ensuring that by the end, you’ll have the skills and confidence to elevate your video editing to the next level. Let's embark on this journey to transform your video edits from ordinary to extraordinary.
Adding Transitions in DaVinci Resolve: A Step-by-Step Guide
Transitions are more than just connectors between video clips; they are the magic that can elevate your video project from good to remarkable. Let's dive into the nuances of adding seamless transitions in DaVinci Resolve, ensuring that your edits not only look professional but also captivate your audience.
Option 1: Using the Effects Library
Step 1- Opening Your Project:
Begin by launching DaVinci Resolve and opening your video project. It’s essential to have your video clips neatly arranged on the timeline. This preliminary organization is key, as it sets the stage for a smooth editing process. Visualize how your story unfolds and how each clip contributes to the narrative.
To get started, you’ll want to be on the Trim Edit Mode.


User selecting the Edit Section for DaVinci Resolve transition article.
Step 2- Selecting Transitions:
Starting in the ‘Edit’ area, navigate to the ‘Effects Library’ panel, a treasure trove of transitions. DaVinci Resolve offers a plethora of transition options, ranging from subtle fades to dynamic wipes. Browse through this library and select a transition that aligns with the mood and style of your project. Think of how each transition can enhance the storytelling aspect of your video.


User accessing the transition effects menu for article on how to add transitions in DaVinci Resolve.
Step 3- Applying the Transition:
Once you’ve chosen your transition, it's time to bring it into your project. Simply drag your selected transition between two clips on the timeline. This intuitive click-and-drag method makes it effortless to apply transitions. As you place the transition, consider how it influences the flow and pacing of your narrative.


User dragging transition in between scenes for DaVinci Resolve video transitions article.
Step 4- Adjusting Duration and Properties:
After applying the transition, double-click on it in the timeline. This action opens a new world of customization. Here, you can adjust the duration to control how quickly or slowly you want the transition to unfold. Additionally, explore other properties and effects that can be tweaked to ensure that the transition perfectly complements your clips.


User accessing transition properties menu to help users who might ask why DaVinci Resolve won't let me add transitions.
Step 5- Previewing and Tweaking:
The key to perfecting transitions is in the previewing and tweaking. Always take the time to preview how the transition integrates with your video. This step is crucial for understanding the impact of your edit. If something feels off, don’t hesitate to go back and make necessary adjustments. The goal is to achieve a balance where the transition feels like a natural part of the story, enhancing the viewer’s experience.
Option 2: Using the Trim Edit Mode
Following an alternative method, here is a step-by-step tutorial on adding transitions in DaVinci Resolve, focusing on the trim edit mode and fine-tuning through the inspector.
Step 1: Starting in Trim Edit Mode
- Ensure you're in the trim edit mode for precise control over transition application between clips.


User clicking on the trim edit mode to help users understand why DaVinci Resolve sometimes can't add transition.
Step 2: Selecting Clip Edges for Transition
- Click on the end of the first clip and the beginning of the next clip where you want the transition to occur. This sets the exact points for the transition.


User selecting end of clip for article on DaVinci Resolve transitions.
Step 3: Adding the Transition
- Navigate to the top of your timeline and click on 'Add Transitions.' If prompted to trim clips, proceed as needed. This adds a default transition.


User clicking add transition in menu for DaVinci Resolve transition article.
Step 4: Adjusting Transition Duration
- Adjust the duration of the transition either directly on the timeline or by right-clicking and changing the duration in frames or time.


User accessing Change Transition Duration Menu for article on How to add transitions in DaVinci Resolve.
Step 5: Using the Inspector for Transition Styles
- Click on the inspector in the top right corner and go to the Transitions section to change the transition type and control its aspects.


User adjusting transition settings for DaVinci Resolve video transitions article.
Step 6: Customizing Transition Properties
- In the inspector, select a transition type, like 'Edgewipe', and adjust properties such as duration, angle, border, and feathering.
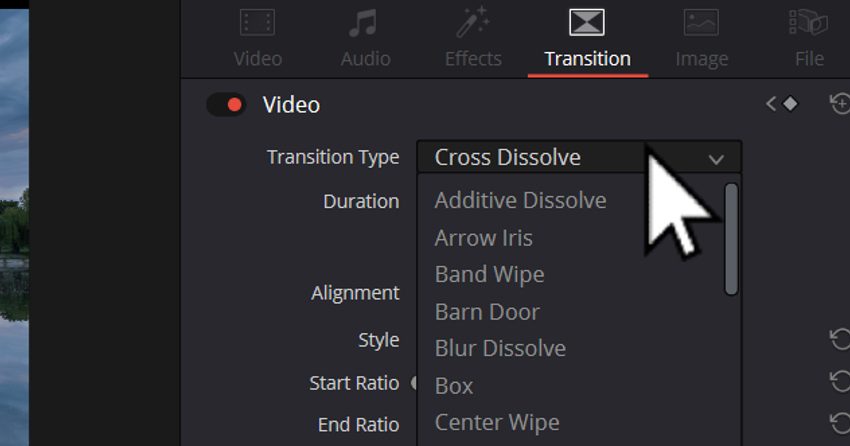


User accessing transition type menu for user who don't understand why DaVinci Resolve won't let me add transitions.
Step 7: Exploring Transition Presets
- Access a variety of transition presets in the Effects section in the top left corner. Preview transitions by hovering over them.


User accessing preview mode with effects for to help DaVinci Resolve users who can't add transitions.
Step 8: Finalizing and Previewing
- After customizing, preview your transitions to ensure they smoothly integrate with your video and make any needed adjustments.
This method provides a comprehensive approach to adding and customizing transitions in DaVinci Resolve, enhancing the overall editing experience and output quality.
By paying attention to these details and utilizing the powerful features of DaVinci Resolve, you can transform your video projects into engaging, polished narratives that capture and hold your audience’s attention.
Common Problems and Solutions
Dealing with challenges while adding transitions in DaVinci Resolve is a common part of the video editing process. Here are some additional common issues and their solutions, along with more FAQs for a smoother editing experience:
Problem: "The transition looks jumpy or glitchy."
- Solution: This often happens due to rendering issues. Try rendering your clips (right-click on the timeline and select ‘Render Cache Color Output’) before applying the transition. This step can help smooth out any glitches.
Problem: "I can't find the transition I need."
- Solution: DaVinci Resolve has a vast array of transitions but they might not all be visible by default. Expand the transitions section in the ‘Effects Library’ or consider downloading additional transition packs that suit your project’s theme.
Problem: "Transition effect is too abrupt or too slow."
- Solution: The pacing of a transition can greatly affect its impact. If a transition feels too abrupt or too slow, adjust the duration by clicking and dragging the edges of the transition in the timeline. This allows for a more controlled and nuanced transition effect.
Problem: "Audio glitches during the transition."
- Solution: Audio issues often arise during video transitions. To address this, separate the audio from the video clips (right-click on the clip and select ‘Link/Unlink Clips’) and apply audio-only transitions or adjust the audio fade in and out points manually. This ensures smoother audio transitions.
Showcase of Top 5 Envato Elements Transitions Templates
Enhance your videos with these professionally designed transitions from Envato Elements:
Confetti Seamless Transitions | DaVinci Resolve


Confetti transitions in Envato Elements website thumbnail for article on DaVinci Resolve transitions.
- URL: Confetti Seamless Transitions
- Description: Add a festive touch with these lively confetti transitions. Perfect for celebratory videos.
Magic Sparks Seamless Transitions | DaVinci Resolve


Magic Sparks Transitions in Envato Elements website thumbnail for DaVinci Resolve transition article.
- URL: Magic Sparks Seamless Transitions
- Description: Ignite your storytelling with these dynamic spark transitions.
Film Burn Leak Transitions For DaVinci Resolve


Film burn transitions in Envato Elements website thumbnail for article on How to add transitions in DaVinci Resolve.
- URL: Film Burn Leak Transitions
- Description: These film burn leaks offer a vintage aesthetic, ideal for creative storytelling.
Transitions for DaVinci Resolve


Transitions for DaVinci Resolve in Envato Elements website thumbnail to help with DaVinci Resolve video transitions.
- URL: Transitions for DaVinci Resolve
- Description: A versatile collection to suit various video editing needs.
Christmas Time Set for DaVinci Resolve


Christmas time transition set in Envato Elements Website thumbnail for DaVinci Resolve transitions article.
- URL: Christmas Time Set
- Description: Bring the festive spirit into your videos with these Christmas-themed transitions.
Additional FAQs:
- Q: Can I customize a transition in DaVinci Resolve?
- A: Absolutely. After adding a transition, double-click on it in the timeline to open its properties. Here, you can adjust various aspects like timing, motion, and effects to tailor the transition to your specific needs.
- Q: How do I save a custom transition for future use?
- A: Once you’ve customized a transition to your liking, right-click on it in the timeline and select ‘Create Transition Preset’. Name your preset, and it will be saved in the ‘Effects Library’ for easy access in future projects.
- Q: Can transitions be reversed or flipped in DaVinci Resolve?
- A: Yes, you can reverse a transition's direction. After adding the transition, go to its properties and look for an option like ‘Reverse’ or ‘Flip’. This can add a unique effect to your transitions, offering more creative flexibility.
- Q: Is it possible to copy a transition from one cut to another?
- A: Definitely. If you have a transition that you particularly like, you can copy it to another cut. Right-click on the transition, select ‘Copy’, then right-click on the target cut and choose ‘Paste’. This feature is useful for maintaining consistency in transitions across various parts of your video.
These problem-solving strategies and FAQs aim to enhance your efficiency and creativity when working with transitions in DaVinci Resolve, making your video editing process both enjoyable and productive.
Get Unlimited Transitions with Envato Elements Subscription


Looking for more than just transitions? Envato Elements offers millions of professional-grade digital content pieces, including stock footage, music, and much more. And now with integrated Ai search assistant, it’s an incredibly invaluable treasure trove for any video editor! Also, for more insights into video editing and DaVinci Resolve, check out our other tutorials and roundups on Envato Tuts+.
Conclusion
Adding transitions in DaVinci Resolve can significantly enhance your video projects, making them more engaging and professional. Experiment with different transitions and utilize the resources from Envato Elements to elevate your video editing game.
 By
By


