iMovie is a solid video editing app for Mac users. Some users may decide they want to take their edits to the next level and use a professional-level editing program, though. In this tutorial, I will show you how to send an iMovie movie to Final Cut Pro 10.
iMovie is Apple's consumer video editing offering for Mac. Free with the purchase of any new Mac since October 2013 (or $14.99 otherwise), iMovie is a great way to get started with video editing. Apple sums up editing with iMovie nicely: "a major production, without the major production." If you're looking to put together a simple video, there's a good chance iMovie has you covered.
Going Pro
But what if you want to take your video to the next level? Final Cut Pro X is an advanced non-linear editor with all the tools you'll need. Here's just a few of the professional editing tools Final Cut Pro 10 offers that iMovie doesn't:
Advanced media management with keywords and Smart Collections
Magnetic Timeline: professionally-equipped, multitrack, and customizable
Multi-channel audio with effects, plug-in support, and surround mixing
Multicamera editing
Color correction and scopes
Advanced video effects
Customizable titles
Integration with Motion and Compressor
Comprehensive export options
Ready to make the jump? Head to the Mac App Store. Not sure? You can try Final Cut Pro for free for 30 days here.
Send an iMovie Movie to Final Cut Pro
So you've decided to upgrade from iMovie to Final Cut Pro. But what do you do with your old and/or in-progress projects that are still in iMovie? Thankfully, with the current versions of each software, Apple has made the process of sending a project from iMovie to Final Cut Pro extremely simple. You'll be able to use the professional tools Final Cut Pro has to offer on your iMovie projects in no time.
To get started on sending an iMovie movie to Final Cut Pro, open iMovie and load the project you'd like to transfer into the timeline.
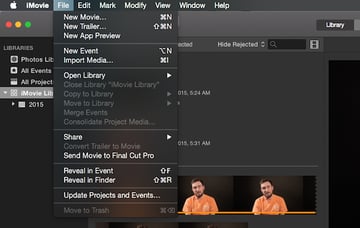
Then go to File > Send Movie to Final Cut Pro.
iMovie will launch Final Cut Pro, create a new Final Cut Pro Library called iMovie Library, create a Final Cut Pro Event (with the same name as the iMovie Event your movie came from), and finally, load your movie into the Event as a Final Cut Pro project. Click on the project to load it in to the timeline. At this point, you can start editing your new project.
If you go to your "Movies" folder in Finder, you will find the newly created "iMovie Library" Final Cut Pro Library. This is created the first time you send an iMovie movie to Final Cut Pro, and it will be used by iMovie in the future for any more movies you send.
Send an iMovie Trailer to Final Cut Pro
iMovie allows you to quickly create cinematic trailers by filling out a "credits" text form and selecting short clips of video, which iMovie then compiles based on the template you selected. Because this process does not take place in a standard timeline, though, getting an iMovie trailer into Final Cut Pro requires an extra step.
Notice the lack of a timeline when editing an iMovie trailer.
To convert your trailer into a timeline-based movie, go to File > Convert Trailer to Movie.
The trailer can now be edited (or sent to Final Cut Pro) as a standard iMovie movie.
Once again, to send your movie to Final Cut Pro, go to File > Send Movie to Final Cut Pro.
Your iMovie trailer can now be edited as a Final Cut Pro project.
Conclusion
iMovie is a great piece of software, but some users may want to upgrade to the professional features Final Cut Pro has to offer. If you're one of those users, don't worry. You can now easily move your iMovie movies and trailers to Final Cut Pro and start editing like a pro in no time.


 By
By


