
Focus stacking is a technique usually associated with macro photography, tripods and precision. But you can use it with a 400mm lens, handheld, and come out with some nice images. And to make things even more difficult, the same image also is a vertical panorama. Let's see how it's done!
 This image is the result of a focus stacking technique. It could not be done in a single shot. Read further on to know why and how it was done.
Taking multiple pictures these days is often associated with HDR photography, but there are other times and reasons for taking several pictures of one subject. In HDR, it is usually because you need to go further, in terms of exposure, than the sensor can cope with in a single shot. You take a series of shots at different exposures, and mix them to get a final image with properly exposed highlights and shadows.
 With a 400mm lens handheld, at 1/1000, f/9 and 400 ISO, the three frogs could be kept in focus, but not much else. And choosing a smaller aperture would cause diffraction and problems with the shutter speed used with this lens.
To achieve focus stacking, you do a series of pictures at the same exposure, but change the point of focus between shots. It is a well known way to get the most depth of field within a single image without using a small aperture.
Focus stacking lets you extend your depth of field beyond what you can achieve by normal methods . Some might think that choosing a small aperture will do this, but sometimes not even f/16 or f/32 will be enough to get everything in focus. The other problem is that the more you close the aperture the more diffraction shows up, and the end result may be an image with sharpness loss.
Depth of field is reduced as your subject gets closer to your lens. That is why this is a very useful technique for macro photography.
 Once you include a frog in the background it becomes evident that there are limits in terms of depth of field. As the shutter speed can not come down much, this is a situation for focus stacking. Handheld!
Focus stacking is usually presented as complex, difficult to master and in need of specific equipment, like focusing rails, tripods, good lighting and, according to some authors, so many other things that most people will simply give up.
But we should not be intimidated because focus stacking can be fun, and an easy way to get images that are different and go beyond what is normally produced with a camera.
In this article, I want to do something different with the technique. I'll show you how to break the rules and do focus stacking the simple way. But I want to take this challenge further, so I use a long lens - my 100-400mm zoom at the long end - and along with stacking photos I'll also create a vertical panorama.
 If you keep the same exposure values, focusing on the frog in the background would cause the front group of frogs to be out of focus.
I should say that doing focus stacking the regular way, with a tripod, and all the other equipment, may be needed for some purposes, but that should not stop you from trying to do it otherwise, especially in situations like the one I describe in this article.
Daring to explore new techniques is a great way to develop as a photographer. Do not just go for what others say to you. After all, with digital photography we're free to try without having to spend lots of money on film. I come from film days, in fact I've photographed more years with film than with digital, so I feel blessed to use the new medium.
 Once you've defined the sequence of pictures you need to use it will be easy. Do more than one set of images just to be sure, and afterwards open them on your computer to check focus and exposure.
So, this is an image of a group of frogs basking in the sun on a fountain spout. Although it looks like a normal picture taken in a single shot, it has more work in it than you might think.
In fact, it is the result of stacking five pictures that also create a vertical panorama. I wanted to do a picture that would let me focus on the frogs on the first plane, but also get details on the frog in the background. I also wanted the front element of the spout to be in focus.
I had to be quick, before the frogs moved away. I did not have time to use a tripod, and I had to hold the lens in my hand. That meant using a high shutter speed. I used 1/1000 and for that I needed an aperture of f/9, not enough to get everything in focus.
The first step is to open the images as layers in Photoshop and align the different layers.
1. Try Out the Sequence of Shots
I mentally planned the number of pictures I would need, and tentatively framed the scene by moving my camera in sequence to understand the best course of action. Then I made a first batch of images, checked them and did it again, adjusting focus between shots in order to get my main elements properly focused.
The automatic functions in Photoshop work perfectly and make the whole process simple. But there is also free software to try.
2. Do the Panorama
The top images in my sequence focused on the group of frogs and then on the single frogs behind them. The two last pictures centered on the water dripping from the fountain spout, so I moved the camera vertically, to get a panorama. I had my series, I just needed to get the images on my computer to edit them.
3. Easy Stacking in Photoshop
There are different programs to focus stack images (see some others at the end of article), but I use Photoshop CS6. Since CS4, it offers these options at a level you can trust. Both the merge function for panoramas and focus stacking are present. I consider them essential for some work

As if by magic the final image has everything in focus.
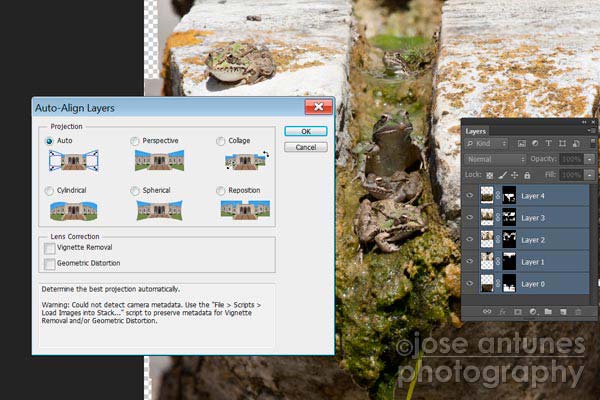
4. Auto-Align Layers
When you focus stack images, all the images are usually taken with the exact same framing, but even so it is wise to use the Auto-Align Layers function in Photoshop (go to the Edit menu and you'll find it).
In my case, as I took the pictures with the camera in my hand. So, I absolutely need to use this function. I use Auto because Photoshop is intelligent and will place my three images with the frogs on top of each other, and align the two remaining images under them, creating my vertical panorama. Easy!
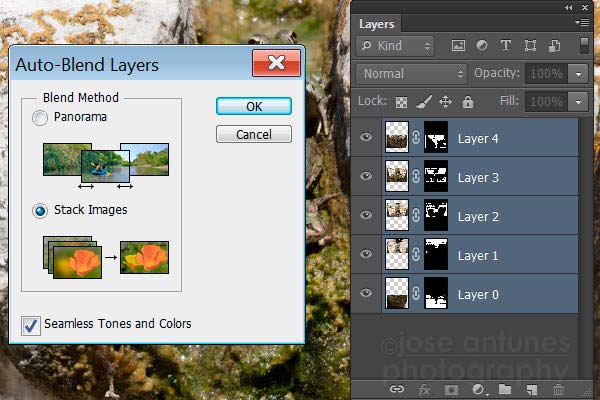
5. Auto-Blend Layers
The second part of the operation can be accessed under the Edit menu, and is called Auto-Blend layers. And that is exactly what it does: it looks at the images and defines what is most important on each of them.
It's like magic, in the end you get a final picture where your important elements are in focus. I guess here Photoshop looked at my frogs in each picture, and like it would do in a family portrait, it chose the best faces.

My vertical panorama is ready to be cropped in Photoshop CS6.
6. Crop your panorama
Using this technique, my final image was huge. The images from my Canon EOS 50D are 4752 × 3168 pixels in size, and my picture of the frogs has 4697x6105 pixels. This means I can make a big print out of it, with a gain in focus I would not have achieved even with the aperture at f/22 or more.
7. Things to Remember
This technique can not be used with moving elements (there would be no frogs on my final picture) and it will not work for everything. You do need to carefully plan your shot in order to get the best results with minimum effort and hassle.
Nothing substitutes the conventional ways of doing focus stacking, but in a pinch this can be your way to get better images than you would with normal procedures. And the more you try this technique, the easier it will become to use. You can then adapt it for areas you never had thought were associated with the words "focus stacking."

This is the final image I created. The original is 4697x6105 pixels, much bigger than the size of my camera's sensor.
Other Software
There is a variety of software beyond Adobe Photoshop that you can use to do focus stacking. The most well know is probably Helicon Focus, but you can also check out CombineZP, which is free, or PhotoAcute. There's also Zerene Stacker. Give them a try and see what you like best!
 By
By


