

Antes de empezar, quiero dejar claro que no soy un abogado. Este artículo proporciona información general sobre algunos aspectos legales, pero no son consejos jurídicos y no deberían considerarse como alternativa al asesoramiento proporcionado por un abogado profesional. Dicho esto, tampoco es necesario ser un abogado para tomar algunas medidas preventivas que protejan tus imágenes, y de eso vamos a tratar en este artículo.
La Importancia del los Derechos de Autor
El copyright o los derechos de autor pueden se un concepto confuso para cualquier tipo de artista, incluidos los fotógrafos. En algunos países la gestión de estos derechos es más complicada que en otros; Estados Unidos es uno de los países en los que su gestión es más compleja. No obstante, existe un principio básico que respalda los derechos de autor en casi todas las jurisdicciones: la persona que crea la pieza de arte original - los fotógrafos en nuestro caso - es la propietaria del trabajo creado. El mero hecho de haber pulsado el disparador y capturado un momento ya te hace poseedor de los derechos de autor de la fotografía. Eso significa que tienes derecho a decidir qué pueden hacer terceras partes con tus fotografías y en qué condiciones.
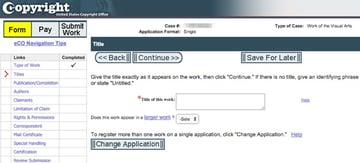
A pesar de poseer los derechos de autor sobre tus fotografías, posiblemente todavía te encuentres con conflictos legales para recuperar los daños ocasionados por quien haya infringido tus derechos y usado tu imagen de forma ilegítima. En EE.UU. es mucho más fácil reclamar los derechos de autor si previamente has registrado tus imágenes en United States Copyright Office (USCO). Para que sea efectivo, debes registrar tus imágenes en USCO durante los tres meses posteriores a la fecha de la primera publicación de la imagen. Si las registras, serás capaz posteriormente de tomar acciones legales para reclamar los daños y los costes causados por alguien que haya usado tus fotografías de forma ilegal. Puedes registrar tus imágenes online a través del servicio eCO de USCO. El coste de registro online es de 35$ por imagen.
Normalmente, gestionar los derechos de autor fuera de EE.UU. es un poco más sencillo y no requiere registro. Normalmente basta con haber hecho uno mismo la captura de la fotografía y poder probarlo (por ejemplo, lo puedes demostrar al ser capaz de reproducir la imagen original), esto te garantiza el derecho a reclamar la propiedad.
Si embargo, debes ser consciente de que algunas jurisdicciones (incluyendo Canadá hasta 2012) conceden los derechos de autor a la parte que encargó la obra de arte, no a la persona que la ejecutó. Dicho con otras palabras, en algunos países es el cliente, y no el fotógrafo, quien posee de forma automática los derechos de autor de las imágenes. Si esto es así en tu región, tendrás que usar un acuerdo de licencia para proteger tu derechos.

Descubre ImageRights
ImageRights es un servicio con dos objetivos: descubrir el uso ilícito de tus imágenes, y simplificar el proceso de registro de los derechos de autor. En el proceso de búsqueda de usos ilegales, ImageRights rastrea la web en busca de sitios web y publicaciones impresas que puedan estar usando tus imágenes. Como parte de ese proceso, ImageRights también te ayuda a recuperarte de los daños al trabajar con socios expertos legales para negociar una compensación por el uso de tu fotografía sin consentimiento previo.
El objetivo de este tutorial es explicarte cómo usar ImageRights para lograr cualquiera de estas dos cosas. Te mostraré cómo enviar imágenes a ImageRights para descubrir infracciones y a usar el servicio para simplificar el registro de los derechos de autor de tus imágenes.


Es importante mencionar que a través de su red internacional de abogados asociados, ImageRights puede ayudar a reclamar los derechos a fotógrafos de cualquier país, no solo a los residentes en EE.UU. Echemos un vistazo a cómo usar ImageRights con el plugin para Adobe Lightroom.
Instalar el Plugin ImageRights
ImageRights ofrece un plugin para Lightroom que simplifica el uso de su servicio integrándolo en tu flujo de trabajo. Tras crear una cuenta en la web oficial de ImageRights, inicia sesión y llegarás al panel de control del servicio o dashboard. Abrir una cuenta en ImageRights es gratuito en principio, pero el servicio de registro de imágenes es un proceso de pago. El servicio se gestiona desde el panel de control de ImageRights, en donde puedes revisar los avisos de posibles infracciones sobre tus fotos.
Desde aquí también podrás descargar el plugin ImageRights para Adobe Lightroom. Empieza descargando el plugin y guárdalo en algún sitio en donde te sea fácil encontrarlo posteriormente. El plugin viene comprimido en un archivo zip, así que tras descargarlo descomprímelo y guárdalo en algún sitio al que puedas acceder fácilmente y en el que pueda permanecer, ya que después no podrás moverlo sin romper Lightroom.
Tras extraer el plugin, avanza y abre Adobe Lightroom. Accede al menú Archivo > Gestor de plugins para lanzar el instalador.


En el siguiente menú, pulsa el botón Añadir situado en la esquina inferior izquierda de la ventana. Tendrás que navegar a la ubicación en la que guardaste el plugin. Localiza el archivo ImageRights.lrplugin y añádelo.


¡Ya está! Eso es todo, ya lo tienes instalado. Ahora, veamos cómo usarlo.
Conectar el Plugin ImageRights
Después de instalar el plugin ImageRights, tendrás que conectarlo con tu cuenta. En Biblioteca del panel Servicios de publicación, verás como ahora se muestra la opción correspondiente a ImageRights. Para configurarlo, pulsa con el botón derecho (Control-clic en Mac) y selecciona Editar ajustes.


En la siguiente pantalla, conectarás el plugin con tu cuenta de ImageRights de forma que Lihgtroom pueda enviar las imágenes directamente al servicio. Introduce tus credenciales de ImageRights y selecciona Verify Connection to ImageRight (Verificar conexión con ImageRights). Si tus credenciales son correctas, recibirás un mensaje y conectarás con el servicio.


Una vez hayas conectado Lightroom con ImageRights, probemos a enviar algunas imágenes al servicio para que ImageRights empiece el proceso de investigación.
Investigar con ImageRights
Tal y como he mencionado antes, un servicio muy útil que ofrece ImageRights es la característica Discover (Descubrimiento). El envío de imágenes a ImageRights para su descubrimiento o investigación significa que el servicio buscará en la web casos en los que se haya empleado esa imagen. Si determinas que la imagen está siendo usada de forma inadecuada, puedes enviarla al equipo de ImageRight para que evalúen y se ocupen de la situación, lo cual finalmente podría resolverse en una compensación económica. Aquí puedes conocer más sobre el proceso de recuperación, pero de momento, enviemos nuestras imágenes al servicio Discovery.
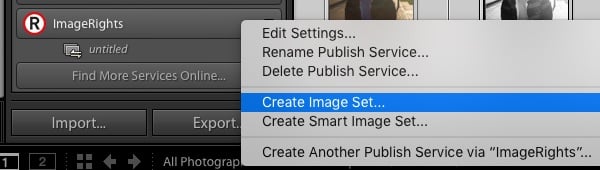
Para enviar imágenes a ImageRights para su investigación, asegúrate de que estás trabajando con el módulo Biblioteca. En el panel Servicios de publicación del lado izquierdo de la aplicación, localiza la sección ImageRights. Para crear un nuevo conjunto de imágenes a enviar al servicio de investigación de ImageRights, pulsa con el botón derecho (o Control + clic en Mac) sobre la caja de ImageRights y selecciona Crear Image Set.

En la siguiente ventana tendrás que indicar un nombre a este "Image Set" o Grupo de imágenes. Puedes denominarlo simplemente "Enviar a ImageRights". Si ya has preparado y seleccionado imágenes que quieras enviar, deja marcada la casilla Include selected photos. También puedes arrastrar y soltar fotos directamente desde el módulo de la Blibioteca sobre el set "Enviar a ImageRights" que acabamos de crear.


Bueno, ya estamos preparados para enviar algunas imágenes a ImageRights. Ahora que las hemos añadido queremos subirlas a ImageReady para "investigar", de nuevo, pulsa con el botón derecho (Control + clic en Mac) sobre la Imagen de Colección que hemos creado en la lista de ImageRight. Ahora pulsa Publicar. Esto iniciará el proceso de carga.


Cuando haya terminado la carga, las imágenes estarán visibles en el panel de control de ImageRights. El servicio empezará a buscar en internet y en publicaciones impresas intentando localizar usos ilícitos de tus imágenes.


Si añades más imágenes a tu grupo y quieres enviarlas, todo lo que tienes que hacer es volver a la colección y pulsar Publicar en la parte superior de la ventana.


Es importante notar en esta fase que nuestras imágenes no están registradas en U.S. Copyright Office sencillamente porque no las hemos enviado a ImageRight para investigar su uso. Otra excelente función que ofrece ImageRight es la simplificación del proceso de copyright, así que vamos a ver cómo gestionar este proceso.
Registrar los Derechos de Autor de Imágenes con ImageRights
Hasta ahora hemos visto el proceso para enviar imágenes a ImageRights para investigar su uso fraudulento. Ahora, vamos a ver cómo usar el plugin de ImageRight para expedir los derechos de autor.
Como he mencionado antes, el coste para registrar las imágenes en United States Copyright Office empieza a partir de 35$ por imagen. El coste de registro a través de ImageRights varía de entre 69$ a 89$ por imagen, dependiendo del estado de publicación y de la cantidad de imágenes. Para conocer mejor los precios, consulta su página de precios. Básicamente, ImageRights carga un coste extra por las facilidades que proporciona para el registro de los derechos de autor.
Para registrar una imagen, selecciona una o varias desde el módulo de la Biblioteca en Lightroom. Después, dirígete al menú Archivo > Extras de plugins y selecciona la opción Prepare USCO Registration for Selected Images.
Tras seleccionar la opción preparar, se abrirá tu navegador y serás guiado durante el proceso de registro. Tendrás que ingresar la información pertinente para que USCO verifique los derechos. La interfaz de ImageRights es mucho más sencilla que la del sistema eCO de USCO, y ésta es una de sus principales ventajas.


Una vez hayas completado el proceso, ImageRights dará como válido el registro de los derechos de autor. Una excelente característica es que con el plugin ImageRights instalado, podrás monitorizar el estado de tus derechos directamente desde Lightroom. Para conseguirlo, debes descargar periódicamente el estado de los derechos (copyright status) de tus imágenes, dirígete a Archivo > Extras de plugins y selecciona Download USCO Status from ImageRights. El plugin descargará todos los estados de los derechos de tus imágenes.
Para comprobar los estados, selecciona una imagen de la Biblioteca. En el panel de metadatos, selecciona en el menú desplegable ImageRights. Esta ventana mostrará los últimos estados de los derechos en USCO de tu imagen.


¡Buen trabajo! Ya has recorrido el proceso necesario para registrar tus imágenes desde Lightroom con ayuda de ImageRights.
Sigue Aprendiendo
En este tutorial, hemos visto cómo usar ImageRights, un servicio diseñado para ayudarte a detectar usos ilícitos de tus imágenes con derechos de autor, así como la importancia de su registro. En conclusión, espero que la protección de tus imágenes no acabe requiriendo la contratación de un abogado o que tengas que recorrer constantemente la web en busca de infracciones de uso.
Para seguir aprendiendo más sobre los derechos de autor de tus imágenes, uno de los mejores recursos con los que me he topado es "A Copyright Primer" de la American Society of Media Photographers. Nosotros también publicamos recientemente una excelente pieza sobre copyright en Envato Tuts+ escrita por Marie Gardiner: "Entendiendo los derechos de autor y las licencias para fotografía". Otro recurso más genérico es la "Guía esencial sobre los derechos de autor para los freelancers que empiezan" de Thursday Bram.
 FreelanceGuía esencial sobre los derechos de autor para los freelancers que empiezan
 Concesión de licenciasEntendiendo los derechos de autor y las licencias para fotografía
Si estás interesado en aprender más sobre cómo funciona el servicio de ImageRights, consulta su página Recovery para saber como proceder en la reclamación de los derechos de las imágenes. También ofrecen distintos planes de servicio.
¿Qué haces tú para proteger los derechos de tus imágenes? ¿Estas registrando los derechos de autor? Deja un comentario y cuéntanos cómo lo gestionas.
 By
By


