

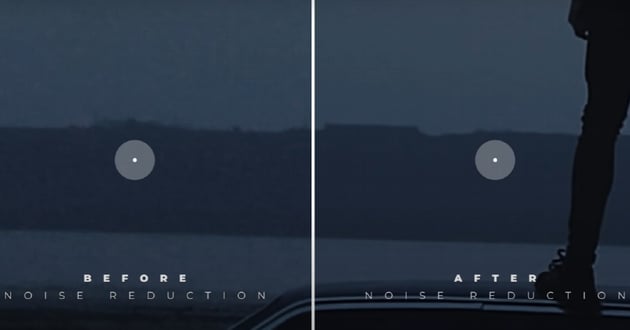
In today's digital filmmaking and video production landscape, achieving clean, noise-free footage is more than a goal—it's a necessity for professional-quality results. Noise, those pesky unwanted grain or speckles, can significantly lower your video's quality, especially in challenging lighting conditions or at high ISO settings. Thankfully, DaVinci Resolve steps in as a powerful ally, offering advanced tools for denoising footage. This guide aims to take you through a straightforward, step-by-step process, ensuring your videos come out looking polished and professional.
Noise reduction in DaVinci Resolve can feel daunting at first. However, with the right approach, it's a game-changer for video quality, allowing you to salvage and enhance footage that might otherwise seem unusable. Whether you're dealing with a dimly lit scene or the aftermath of cranking up your camera's sensitivity, DaVinci Resolve's denoise functionality is your ticket to clear, crisp visuals. Some of the elements of this tutorial are applicable only in DaVinci Resolve Studio, which is the paid version of DaVinci Resolve.


Our tutorial is designed for everyone from beginners to seasoned pros, focusing on how to denoise in DaVinci Resolve effectively. In this article we aim not just to guide you but also to make this resource easily accessible for those seeking knowledge on "how to denoise footage in DaVinci Resolve," "DaVinci Resolve noise reduction," and related queries.
Denoising Tutorial for DaVinci Resolve
Embarking on refining your video content means mastering essential post-production techniques. Noise reduction is one such skill that significantly impacts the visual quality of your projects. This tutorial will guide you through the process of denoising footage in DaVinci Resolve, tailored for both novices and seasoned editors. Our aim is to simplify the denoising process and help you enhance the visual quality of your videos.
By following a series of detailed steps, you'll learn to effectively utilize DaVinci Resolve's powerful denoising tools. We'll cover everything from importing your footage to fine-tuning the noise reduction settings for the best results. Whether you're looking to improve low-light shots or refine your video's overall aesthetic, this tutorial will provide you with the know-how to achieve professional-grade outcomes.
For Further Learning:


Let's begin our journey into denoising with DaVinci Resolve, transforming your grainy footage into clear, visually appealing content.
Key Steps to Denoise Your Footage Covered in This Tutorial:
- Navigate to the Color Page: Denoising features are found in the Color page.
- Apply Noise Reduction: Utilize the Temporal and Spatial noise reduction tools within the "Motion Effects" panel. These tools are your allies in reducing visible noise while maintaining the integrity of your footage.
- Fine-Tune the Settings: Adjust the Temporal Threshold, Spatial Threshold, and other settings to balance noise reduction with detail preservation.
- Preview and Export: Evaluate your adjustments by previewing your footage. Once satisfied, export your video to your desired format.
Denoising in DaVinci Resolve is a skill that, once mastered, significantly elevates the quality of your video content. By following this guide and exploring related tutorials, you're well on your way to becoming proficient in video post-production.
Navigating to the Color Page
Access the Color Page: Denoising capabilities are found within the Color page. Click the "Color" tab situated at the bottom to transition into the color grading workspace, where you'll perform the denoising magic.


Applying Noise Reduction
Temporal Noise Reduction: Temporal Noise Reduction in DaVinci Resolve is a sophisticated technique designed to clean up noise in video footage by analyzing the differences between frames over time. It effectively reduces the random grain or speckles that can occur in low-light conditions or with high ISO settings, without significantly impacting the essential details of the image. This method works by comparing consecutive frames to identify and eliminate noise, making it particularly effective for video sequences where the noise pattern remains consistent across frames. By adjusting parameters like the number of frames to analyze, the quality of the denoise process, and the motion range, users can finely tune the noise reduction to achieve clear, professional-looking results.
Step 1: Right-click your video on the Color page, select "Add Node," and then "Add Serial Node Before." This prepares your clip for denoising.

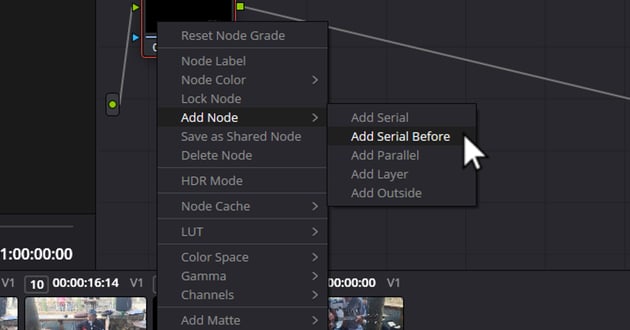
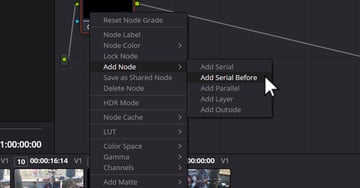
User selecting Add Serial Before Menu Option for DaVinci Resolve denoise techniques.
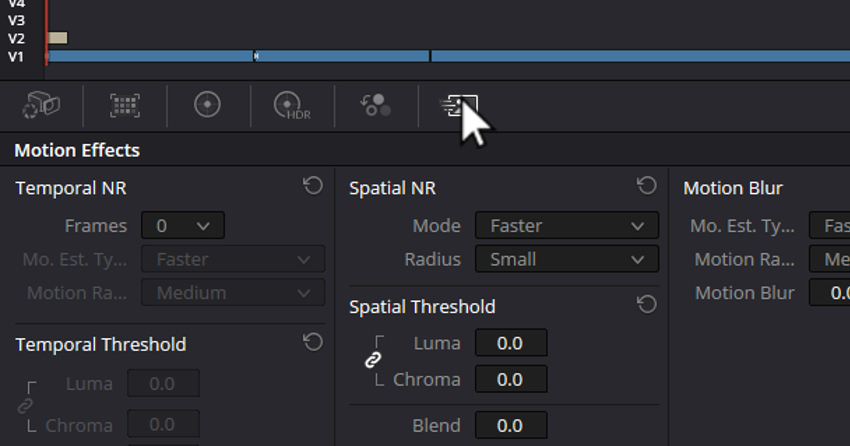
Step 2: Click on the newly created node, then head over to the "Motion Effects" panel. Here’s where you’ll fine-tune the denoising parameters.


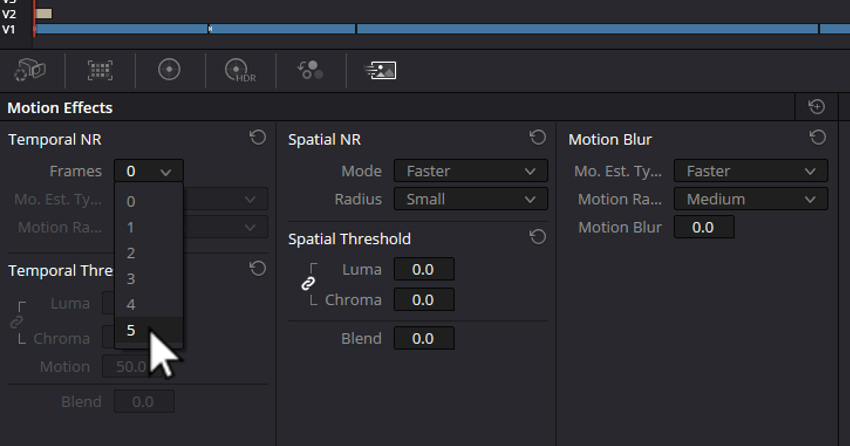
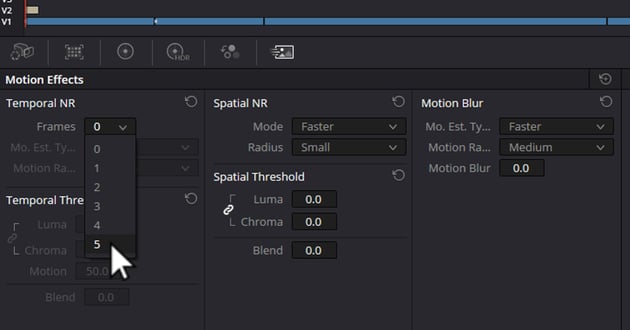
Step 3: Set "Frames" to five, ensuring a balance between denoising effectiveness and processing time.

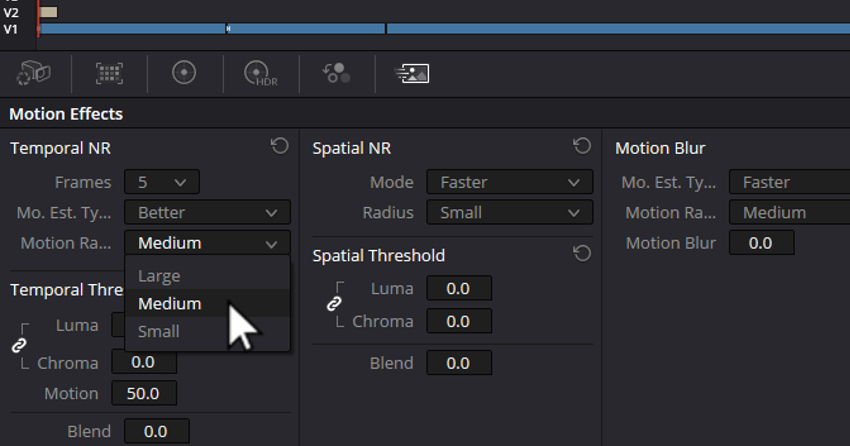
Step 4: Adjust "Quality" to better, offering a more refined noise reduction.


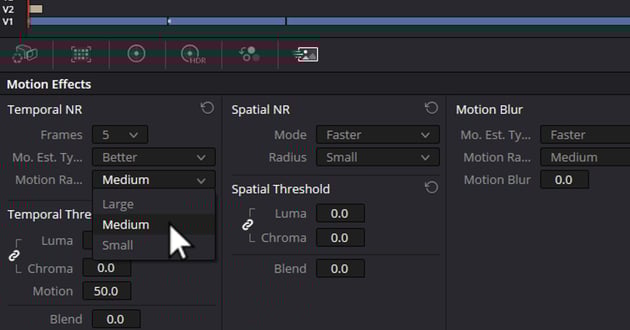
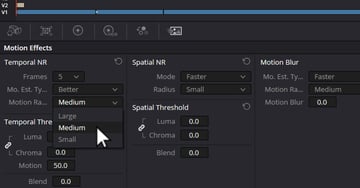
Step 5: Select "Motion Range" to medium, catering to most common video movements.
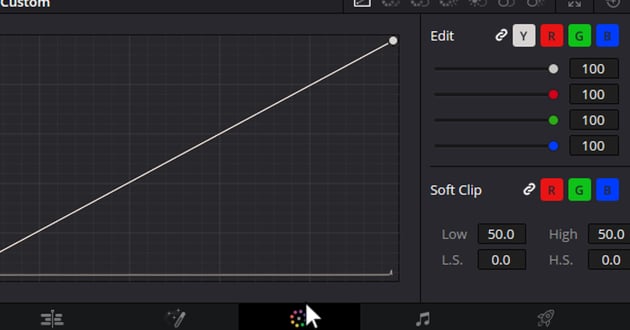
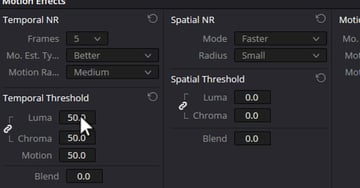
Step 6: For "Temporal Threshold," increase the luma value to 50. This targets the luminance component of the noise.


Spatial Noise Reduction:
Spatial Noise Reduction in DaVinci Resolve targets and mitigates noise within individual frames of video footage, rather than comparing across several frames. This method is especially beneficial for static shots or scenes with minimal movement, as it examines the spatial relationship between pixels within a single frame to detect and smooth out noise. By adjusting the intensity and threshold of the noise reduction, users can precisely control how aggressively the noise is removed, allowing for a cleaner image while preserving important details and textures. This approach is ideal for handling grain and speckles that appear in uniform areas, such as skies or shadows, effectively enhancing the visual quality of the footage without relying on temporal changes.
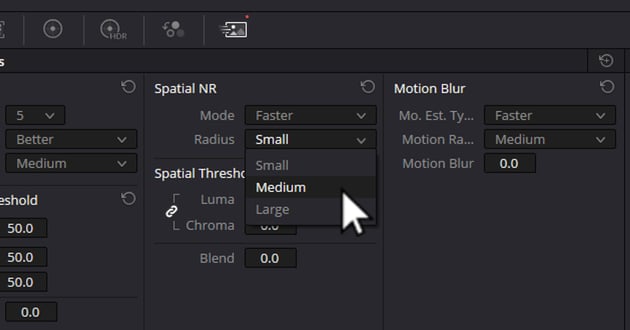
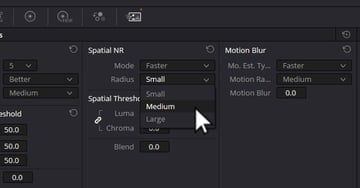
Step 1: Move down to "Spatial Noise Reduction" and adjust the "Radius" to medium, which affects the area of influence for the noise reduction.

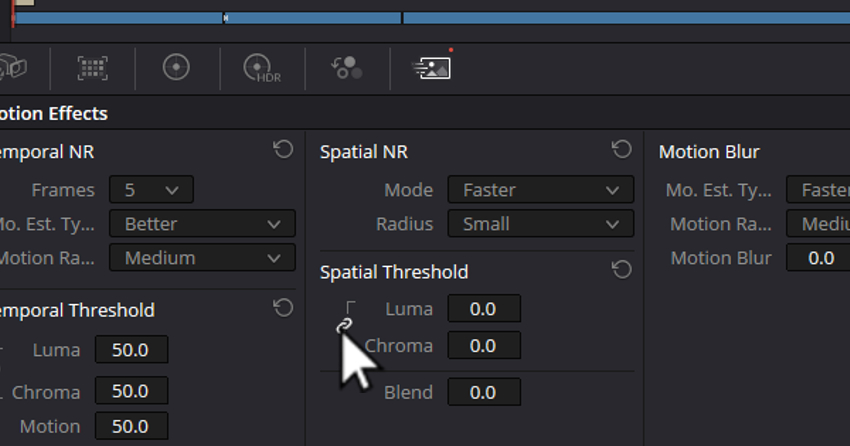
Step 2: Click on the chain icon beside "Spatial Threshold" to manage luma and chroma values independently.


Step 3: Elevate luma to 75 and chroma to 100, fine-tuning the noise reduction intensity and color noise handling.


Fine-Tuning Noise Reduction
Radius and Detail: Navigate through the noise reduction settings to adjust "Radius" and "Detail." These options allow you to control the balance between noise smoothing and detail retention.
Motion Estimation: Within "Temporal Noise Reduction," tweaking "Motion Estimation" settings can mitigate artifacts in moving elements of your video. Opt for a setting that closely matches the video’s motion.
Previewing, Adjusting, and Exporting Your Footage
Review Your Adjustments: Scrutinize your footage after the initial noise reduction settings are applied. Play back the video, observing for detail loss or over-smoothing. Iterative adjustments might be necessary to strike a perfect balance.
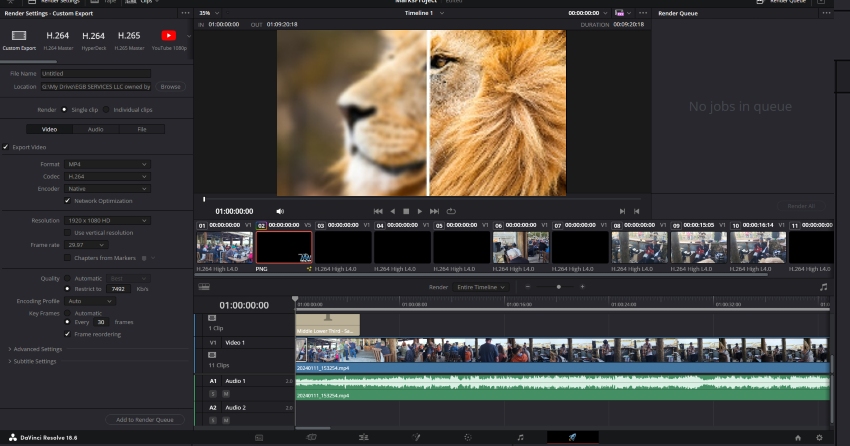
Export Your Denoised Footage: Content with the noise reduction? Proceed to the "Deliver" tab. Here, select your output format, resolution, and codec. Click "Render" to finalize and export your polished video.

Tips for Optimal Results
To achieve optimal results when denoising footage in DaVinci Resolve, it's essential to start with the best possible footage. This means shooting with noise reduction in mind. By choosing the right lighting and camera settings, you can significantly minimize noise, reducing the need for extensive post-production work. For instance, avoid high ISO settings when possible, as these can introduce noise, especially in low-light conditions.
However, it's also crucial to maintain a balance. Over-applying noise reduction in DaVinci Resolve can lead to a loss of detail, giving your footage an unnatural, "plastic" look. Instead, aim for a middle ground that reduces noise while preserving the natural texture and details of your footage. This approach ensures that your videos retain their quality and realism.
By applying these tips and exploring further learning resources, you can enhance both the visual and auditory aspects of your projects, achieving professional-grade outcomes in your video and audio productions.
Elevate Your Video Editing with Envato Elements
Envato Elements introduces an AI search tool in beta, merging its vast library of professional-grade digital content with the efficiency of AI technology. This tool allows video editors and creatives to describe their projects in natural language, offering tailored search results across categories such as video templates, stock footage, sound effects, and music tracks.


Users gain streamlined access to human-made creative assets, complete with lifetime commercial licenses.
Users gain streamlined access to human-made creative assets, complete with lifetime commercial licenses. This innovation underscores Envato's commitment to simplifying and expediting the creative workflow, ensuring users can bring their visions to life with ease and precision.


Envato Elements website (Now boasts powerful new Ai Search) for unlimited content and resources to help with reducing noise in DaVinci Resolve.
FAQ: Denoising Footage in DaVinci Resolve
1. Can DaVinci Resolve's denoise feature be used on any type of footage?
Yes, DaVinci Resolve's denoise feature is versatile and can be applied to a wide range of footage types, including those shot in low light conditions or with high ISO settings. However, the effectiveness may vary based on the footage quality and the noise level.
2. Is the noise reduction feature available in the free version of DaVinci Resolve?
The basic noise reduction features are available in the free version of DaVinci Resolve, but the most advanced tools, such as Spatial and Temporal noise reduction, are reserved for the Studio version.
3. Will denoising my footage result in a loss of detail?
Denoising, if overdone, can lead to a loss of detail. It's important to balance the noise reduction settings to minimize noise while preserving as much detail and texture in the footage as possible. Starting with conservative settings and gradually adjusting is recommended.
4. How can I avoid noise in my footage in the first place?
To minimize noise, try to shoot in well-lit conditions, lower your camera's ISO setting, and use a camera with a larger sensor if possible. Shooting in RAW can also provide more flexibility in post-production noise reduction.
5. Can I automate the denoising process in DaVinci Resolve?
While DaVinci Resolve offers some automated features, denoising typically requires manual adjustments to achieve the best results. The software provides sliders and settings that allow you to fine-tune the noise reduction based on your specific footage.
6. How does Temporal noise reduction differ from Spatial noise reduction in DaVinci Resolve?
Temporal noise reduction analyzes frames over time to identify and reduce noise, making it effective for footage with consistent noise patterns. Spatial noise reduction, on the other hand, analyzes and reduces noise within individual frames, which is useful for static shots or when Temporal noise reduction introduces artifacts.
7. Can I preview the effects of denoising before applying it to my entire project?
Yes, DaVinci Resolve allows you to preview the effects of denoising on your footage in real-time. This enables you to make adjustments and see the outcomes immediately, ensuring you achieve the desired level of noise reduction without compromising the quality.
For more detailed guides and updates on using DaVinci Resolve, including its denoising feature, refer to the official Blackmagic Design support forums and tutorials.]
Conclusion
Mastering the art of noise reduction in DaVinci Resolve is an essential skill for any video editor. By following this guide and understanding the balance between noise reduction and detail preservation, you can significantly enhance your post-production workflow and elevate the quality of your projects. Whether you're crafting a feature film or a short video for social media, the ability to denoise footage professionally is invaluable.
 By
By


