
In this tutorial, I'll show you how to do some commercial food photography and set it on fire! I'm going to take you through a step-by-step process of food photography, setting it ablaze, and all the lessons learned. So, get your camera, lights, and flammable fluids ready!
Introduction
I've been doing a few basic food photography projects for the National Cancer Institute for a few weeks and when I saw the chance to set some produce on fire, I jumped on the chance.
While learning the particularities of food photography through some online lighting tutorials, setting those items on fire brought out the Boy Scout in me as well as a new set of challenges. Composing and lighting food is a challenge, but to get a lively flame in the shot as well turned out to be a bigger challenge than I anticipated.
By the end of the shoot, I developed an even greater appreciation for the studios that do their best to make us salivate. By the end of this tutorial, I hope to not only impart to you some shooting and on-set skills for food photography, but also a healthy respect and appreciation for editorial and commercial food photographers who dedicate themselves into making art of one our most primitive instincts: the desire for food.
Safety First!
Since we're going to be dealing with fire, safety has to be the highest priority. A small fire can quickly get out of control and cause serious property damage, bodily harm, or even death. So, whenever you're dealing with fire and fire near flammable items use extreme caution. Here are some safety tips when dealing with fire:
- Keep flammable items as far away as possible. This includes your fuel sources.
- Be cautious of high winds or breezes as they can carry away hot embers.
- Have good smoke ventilation, but be aware of air currents from fans, open windows, and air-conditioners.
- Have multiple methods of quickly extinguishing flames.
- Never leave a fire unattended or unsupervised.
- Do not work alone. Have a person dedicated to managing the fire.
Controlling the flame by keeping it small, right where it should be, and brief will keep your shoot running smoothly and safely.
Remember, you do this at your own risk.
Photographing Food on Fire
The concept was pretty simple. Photograph food and make it look on fire. There are several ways to do this. The first is to shoot the food item and flames separately then combine them in Photoshop. The second way is photographing the food item and sourcing the flame images from stock photography. The third way, the way I chose, is to get it all in camera.
I decided that the background should be simple. A black background would allow the food, smoke, and flames to easily stand out. I decided upon this look not just because it was going to be easier to execute, but also because I didn't have much working space. The black would eat up stray light from my strobes and make composites much easier if the in-camera method wasn't working.
Once I worked that out, I took a look at my gear and realized that I don't have macro lens. I do have a Canon EF 24-70mm lens with a "macro" mode on it, but I didn't want my camera that close to flames. So, I ended up using my 70-200mm lens to keep the camera away and decrease my depth-of-field. The combo of these factors ruled out using a pepper that was actually spicy because they tend to be quite small and may not produce flames large enough for the effect I wanted.
After a trip to the grocery store, I came across rather large Italian Sweet Relleno Peppers, also called Anaheim peppers, which looked like the spicy variety, but were much larger. I grabbed a few of the best-looking ones and headed back to the studio.
With the peppers in hand, I could now take a look at them and plan how I would like to light them and how best to create the shot.
1. Sketch It Out
With the aid of a desk lamp, the pepper, pen, and paper, I began to put this concept to paper. I would hover the pepper around the light and see how it played upon it. For space and safety reasons, I didn't want a bunch of lights or reflectors surrounding my subject. It would be harder to set on fire, harder to put out, and add more variables to the photo. Not my style.
So, I settled on a simple backlight and reflector with a possible second fill-flash if the reflector couldn't do the job. The black background would be clamped into place using a reflector holder and my potential fill-flash would be a speedlight so I could place it closer to compensate for it's lower power. You can see the rough sketch below.

2. Pre-light
Before dragging out all your gear and rearranging your space for this shoot. It is helpful to run a small experiment to test for feasibility and get a good ballpark figure for your settings. I wanted to know what my camera's settings should be in order to work above the ambient light, expose for a flame, and still be within my strobe's power.
I was worried about the ambient light from lamps creeping into the exposure if I dragged my shutter too long because a candle flame and light bulb can have similar luminosities. I also didn't want to work in the dark (safety and focusing). I used a candle flame and played with my camera's settings until the flame was a little under-exposed (for color), the aperture was nicely within my strobe's abilities, and ambient didn't creep in.

The settings I ended up with were a happy middle-ground for each factor in my image: the flash, flame, and ambient. I could adjust my flame's exposure via the shutter and my flash brightness via the aperture or power settings. The settings I chose were 1/80sec, 200 ISO, and f/11.
The slower shutter allowed the flame to register and was well below my camera's sync speed, so I could crank it up nearly 2 stops if my actual flames were brighter.
200 ISO was for a low-noise image and helped kill the ambient light.
The f/11 aperture was also middle-ground because it could still be handled by a speedlight if I chose to use it. I could open up to f/8 or close-down to f/16 without much concern except for recycle time.
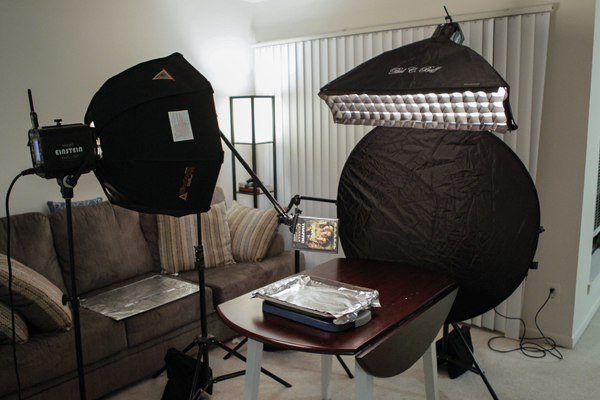
3. Bring Out the Gear
Based upon the sketch and how I wanted my pepper to be lit, I started clearing my workspace and setting up the equipment I would need for the shot. I set up the equipment from background-to-foreground because of narrowness of the set, establishing the camera's final position last. Here is the list:
Camera and Lighting Equipment
- Canon EOS 1D Mark IV
- Canon EF 70-200mm f/2.8L IS USM II lens
- Cable release trigger
- Tripod w/ ball head
- Four light stands
- Two reflector holder arms w/ clamps
- 43-inch black reflector
- Two Einstein 640ws monobloc strobes w/ MC2 radio triggers
- Gridded stripbox
- Photoflex 16-inch octobox
- Four 20lbs sandbags
- PocketWizard Flex-TT5 transceiver w/ AC3 controller
- Set of A-clamps
Fire and Safety Equipment
- Italian Sweet Relleno Peppers (at least 2)
- Cotton balls and paper towels (fuel and clean-up)
- Rubbing alcohol, kerosene, or lighter fluid
- Skewers (wood is fine, metal preferred)
- Lighter or matches
- Small, sharp knife
- Baking pan
- Aluminum foil
- Water
- Damp towel
- Fire extinguisher
The light stands as well as the stands holding the reflector and the pepper were weighed down with sandbags to prevent accidental tipping. Everything was locked down tightly because even at f/11 my depth of field was really thin on a 200mm lens and it allowed me to adjust my pepper or lighting without losing focus.
The baking pan pulled double-duty as a water-filled reservoir and reflector, kicking back some light onto the pepper. Attaching the skewered pepper via a reflector arm allowed me to adjust the pepper's height and angle relative to the lights, background, and camera's framing. I used my camera's LiveView function, zoomed-in, to confirm focus whenever I moved the pepper.

4. The Test Shot
Once I got everything roughly into place, I used an item similar in size to the pepper to help pre-focus and see how my lights were acting. The gridded stripbox produces a soft, but very narrow, beam of light and I wanted to know where it was falling before I put a pepper on the set. Below are two angles of the set using a DVD case stand-in.


5. Prepare the Pepper
In many grocery stores, peppers are refrigerated. I waited until the peppers warmed-up to room temperature to avoid condensation and "water droplet fingerprints" when handling a cool pepper. Also, condensation would reduce the shiny quality of the skin. So, we had to wait a while before working on the pepper.
We picked the best looking one to perform our little surgical procedure of lightly stuffing some fuel-soaked cotton balls or paper towels into the pepper's cavity through a slit. The slit needs to be on the side of the pepper that is hidden from the camera's view, but close enough to the "top" so that the flames can rise freely while keeping the soaked wick hidden from view.


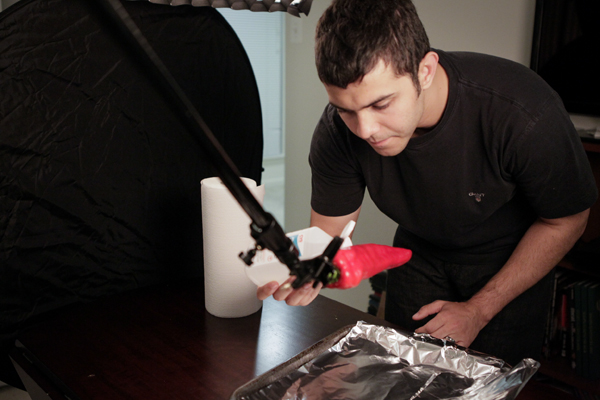
6. Lighting the Pepper
We're now ready to bring the pepper onto the set to make sure the lighting is right for it. I skewered the "backside" of the pepper to keep it stable and away from the rubber clamp that would be holding it.

What Each Light is Doing


Keeping my camera set to keep the ambient black while exposing for the flame, I adjusted my flash output until it looked right. I had to be really careful with my fill light's power and distance because I didn't want it to spill onto the background and give me dark gray instead of black. So, I moved the fill light in really close so I could lower the power and exploit the inverse square law.
It turned out that my aperture was only a little off, but I had to pump up my main light's power really high. I closed my aperture to f/16 which boosted my main light to nearly full power. The stripbox's double diffusion ate up a lot of light. My fill light, the 16" octabox with another Einstein, was in very close and only needed 1/128 power.
The f/16 aperture is high for a speedlight, but I was able to reduce some of the fill-light spill on the background and gain additional depth of field because the pepper was thicker than the DVD case I used as a stand-in. The use of two AC-powered monoblocs allowed me to use the motor-drive on my camera to capture the flames. I used the "L" setting for the motor drive because at full-power my main light might miss frames at 10fps.
7. Begin the Flambé
Reposition the pepper in the lower portion of the frame to make room for the flame and smoke. Take another test shot for lighting and focus confirmation. Now, we can douse the cotton or paper towel with our fuel. Fueling up on set rather than off reduces the amount of fuel that evaporates (especially true with rubbing alcohol) and keeps spills in one spot.
Ok, we're ready to shoot. I'm sure the first attempt will be perfect...

Let's try it again. Fail.
One more time. No flame showing up.
I can see the flames with my eyes. Smoke is showing up, but the camera isn't registering the flames. After a few more frustrating tries, I hypothesize that my flames must be too "thin." So, I cut some vents into the backside of the pepper and tease out a little cotton. Light it again.

The flames are concentrating exactly how I want them, but my camera just isn't seeing what my eyes are. Stubbornly, I do the same thing 20 more times. Literally. I add a little more cotton and fuel each time.
So, I remove the pepper and decide to run a few tests with a fuel-soaked paper towel wrapped on a skewer and run some more tests so I can fix the problem without losing my best-looking pepper.

I discovered two issues:
- The rubbing alcohol was burning too cleanly, keeping the flames thin and blue. The vapors and fuel were burning, but not the cotton or enough air to get that yellow flame I wanted or the smoke.
- My shutter speed of 1/80sec was too fast to register what my eyes could see.
I dragged my shutter from 1/80 all the way to 1/5 and used only a few dabs of rubbing alcohol just to get the burn started quickly.

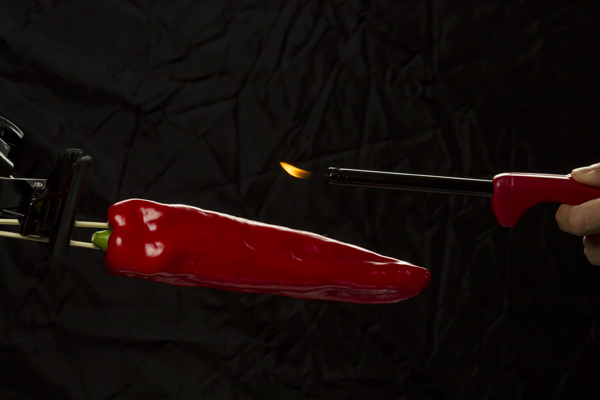
8. Get it Right
Armed with my new settings, 1/5sec, ISO200, and f/16, I put the pepper back on the set and replenished it with drier cotton than before. It would produce yellower flames as well as more floating embers and smoke. The vents I cut earlier should concentrate the flames where I want them.
I used a cable release because I was using a 1/5sec shutter speed and even though the flash was 1/2000sec, freezing movement, I knew the flame needed to burn-in.
My assistant and I only needed to repeat this a few times and nine quick motor-driven frames later, we got our final result. Although the final image was the fourth frame, we tried a few more times to see if we could improve on it.
Final Image

Conclusion

I learned a lot doing this shoot. Firstly, food photography takes a lot preparation and grip gear (clamps, stands, skewers, etc.) to pull off an image. Secondly, a lot of patience and willingness to try and try again until the shot is "right." And finally, that even I forget some photography basics during frustration.
I should have known to just simply drag my shutter more in order to resolve the invisible-flames problem rather than spin in circles for 20 shots. I also learned that barbeque lighter fluid or kerosene would've been a better choice because it burns a little dirtier than alcohol, giving me the smoke and flame I needed without a bunch of smoldering embers floating about my studio.
I really enjoyed this project, and I hope you enjoyed learning about balancing light sources of dramatically different luminosities in a single frame.
 By
By


