
I love night shooting and night photography. I think it's the ambience that comes from a dark blue environment dotted with yellow-orange lighting. It's like a natural cyan-orange split tone on the world, every night. All the lights, and the flare associated with them, lends the whole thing a very cinematic feel. The dark inspires our imaginations and adds mood to any shot. I'm going to try to use these feelings to shoot a portrait at night on location.
1. Wardrobe and Makeup
I wanted the wardrobe to match the night, so it would, to a certain extent, blend in and let the model's face do all the heavy lifting. Not really having any longer dresses, the model, Brittani, went out and bought a black dress with rhinestone accents, which I thought worked well. Shooting black at night is a challenge, because it sucks light and is easy to completely lose in shadow, but I wanted to try it anyway.

Makeup for night is usually heavy, sultry and moody to match the atmosphere. I wanted to go the opposite direction. What happens if you keep it clean and light? We were working on beauty posing for a few minutes prior to leaving, and decided to leave the no-makeup look as-is. I felt that the pale skin with dark eyes and long lashes should easily define the face on their own. A little concealer wouldn't have gone amiss, as you'll see shortly, but this wasn't really the end of the world.
2. Challenges of the Night
Night shooting brings with it a lot of challenges, revolving around the low light levels. For cityscapes, you can lock down on a tripod and push the shutter speed as far as necessary, but when trying to freeze a moving person, even one holding relatively still, the shutter speed needs to be somewhere in the 1/25th-1/60th range. This generally means that hand-holding is possible, which is handy for quickly altering your angle and playing with the perspective of the background, or putting the model's face in a different spot.
Having shot in the night before, I knew that the ambient light is also very directional and hard, although it may not look like it to the casual observer because of the way it falls off. This presents an issue when trying to get a whole face evenly lit. My solution? A speedlight.
3. Adding Flash to Ambient
Since I wanted the flash to blend in with the ambient and support it rather than overpowering it and looking like an overcooked strobist portrait, I had to expose for the ambient first. To get a useable handholding shutter speed, I used an exposure of 1600 ISO, f/2.8, 1/25th second. I'd wanted to start at f/4 to see how the depth of field would look at a relatively wide angle of about 28mm, but it turned out that the wider aperture was fine at this focal length.

I had a good-sized parking garage entrance light over my right shoulder, which I was using to light the right side of the face. This was leaving a lot in shadow, though, and it wasn't really enough to illuminate the dress effectively.

So next I added in the speedlight, at 1/16 power, 50mm zoom, through a shoot-through umbrella on a stand about 7ft high. This would come in with a nice punch, putting a pool on the model's face, and look like another ambient light on the other side of the street.

Turns out these speedlights pack a lot more power than we give them credit for, and I had to zoom out to 35mm and knock it down to 1/32nd power, while moving the model from about three feet away to more like six feet. The result was softer shadows and a better exposure, so now I could concentrate on framing the model with the scene. This was easier said than done.

4. Plan Your Location Thoroughly
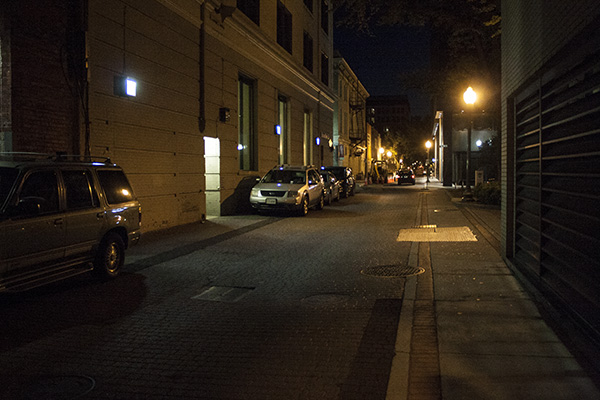
I had scouted this location previously whilst errand-running, and it seemed quite promising. I liked the number (and varying colour balances) of the lights, as well as the mish-mash of various early- to mid-20th century architectures. The faux-cobbled streets contrasting with the strong lines of the buildings, broken up in the background by sky and foliage, looked quite promising.
On the night, however, an abundance of parked cars and and ongoing roadworks (yes, at 9 p.m.) in the background broke up the attractive composition, and a car right near where we needed to shoot made finding that cinematic wide shot impossible. This was, however, the best location in this part of downtown, and having scouted no other locations that had seemed as promising as this one, we pressed on.
The main issue was getting the model's head in the clean spot of background whilst simultaneously avoiding seeing the roadworks, and minimising the appearance of the parked cars. I had tried to go for some wider shots for a little more of that cinematic look and showing the classical styling of the streetlights, whilst relying on colour contrast and rim lighting for background separation. This sort of worked, but the compositions were a complete no-go at that wide angle with the cars nearby.

The problem was that the lights I really liked were directly behind the road works, and having a big yellow digger arm and orange cones in front of my nice "neovictorian" lights rather killed the whole thing. I tried some creative compositions, but this wasn't really going to happen, given their spatial relationship. Hitting the trifecta of lights in the background, no roadworks, and no foreground vehicles, whilst the model was in a good pose and catching the expressions, was all but impossible. Moral of the story: make sure you check out your location before the shoot several times at different times of day!
5. Everyone Has a Plan...
Interruptions from regular through-traffic, which I hadn't seen there before, broke up the rhythm of the shoot and made both our lives difficult. Moving the light stand to the side and then trying to put it back in the same place was difficult, so I could only grab two or three pictures before I had to reset the lighting. People kept getting in the images in the back, and not being locked down on a tripod meant that I couldn't just composite them out.
So, at this point, I gave up on my grand plan of the wide, cinematic shot and came in a bit to try more a three-quarter length. This closer focusing distance had the added advantage of reducing the depth of field at the same aperture setting, so I could be less concerned about background distractions and focus on pose and expression.

With a last spate of interruptions from cars, I looked through the closer shots and decided I wasn't really feeling it. Instead I was going to focus more on the portrait aspect of this concept and allow the ambiance to feed the cinematic aesthetic of the image. So I moved in even closer for a head-and-shoulder framing, allowing the background to vanish into bokeh.
6. Classic Portrait
From here it was a case of waiting for the right expression, working the direction. This was doubly hard at this point, not so much because of the restaurant-leavers, who had largely vanished by 10pm, but the sheer darkness of the alley. It became a focusing nightmare. I ended up in live view, focusing manually, but for the flash to trigger from the T3i I had to click out of live view before hitting the shutter. Sort it out, Canon!

I was left in the situation of being unable to capture expressions exactly as they happened, to catch pose changes at just the right time. Communicating this to the model, she slowed down her movements and paused more frequently to let me lock on in 10x digital zoom before firing. This time of night really needs a FAST lens and a camera that can see in the dark, which the T3i I was using couldn't. If you have a 5D3 or a 1D, you should be fine! Otherwise, prepare for some really fast fingerwork.
7. Final Sequence
Finally, after some time without interruptions so I could leave the lighting set and work on interactions and framing, and a quick trigger finger to switch out from live view, I hit several good expressions in a row.


I chose what I felt was the strongest, though I'm not noted by my wife for this skill! I think it has an elegance, but a vulnerability. A quiet intensity, yet some unsurety.

Exactly what I think of when I think of the night, and this model too, come to that. So it works perfectly. Let's take it into Photoshop.
8. Post Production Screencast
So far you've been looking at mildly tweaked jpegs from Camera Raw, but to get the final image how I want it, there's a lot more work to be done. Here's a screencast recapping what I did to the image and why. Camtasia doesn't seem to like the Photoshop brush, so when I'm using a tool with a brush cursor, the actual cursor position is a little further up and right of where you see the cursor. Bear this in mind when I'm pointing at particular objects.

9. Final Image
This is the result of the post work. Thanks to Brittani for braving the busy night without being self-conscious.

You can see a large version on 500px right here.
Questions? Comments? Hit up the comments below!
 By
By


