

No matter how much you enjoy the editing stage of photography, you probably want to work through it as efficiently as possible. For Lightroom users, a common complaint is that the program feels sluggish or moves slowly when switching images. The good news is that Lightroom benefits greatly from just a few configuration tweaks. In this tutorial, I'm going to share five great tips for speeding up Adobe Lightroom.
1. Increase the Camera Raw Cache
If you only make one tweak from this list, make it this one. When Lightroom reads the linear data from raw images in order to display the pictures onscreen it creates a preview in it's temporary storage, or "cache," meaning it saves it's interpretation of the image.
The problem is that raw image files are large, and Lightroom's default settings don't reserve enough space to work with these images in its cache. Adobe's default installation leaves the raw cache at one gigabyte, which isn't near enough; this means that it will store the most recent one gigabyte of viewed images. If you try to switch to other images, you'll notice slower performance as Lightroom renders the preview to the cache.
A solution is to significantly increase the size of your cache. This will use more disk space, but significantly improve performance. To tweak the Camera Raw Cache, access the Preferences in Lightroom and choose the File Handling tab. In the Camera Raw Cache Settings section, input the maximum amount of space you want to allot to the cache.


How much space should you allot to the Camera Raw cache file? Well, the easiest answer is "as much as you can spare." In theory, you'll never need a cache larger than the size of the your image collection, so use that as the absolute maximum. In reality, even a modest increase from the one gigabyte default value to 20 gigabytes could greatly improve your performance. According to Adobe's guide on improving performance, "increasing the Camera Raw cache to 20 GB or more can dramatically speed performance."
Another key for a fast cache is where you store the file. If possible, place your cache on the fastest hard drive you have available. If you have an SSD, definitely move the cache file to it. You can change the location of the cache by clicking Choose on the Settings menu and then selecting a path to store it.
2. Trick Lightroom Into Using Smart Previews
Adobe added Smart Previews in Lightroom 5 in 2013, and it quickly became a user-favorite. This feature allows you to keep working even when you're disconnected from your original images.
I do all of my work on a laptop. However, my storage space is limited on the laptop, so my images live on an external hard drive. In the past, if I wanted to keep editing, I had to take the hard drive with me. Smart Previews are the solution to having to lug an external drive around; it creates smaller placeholder files that can be used instead of raw images.

I build Smart Previews for my images. Lightroom builds a smaller version of the image that allows me to keep working; I can continue the edit even when my external hard drive is unplugged. The Smart Previews file is small enough to keep on my laptop (my 100 gigabyte image collection compresses to just seven gigs of Smart Previews.) Because my catalog and Smart Previews file is stored on my laptop, I can keep editing regardless of location. If you haven't used Smart Previews, this tutorial on Tuts+ will help you get started.
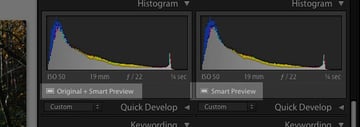
Force Smart Previews
Now, for the trick: when you're working and Lightroom has access to the original file and the Smart Preview, Lightroom defaults to using the larger image file. This leads to slower performance. My own testing shows that editing with just the Smart Preview is actually much faster! To force Lightroom to edit the Smart Preview, we need to either physically disconnect from our images, or use a rename trick to make Lightroom think we are.
If you want to physically disconnect from where your images are stored, that's easy enough; just unplug the external storage and Lightroom will be forced to edit from the Smart Preview.

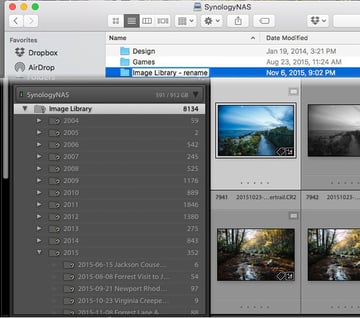
If your images are stored on an internal drive or you don't want to disconnect each time, there's a solution as well: just find the folder that stores your images, and rename it. This breaks Lightroom's link to the original image, and forces it to edit just the Smart Preview. Remember that you need to rename the image outside of Lightroom in order to break the link; renaming it from within Lightroom will keep the image linked.
When you're finished, simply reconnect to the external drive, or rename the folder to its original name. The images will come back online in Lightroom, and you can resume normal editing. The changes you make while the image is offline are preserved.
This simple rename trick is one way to force faster performance in Lightroom. Because Smart Previews are smaller files, the editing performance is bound to increase when you limit Lightroom to using only those files.
3. XMP as Needed
One feature that I often advocate for is turning on XMP sidecar files when working in Lightroom. If you aren't familiar with XMP files, they act as a backup to the Lightroom catalog system. Your edits are stored not only in the catalog, but in "sidecar" files that store edit data. Open an image with an XMP file in another app, and if it's supported, the same edits will be visible in the app.

Create XMPs on Demand
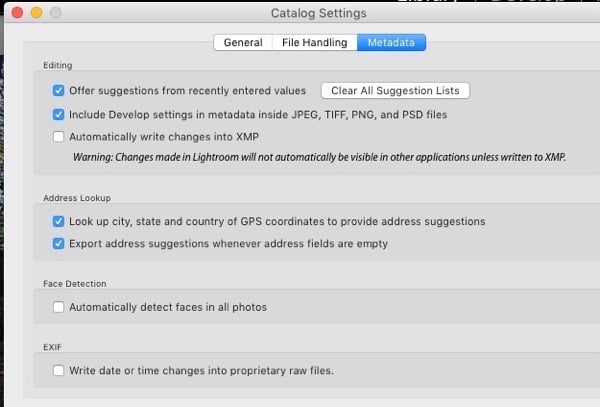
Creating XMP files isn't turned on by default in Lightroom, but I frequently suggest enabling it. You can enable the automatic creation of XMP by accessing the Catalog Settings, navigating to the Metadata tab, and choosing Automatically write changes into XMP. Going forward, Lightroom will automatically create these sidecar files that hold edit data.

The problem is that with this option turned on, Lightroom is constantly writing to the sidecar files. It's not hard to see that this could cause Lightroom to take a performance hit. While I still believe in using XMP files, it's better to periodically build them and not tie up your system resources in constantly building them.
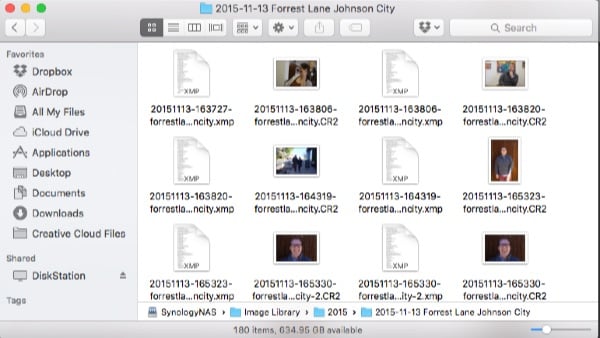
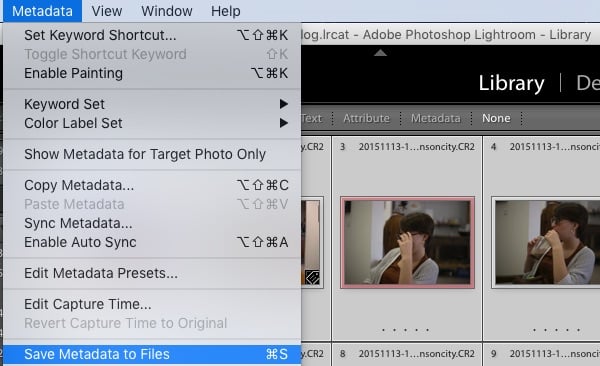
To build XMP files as needed, select the images that you want to render the sidecar files for. You can always select all images by using the Library module's Grid View (press G on your keyboard) and choosing Edit > Select All. Then, choose Metadata > Save Metadata to Files to save your image edits to XMP files. The files will be built in the same folder as the image files, and you'll have created a backup of your edits.

With this approach, Lightroom will expend less resources constantly writing out XMP files and only do so as requested. It's another tweak that will make the app feel more responsive and zippier while working.
4. Try Out Digital Negative Format (DNG)
Raw image formats are somewhat tricky. Each camera uses a proprietary format that differs from one camera to the next; your Canon Raw files (.cr2's) differ from your Nikon Raw files (.nef's) or Olympus Raw files (.orf's), and so on. Each camera manufacturer develops its own format and then it's up to Adobe to support each file in Camera Raw.
Adobe developed the DNG format to help address the problem of the uncertain future of file types. Unlike Raw, DNG is an open format that many developers can create applications to work with.

Digital Negative is an Adobe format, so it's not surprising that my testing shows that DNG files lead to faster performance in Lightroom than their proprietary counterparts. Lightroom renders a preview more quickly and the adjustments don't lag as other raw formats.
It's worth trying the DNG format out whether you want to future proof your image collection or are looking for a performance gain.
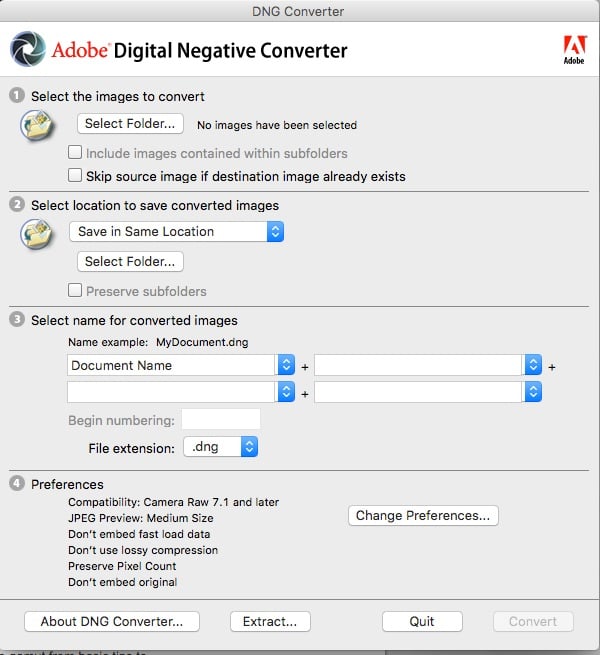
Convert to DNG
To convert an image to DNG in Lightroom, access the Library module and enter into Grid View by pressing "G" on your keyboard. Once you've done so, select the images that you want to convert to DNG. Then, access the Library menu and choose Convert to DNG.


When you're converting your images from raw to DNG, the default options are typically the best choice to make, including leaving Embed Fast Load Data enabled. This will help show a preview of the image as quickly as possible in Lightroom.
Some photographers use DNG conversion to standardize their files and make sure they work far into the future. Others use it for a slight performance boost within Lightroom. In either case, it's worth testing the format to see if it improves your results.
5. GPU Acceleration
This last performance tweak is a simple and easy check for a feature that you may already be using. With Lightroom 6/CC, the application became GPU accelerated. This means that if your computer has a GPU, or graphics card, that Lightroom can handle some of the image processing in the Develop module by offloading the processing to your GPU.


Ensure that you have GPU acceleration enabled by accessing the Lightroom Preferences and navigating to the Performance tab. Make sure that the box is ticked to enable GPU acceleration if you have a supported piece of hardware.
That's it! According to the developer notes, Lightroom now enjoys a performance boost in the Develop module when GPU acceleration is enabled on certain sliders. If you have a supported piece of hardware, it's easy to enable, and if not, consider this in your next hardware selection.
Recap
I see Lightroom optimization as a crucial step that speeds up every part of my workflow. If each of these steps saves a few minutes during an edit, I'm confident the saved time adds up in a major way.
To keep learning about performance optimization in Lightroom, here are some other great resources on the topic:
- Daniel Sone offers up 3 Ways to Avoid "Loading..." Slowdowns in Lightroom.
- Check out more about Smart Previews with my 2014 article on how to build them and add them to your catalog
- Adobe offers an official page on improving performance with some tips similar to mine, as well as alternative suggestions
- Finally, if you're looking for another way to work quickly through an edit from capture with some speed culling tricks, this tutorial has a great tip on Auto Advance when flagging and rating images
 By
By


