

Have you ever shot a photo that appeared perfectly exposed on your camera's display, only to be surprised when you view it in Lightroom? Maybe your exposure didn't turn out quite as expected.
Have no fear: In this tutorial, you'll learn to use Adobe Lightroom to correct and adjust exposure.

What is Exposure?
When your camera's shutter opens, light from the scene passes through the lens, exposing the sensor or frame of film with an image. You might even hear a photograph called an exposure.
Depending on the scene, you (or your camera) will choose settings that expose the frame with the right amount of light to create a useful image. A proper exposure accurately lights the scene, with as much detail as possible in both the lightest an darkest parts.


Exposure is rarely perfect. You don't always have time to set your camera precisely to the scene. Thanks to raw processing software like Adobe Lightroom, you can correct exposure later.
There are multiple sliders that help you adjust your exposure. Let's learn about three main ones.


Two Keys to Better Exposure Adjustments Before You Ever Open Adobe Lightroom
Adobe Lightroom is a powerful tool to correct exposure, but before you start working inside the ap there are two settings that will help you understand and work with exposure.
1. Calibrate Your Monitor
Think about it: if you've ever adjusted the settings on your monitor, you know that there are many options like brightness, contrast, and color settings. Every monitor is different, and that's why calibration matters to bring it to a neutral target.
Learn more in our course lesson, Monitor Calibration, from our course, From Pixel-Perfect to Print Ready in Photoshop.
2. Shoot in RAW
You probably already know that RAW image files take up more space. That's because they capture more data in the exposure.
The effect of this is that you'll have more freedom to adjust the exposure with less quality loss. Shooting in RAW means that as you pull the sliders that adjust exposure in the next section, you can recover more detail.
How to Use the Exposure Slider (Without Overcorrecting)
On the surface, using a slider in Adobe Lightroom is simple: just pull on the slider and watch your image adjustment in real-time. Adjustments are "non-destructive," so you can change them as many times as you want with no impact on quality.
To correct exposure, find the Exposure slider in the Develop module. It's near the top of the Basic panel. As is the case with many sliders, it's as easy as dragging it to adjust your image.
Pulling the slider to the left will decrease the exposure, giving the image a darker look. Pull the slider to the right to increase exposure and increase the brightness.


Exposure is an easy adjustment to apply. But, the exposure slider can be difficult to judge. Let's look at two tips to master exposure adjustments.
How to Use Clipping Indicators
So, how do you know when you've applied too much exposure correction? There's a helpful indicator called clipping that helps you monitor your corrections.
Clipping occurs when your image loses data in the highlights and shadows. As you pull the slider too far to the left, your image will eventually lose detail in the shadows. The reverse is true for the highlights.
Turn on clipping by clicking on the two icons in the corner of the histogram in the Develop module. The icon on the left will help you monitor clipping your shadows, while the clipping indicator on the right helps monitor your highlights.


As you begin to drag the exposure slider with the clipping indicators turned on, be on the lookout for two visual indicators. When your image shows bright areas, you've lost detail to the highlights. Blue areas mean that you've lost detail to shadows.
It's also important to note that exposure adjustment is part science and part art. It's okay to have parts of the image that are lost in the shadows or bright. Use clipping indicators as guides, but don't be afraid to adust exposure to your liking even if details are lost.
Using the Histogram
If you don't have a perfectly calibrated monitor or trained eye for exposure, there's a tool that really comes in handy. It's called the histogram, and you've probably seen it in the upper right corner of the Develop module.
The histogram is a graph that represents how the tones of light in your image. The shape of the histogram helps you judge the exposure in a more technical way. You can even click on the histogram and drag it to adjust exposure in Adobe Lightroom.
Check out our tutorial to learn more about using the histogram to understand your exposure.


Four Sliders for Advanced Exposure Adjustments
The exposure slider controls the entire frame. For more precise controls, you can turn to two additional sliders in the Develop module.
Let's take a brief look at two additional for more advanced controls. You'll see that they each have a place in precise exposure control.
Whites
The Whites slider controls the white point of an image. Think of it as a slider that sets the reference "white" point of an image, or the brightest point of an image.
By pulling on the whites slider, you're telling Lightroom to re-interpret the whitest point of an image. Shifting the whites slider will set a brighter or darker point to interpret white tones in your image.
See an example of adjusting the whites slider below. Look at the face of the building, especially:


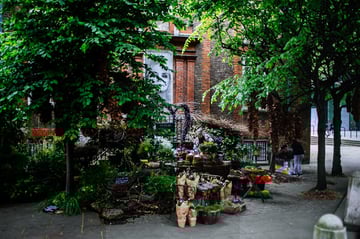
Blacks
While the "whites" slider adjusts the white point of an image, the Blacks slider re-interprets the black point of an image. With a shift to this slider, you're telling Lightroom to rethink the darkest point of the image.
See an example of adjusting the blacks slider below. The blacks are a little bit crushed on hte left, but OK in the middle, and more readable on the right:


Creative Adjustments for Images in Adobe Lightroom
This tutorial focused on adjusting images to a neutral place by applying Lightroom corrections. I'm sure that you're thinking now about getting more creative by applying stylistic adjustments.
More Adobe Lightroom Resources

 How to Auto-Import Photos From a Networked Folder in Lightroom (Great for Teams)


 10 Top Instagram Look Presets and Color LUTs for Lightroom CC and Mobile

 How to Apply RAW Profiles to Photos Automatically on Import With Lightroom

 How to Make Local Changes in Lightroom Classic Using the Range Tool (Luminance Masking)
 By
By


