


You might not be invited to shoot jewelry for Christie’s catalogs, but taking pictures of your own jewelry can be a of fun, and a lesson about the way light works. Today, we'll walk you through the entire process.
1. Equipment
Photographing jewelry is not necessarily an easier task because we have digital cameras. It is true they help, giving you an immediate idea of the results, but they don't resolve the basic need for an understanding of light. You have to know how you can make it work with you to get the best images possible.
That being said, to photograph jewelry you do not need a lot of equipment. In fact, a sheet of white paper and some window light and reflectors will do, at a basic level. Even a compact camera with a macro or close up function will do the job, as long as it also lets you control the exposure.

You'll also need some jewelry to photograph. When you're starting out, you won't be doing contract work for Cartier, so look to your own family or even your own jewelry box and photograph things that have some meaning to you.
Creating Your Set and Gathering Props

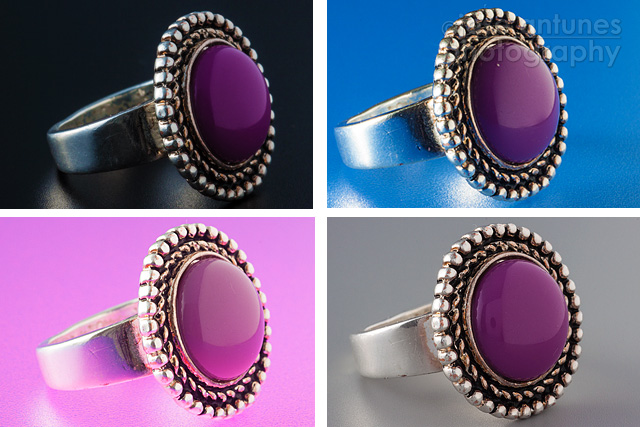
There are an endless amount of locations and scenes that would result in good jewelry photography. For this tutorial, I used a tabletop studio with different colored backgrounds. These are relatively inexpensive, but if you're not will to invest yet, you could use a bed sheet or some butcher paper and still achieve good results.
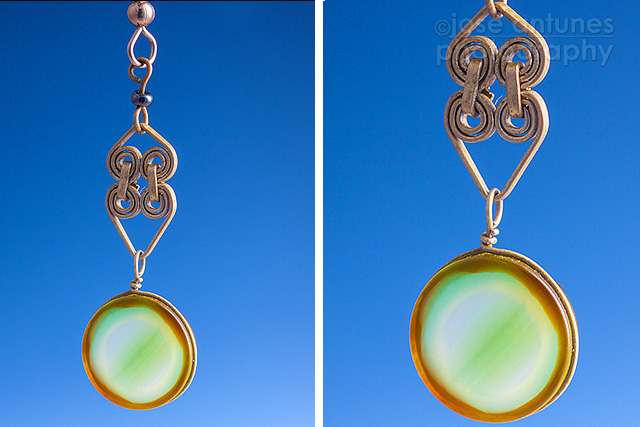
You'll often want something other than the piece of jewelry in photo to add depth or tell a story. If you become hooked on this type of photography, make it a habit to collect materials you can use as props and or background. Ceramic tiles, stones and weird piece of wood will give you multiple options for more elaborate work. At the same time, resist the temptation to clutter up your image with a bunch of junk.
Choosing a Camera

Modern compact cameras often have excellent macro capabilities due to the small sensor they house. Therefore they are great tools for jewelry photography if you can manually adjust your exposure settings. This task is easier on a DSLR, but most for most jewelry, you'll need a macro lens. A macro lens is a great investment, but they don't come cheap.
Choosing a Macro Lens
I use two macro lenses, 60mm and 100mm, with an APS-C body. Having two lenses lets you choose to work closer or further away from the subject. The 60mm can be problematic for some of the sets with very small object because I have to get too close to the object to fill the frame. The 100mm is more versatile in that sense. When choosing a macro lens, think about what you're going to use it for and how close you actually want to be to your subject.
Use a Tripod and a Remote Shutter Release
A tripod is nice to have for this work. Sometimes I will work with the camera in my hand, especially if I am using flash. Still, a tripod will help you to keep a subject framed the same way, which will allow you to precisely adjust your focus.
A remote shutter trigger is essential, so you do not have to press the shutter on the camera. As some exposures can be on the longer side, touching the camera would cause vibration that would show on the image.
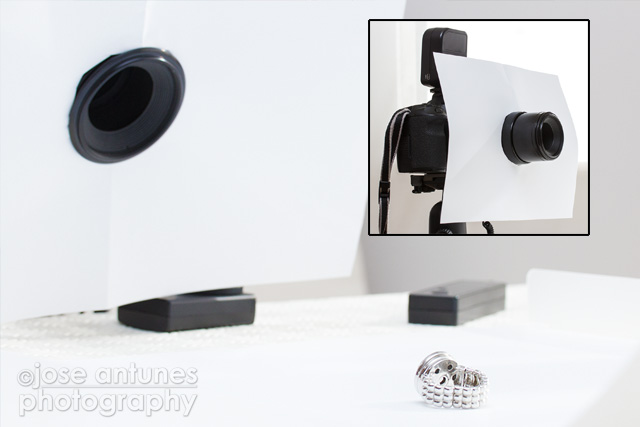
Flashes, Diffusers and Reflectors

A lot of my table top photography is done with natural light and reflectors. See my article, 8 Reflectors You Already Have in Your Home, for some info on making your own reflectors. You can also use flash, that lets you shoot at any hour you want. One flash will be enough, two will be great, three is probably too much.
A flash and a single reflector (from commercial brands to a white piece of paper, foam, or cardboard) will offer you multiple options. Your flash must "off camera" for professional results. You can use cables or radio triggers to place you flash off to the side of the scene.
2. Creating Soft, Even Light

The best photography location is closer than you think. Find a window at home that offers good light you can control, set a table there and your studio is almost in working order. A white foam board can be your working base, then add a few homemade reflectors, maybe some small mirrors.
Just remember that light has color, and that light changes. If you've a red wall in the background its tone will probably influence everything around. Also, do not mix lighting. If you're using window light, turn off all the other lights in the room. You can use flash, tungsten lights, fluorescent, but do not use them together.
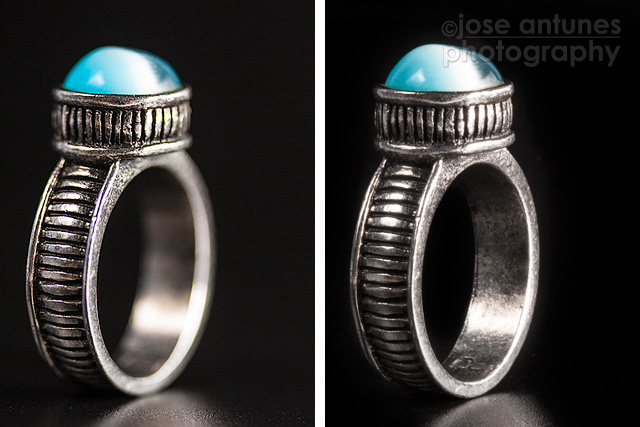
The goal for most jewelry photography is to create soft even light with very little shadow. Working on a black background makes this a little easier. When you're first starting out, use the reflector to make it seem like light is hitting the subject from all directions.
The Right Conditions

The keys to good jewelry photography are sharpness, lighting, exposure, so it pays to study each situation and define what you intend to do. Sharpness will be drastically affected by your depth of field, so I usually start my exposure solution by concentrating on my aperture. When shooting macro photos, your depth of field will be very shallow due to the small distance between the object and your camera. Because of this, it's not uncommon to use apertures above f/11.
The best way to control your lighting and exposure is to use your flashes in manual mode. Flashes offer consistent light that can be positioned exactly. By using manual mode, I can control the exact output, even if I change backgrounds or colors in my setup. Experiment with the position of your flash and reflectors, and you'll find a good combination.
Try, Try, Try!

Patience and practice are the most important parts of shooting jewelry. You need to be aware of your focus, but most importantly, your light. Soft, even light tends to produce the best look. Remember to keep batteries charging, both for camera and flashes, listen to some good music, and have a nice cup of coffee on hand while you review your images to see how the session is going. Make small changes, and you'll find yourself making good images.
 By
By


