Course intro and overview
DaVinci Resolve is the industry-standard tool for color grading video content, and you can get it for free right now, with no gimmicks—just full access. But because it's an industry-focused tool, it has a steep learning curve.
"This quick start guide to color grading in DaVinci Resolve is designed to tell you everything you need to know to get started color correcting and grading in Resolve, without bogging you down with any of the more advanced tools."
What you'll walk away with will be a great understanding of the layout of Resolve in general, but more specifically the Color tab. We'll build your confidence in navigating the program and navigating a basic color grading workflow, and we'll give you a solid foundation that will help you when you do decide to dive in deeper later on with those advanced techniques.
How to download DaVinci Resolve 19 for FREE
If you haven't yet downloaded DaVinci Resolve or you're having some trouble navigating to the free version, here's a quick guide.
Just navigate to the DaVinci Resolve page on the official Blackmagic Design website, and hit the Download DaVinci Resolve button. Just make sure you're selecting the free option. The differentiator is that the paid one is called "Studio".


I'm working in the paid Studio version, and I'm currently running DaVinci Resolve Studio 19, but some of the tools I'll show you in this video are available in the free version as well as versions 17 and 18.
When you've downloaded DaVinci Resolve and you first open it up, it'll prompt you to create a project library. Call that whatever you want. Again, once you're using the program a little more heavily, you can dive into the weeds of the various project database settings, but for now, just create a database with any name you want, and then create a new project.
Overview of DaVinci Resolve workspaces
Now we're in Resolve. If you've never seen it before, the first thing you need to know is that the tab at the bottom is your navigation bar between the various workspaces in Resolve.


These workspaces are roughly linear in terms of a typical project workflow and go from left to right in this fashion:
- Media: A great workspace for organizing your rushes and assets for a project, especially if it's large and complex.
- Cut: Useful for powering through an edit and getting to a rough cut. The focus on this page is speed.
- Edit: Here you'll find more traditional non-linear editing (NLE) tools, and this page works in conjunction with the Cut page.
- Fusion: Where you do your VFX compositing and motion graphics.
- Color: For color grading and correction, which is what we're going to dive into in this course.
- Fairlight: The audio workspace.
- Deliver: Where we set our export parameters and deliver our finished video.
Try Envato
This video is brought to you by Envato, the unlimited creative subscription with the broadest range of categories—everything that you need to make great videos.
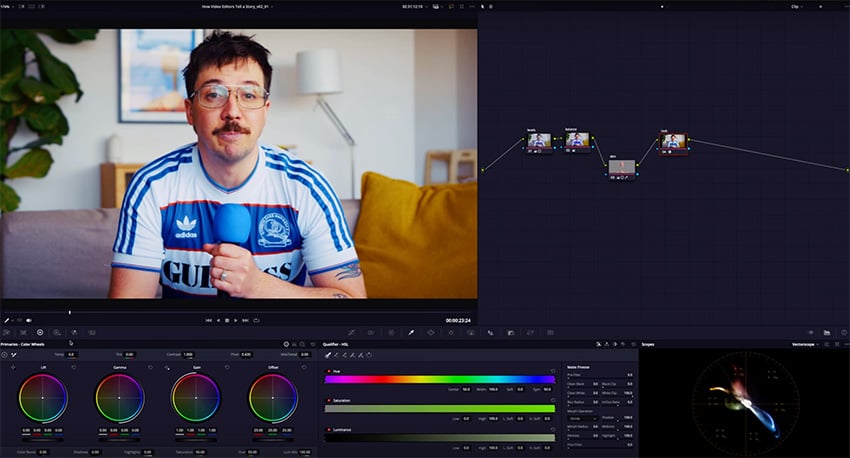
Layout of the DaVinci Resolve Color page
The Color page is quite simple in its layout, and it's very customizable. You can easily toggle things on and off in the top toolbar, so it's a good place for us to start.

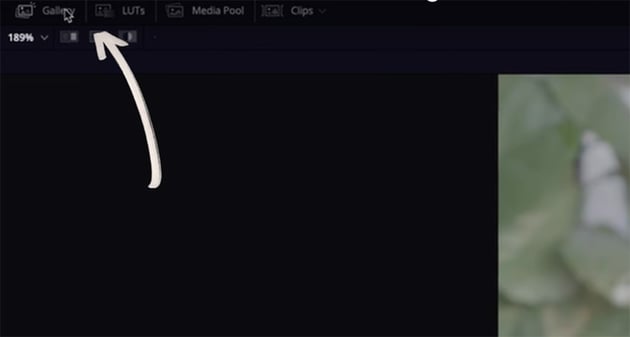

Here's what each of those options controls, from left to right:
- Gallery: You can store frame grabs from shots that you're working on here, and then you can apply those parameters from the frame grab to a new shot. It's very handy, and I'll show you that later on in the course.
- LUTs: This is a place where you can quickly navigate through and apply LUTs that you have stored on your machine. Resolve does come with a bunch of correction LUTs for different types of cameras and media types, which is very handy.
- Media Pool: This is the same media pool you have access to in other workspaces in Resolve, like the Media, Cut, and Edit pages. It's where all of your assets live.
- Clips: This shows and hides the clips that make up your timeline. I generally hide these when I'm working on a shot, and then show them when I'm ready to move on to the next one.
You'll also see some more options over on the right.

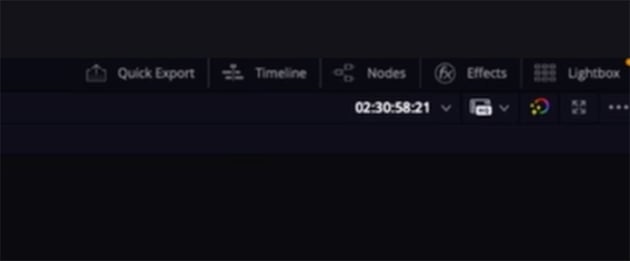

Here's what they do:
- Quick Export: Pretty self-explanatory—this is for doing a quick export of your project.
- Timeline: This is sort of like clips but without the pictures. Also, when you have clips open, you get more working options, whereas the timeline is more of an overview.
- Nodes: This is where you'll build your color grade. I rarely toggle this off, but sometimes it is handy to hide it if you're dialing in some other things. While you're getting used to working with nodes, I'd keep it open.
- Effect: This toggle opens up a list of effects that you can bring into your nodes for various effects.
- Lightbox: A zoomed-out overview of all of your clips.
So that's it for the top toolbar. In the center, you have the reference display and your nodes. Below that, we have our actual toolbar, which houses all of the tools necessary to correct and grade our images.


Color tools overview
Now let's go through an overview of all the color grading tools, from left to right on the toolbar shown here.

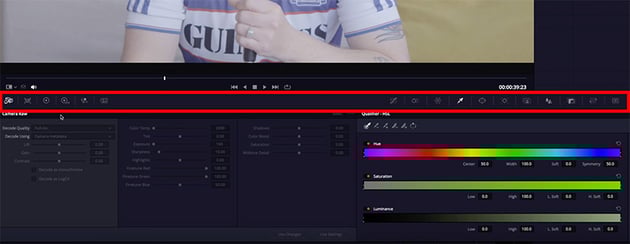

- Camera Raw: If you're working with raw files, you can set the parameters of that raw footage here. For instance, you might want some tint, temp, or exposure corrections in the raw file data before you tackle that in the grading node.
- Color Match: If you're working with a physical color checker, you can match your colors here, and it'll tell Resolve what sort of color space you're working with.
- Primaries Color Wheels: This is where we'll do the bulk of our correction and grading in this course.
- HDR Color Wheels: I'd be shocked if you were working with HDR content on your first couple of outings in Resolve, so we'll leave that alone in this course.
- RGB Mixer: Use this to tweak the red, green, and blue values across your image. I find this really useful for adding specific color washes to a corrected image.
- Motion Effects: Use this to reduce noise in your footage. This is a feature that is limited to the Studio version, however, so we'll leave it for now.
- Custom Curves: If you've done any sort of photo manipulation before, you might be familiar with the idea of curves. This is where you can control things like contrast, saturation, and luminance.
- Color Slice: A brand new tool in Resolve 19, which gives you a series of preset qualifiers with the ability to tweak things like hue, saturation, and density of colors within your image.
- Color Warper: This allows you to warp colors based on the luminance and brightness. It displays a web representing all of the hues and saturations in your image, and you can click and drag to make changes. It's a very intuitive tool for secondary grading.
- Qualifier: This tool lets you select a specific area of your image to change, and gives you a set of tools to refine that selection.
- Windows: Power windows are similar to the qualifier, but they select things within a set shape. You can also use windows to mask out parts of your image.
- Tracker: This lets you automatically track those windows that you've just made, making sure that they follow the part of the image once it starts moving again. You can track forward and backwards from the frame in which you've made the initial window.
- Magic Mask: If you're familiar with rotoscoping, the Magic Mask is similar to that, but for grading. It's an AI-assisted tool that does an exceptional job of masking out a person or the features of a person to complete secondary grades on. Because this uses the neural engine in Resolve, it's only available in the Studio version.
- Blur: Pretty self-explanatory—you can add blur and sharpening to your image in this section.
- Sizing: Here you have some transform controls for your image, but generally you'll do all of this in the Edit workspace. It's not entirely relevant for the color section.
- 3D: This is where you would have 3D tools, but we're not going to cover that in this course since we're focused on color grading.
On the right-hand side of the toolbar, you have buttons for toggling between keyframes and scopes. We're not going to be using keyframing in this course, so we'll keep our scopes shown. I'll explain how they work in the next section.
DaVinci Resolve color grading scopes
DaVinci Resolve gives you five professional scopes to guide your color correction and grading.


- Parade: Helps you see the strength of each of your color channels and allows you to quickly compare them.
- Waveform: Does basically the same thing as the parade, but it allows for comparison of color and luminance in the same image.
- Vectorscope: Displays your hue and saturation on a circular graph representative of the color wheel. It's very useful when grading skin tones.
- Histogram: A quick and easy way to see where your highlights and shadows are sitting within the image.
- Chromaticity: This is pretty advanced for basic color grading, but essentially it helps you see where your image is sitting within a wider color space, which is crucial in a broadcast setting.
That's it for our flying overview of the color workspace. Now you should have a pretty clear idea of where everything is and what it does.
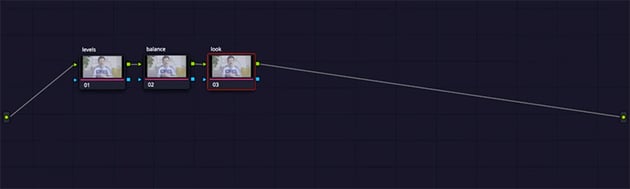
How to build a node tree for color grading
If you're completely unfamiliar with a node-based workflow, it's pretty simple. You start on the left, do stuff in the middle, and finish on the right. In the image below, the green dot on the left is our footage as is, with no changes. Then we create a node, do a bunch of things in it, and connect it to our output on the right, which will display the changes we've made in the middle.


We'll start with a basic three-node structure. The first two will be our correction nodes, and the final one will be our "look" or creative grade.
Color correction vs. color grading
Before we move on, let's talk about the difference between color correction and color grading:
- Color correction takes the footage from the camera's native format and corrects it to the output color space.
- Color grading is the creative flourish that you add afterwards. This is where you get to define the look, use the tools to get creative, and bring your footage into the world that you're building.
You can correct in a number of ways:
- Manually, as I'll show you shortly
- Via a color managed workflow, which means letting DaVinci Resolve make automatic corrections.
- At a node level with something called a color space transform (CST), which is basically the same thing but at a node level rather than a project level.
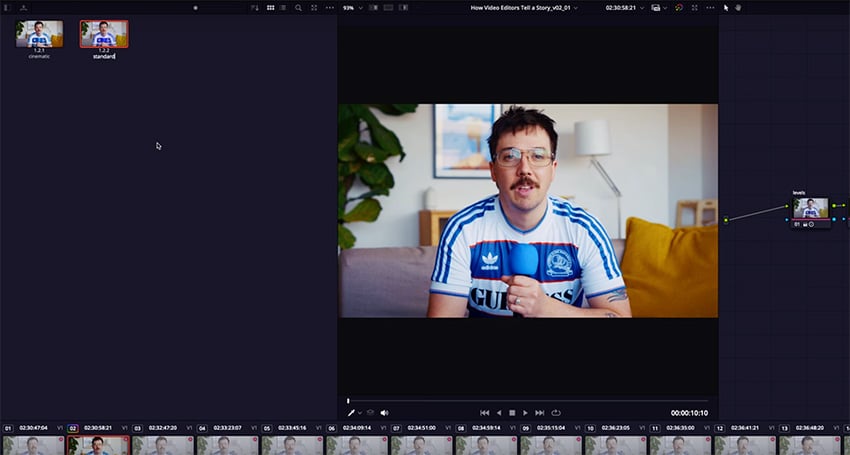
I think as a beginner it's important to know how to do it manually, so I'll show you that process now. Over in our node tree, I want you to create three serial nodes. You can either right-click > Add Node > Add Serial or hit Option-S on your keyboard.
On the left-hand node, I want you to right-click and select Node Label or hit Control-l. Call this one "Levels". The middle node will be "Balance" and the right one will be "Look".


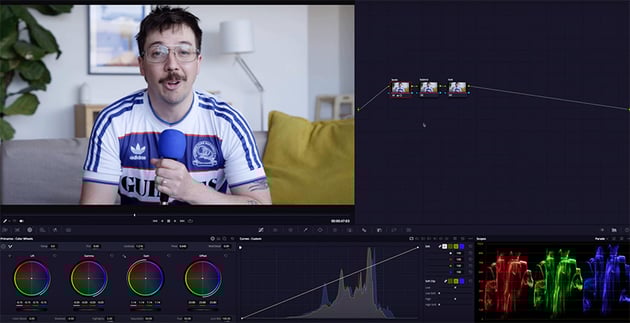
Then, at the bottom, I want you to open up the Primaries Color Wheels, and on the right, in our scopes let's make sure that our RGB Parade is the one that's showing.


Adjusting the levels node
With the Levels node selected, we're going to use the Lift, Gamma, and Gain wheels to add contrast to the image and adjust the luminance levels.
We'll pull the lift down, and we'll check the scopes to make sure that we're not clipping it. Then we'll pull the gain up, again keeping an eye on our scopes. Then we'll use the gamma wheel to find a nice point for our midtones to sit. Then we'll just tweak all three to find a place that looks visually pleasing as well as abiding by our scopes, of course.
The offset adjusts all three simultaneously, and you use this to bump it either way depending on your needs. We'll also introduce some contrast, and I'll play with the highlights and shadows in the sliders at the bottom.


Doing a color balance
Next, let's select our Balance node. This is where we'll work on the color of our image.
First up, let's introduce some saturation as we're still sitting quite flat from our original footage. We can also shift our white balance over in the Temperature and Tint sliders. Slide left for cooler and right for warmer on the Temperature, and then on the Tint, you can adjust the green and magenta shifts.
You can use your scopes to get an idea of where your color is sitting. We've obviously got a bit more blue in this image in my shirt, the microphone, and the painting in the background, so that's why the blue is sitting higher in our scopes. But if we didn't have that much blue in our image, that might indicate to us a color imbalance.
Creating a custom look
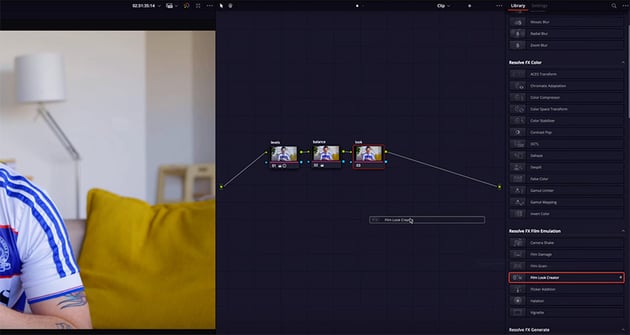
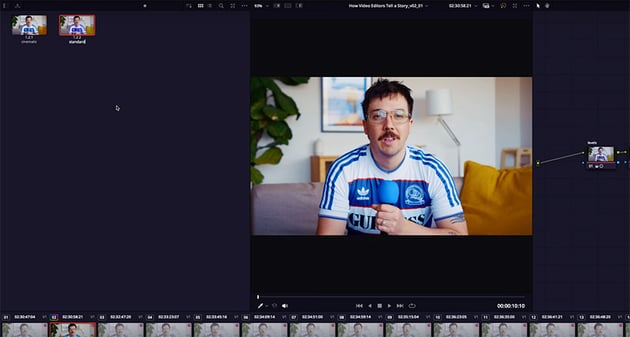
Finally, let's move on to the Look node. In this node, we can add our creative grade. We can do this in the primaries wheels, for example creating a stylized teal and orange look by pushing the shadows towards teal and the highlights and midtones up around orange.
Or we could play with some of the built-in effects that come with Resolve. So let's reset that node by right-clicking on it and selecting Reset Node Grade, and then we'll open up our Effects section. I like playing with the Film Look Creator as it offers a bunch of different options, as well as some great presets to start with. So simply drag and drop it onto your node, and you can create a really different and interesting look, which you can then adjust in the settings if you want to.


Copying multiple grades
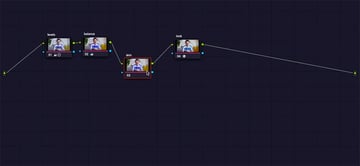
So we've now graded one shot in our project, but how do we grade the rest of them? Well, you could go through and do it manually for each shot. There would be times when you might need to do that, but more often than not, you're going to have a similar shot throughout, so you can simply copy the grade across.
The best way to do this is to right-click on the image and select Grab Still. Now that still will appear up in the gallery, and you can label it. For instance, I'll call this one "Cinematic" as we put the Film Look Creator on it, and I'll save the other one as "Standard".

Now we can go through and select the rest of our clips, and then mouse over those stills to audition the grade on them and right-click > Apply Grade to apply the look that we've created. That will also bring over all of our established node tree. Then, if you need to, you can make specific tweaks per shot. Simple!
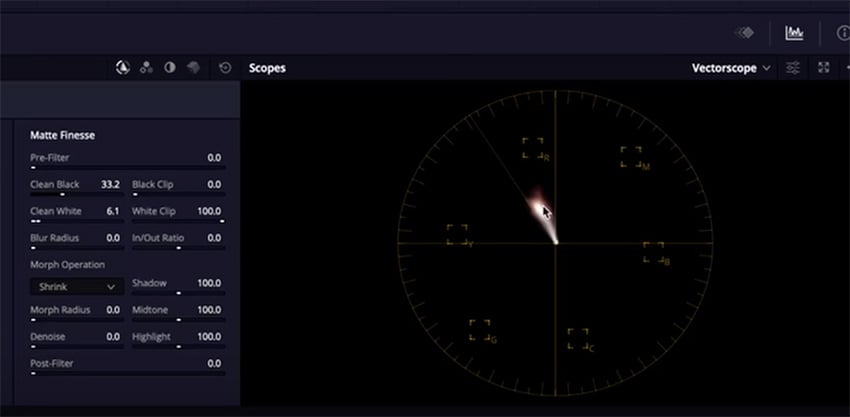
Grading skin tones
Finally, let's take a look at color grading skin tones. This is something you'll often need to do, since most footage includes humans!
As we discovered earlier when we looked through all of the tools available, there are plenty of ways to isolate part of the image to perform your secondary grades on. For this, we're going to use the Qualifier.
Going back to our shot that has our film look grade on it, we'll create another node after the Balance node, and call it "Skin".


Now, let's select the Qualifier and make a selection of the skin in our image. Then click the little button up in the top left to show you the key. In older versions of Resolve, that button will look like a little magic wand. Now you'll see your footage with only the skin selected.

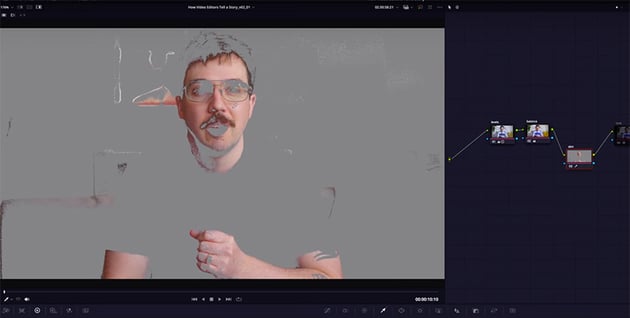

Now I'll just use some of the tools to refine this selection—I like to do it in the HSL sliders. You don't need to be too pixel-perfect as we're not making major adjustments to this part of the image.
Let's open our Vectorscope and zoom in on the image. You can see that the skin tone is sitting just a little to the right of the line, which means we're looking a little bit red in terms of our skin—ideally, it should be sitting right on the line. It doesn't need to be perfect, but the closer the better.

Now we'll go back to our Primaries Color Wheels and make that adjustment. Try turning off the selection and bypassing the node a few times just to see the difference that we've made and to make sure we're not pushing it too far. And then let's switch our Look node back on, and we'll make a few final adjustments now that we can see how it looks with all of our nodes turned on.

And that's it! You now know how to do a color correction, a primaries grade, and a secondary skin tone adjustment, as well as how to work with effects, nodes, and scopes in DaVinci Resolve.
If you want to learn more, try the free DaVinci Resolve tutorials here on Envato Tuts+. Here's a small selection to get you started:

 How to Tell a Story in Film and Video With Colour Grading in DaVinci Resolve


 How to Refine the Colour in Videos Using DaVinci Resolve


 How to correct lens distortion in DaVinci Resolve Studio


 How to use AI in DaVinci Resolve Studio 19


 DaVinci Resolve vs. DaVinci Resolve Studio: Which Should I Choose?


 How to Make a Lyric Video in DaVinci Resolve

And check out these video courses to learn DaVinci Resolve in depth: