How to Deliver Digital Images to Your Clients Over the Internet

At some point in your career as a photographer, you’ll need to share images over the Internet. If you’re sending pictures to your friends and family, you can be as casual as you like. If, however, you are delivering images to a client, then you must do it in a professional manner. Your professional reputation can be damaged by something as simple as a poorly worded email.
In this tutorial, I’ll show you how to deliver digital photos to clients over the Internet.
What You'll Learn
- How to send and deliver digital photos to clients
- How to organise your files for delivery
- How to name your images semantically
- How to sort your metadata in Lightroom
- How to prepare a PDF contact sheet
- How to create a ReadMe file
- How to send a professional email
Jump to content in this section:
Why You Shouldn’t Use Email
When it comes to choosing the best way to send and deliver photos to clients, many people will choose to attach the files to an email. This is a terrible way to do it. If you're trying to find the best way to send photos to clients, let me explain why email should be at the very bottom of the list.
First, digital images taken with a modern DSLR, even when exported as JPEGs, are generally a few megabytes in size. A full-size image taken with my 5D MKIII and saved as a JPEG at 70% quality, the settings I normally use for client images, is around 5 MB. Most email services limit the size of attachments to 25 MB. Even in the best case scenario, you’ll at most be able to attach five or ten images. For larger shoots, sharing five to ten shots at a time is far from the best way to send photos to your clients.

Second, there’s a good chance your client will receive the images on their smartphone. If they are using a cellular connection, your large attachment will take up a decent chunk of their monthly data allowance. Eating up their data is far from the best way to send digital photos to clients.
If they have a poor signal, the email will take a few minutes to download, slowing all other Internet traffic to a crawl. By the time they open the email, you’re unlikely to be at the top of their “favourite people” list.
While email has its place, it's not the best way to share photos with your clients.
How to Deliver Digital Photos to Clients
Instead of email, the best way to deliver photos to clients is to use a dedicated file hosting service. In the past few years, a number of great companies have all started offering large amounts of file hosting for a very reasonable monthly fee. The most popular of these services are Dropbox, Google Drive, and Microsoft OneDrive.

All work in much the same way: a folder on your computer is mirrored to the service’s servers. Anything you add to it is automatically uploaded to the Internet. You can share any individual file or subfolder—such as the one containing your client's images—simply by sending a unique URL. The convenience alone makes it worth trying if you don't know how to send digital photos to clients.
Using one of these services overcomes many of the limitations of email, making them some of the best ways to share photos with clients. While you don’t have unlimited space, all the services offer at least a few gigabytes for free. This is more than enough if you're delivering thousands of photos to clients.
A Note on Professional Services
If you’re a professional photographer and need the best way to deliver images to clients regularly, it might be worth your while looking at some of the professional services that automate the whole process. While doing it yourself is free, if you’re delivering 15 or 20 shoots worth of photos to clients, a service like Pixieset or PASS will simplify the whole process.
How to Organise Your Files for Delivery
Even if you use a file hosting service, you can’t just start delivering photos to clients with a link and be done with it. Instead, you need to create a professional package for delivery. Here are some guidelines for how to send and deliver digital photos to clients like a pro.
Name Your Images Semantically
Sending an image called IMG_324582 to a client doesn’t give off the air of a professional. Instead, you should ensure all your images are named properly.
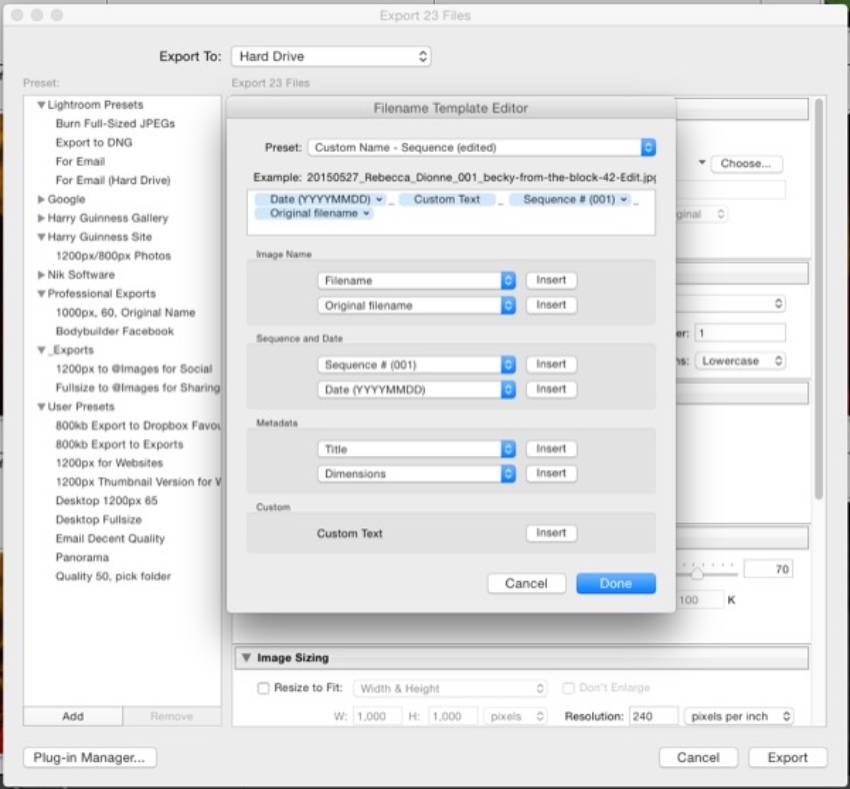
There are any number of formats you could use, but I recommend you choose one that includes the date of the shoot, a descriptive title such as the job or model name, a sequence number, and the original filename. You should also use underscores or hyphens instead of spaces. Not every operating system plays nicely with spaces, so the best way to send digital photos to clients includes having a proper naming convention.

For example, I use the structure YYMMDD_Job_Name_Sequence#_FileName; images are then named something like 150621_Ali_Clarke_001_5D3_10004.
Each component serves a purpose. Starting with the date keeps every image in chronological order. It also allows you to reuse descriptive titles such as a model’s name. The descriptive title makes it easy for you and the client to identify the images without looking at thumbnails when you’re browsing your computer.
The sequence number gives each image a unique identifier within the series. Finally, including the original file number creates a link between each exported image and the RAW file. If a client wants a larger version of an image, they can tell you the last few digits and you’ll be able to find it. Keep this organization technique in mind when thinking about the best way to share photos with your clients.
Sort Your Metadata in Lightroom
Lightroom’s ability to import and develop RAW files gets the most attention, but it is also an incredibly powerful metadata manager. Use Lightroom to add a title and caption to each image if you want the best way to send digital photos to clients with detailed metadata.
Ideally each image should have a unique title, even if the only change is to incrementally increase a number. For example, you might title three similar images as Black Dress Look #1, #2, and #3. The caption should be a description of each photo.
If you get your metadata sorted as you edit images, it makes it easier to upload them to the web, create contact sheets, and deliver photos to clients. If you’ve never paid too much attention to metadata before, Andrew Childress’s course The Living Archive in Lightroom is a great place to start.
Include a PDF Contact Sheet
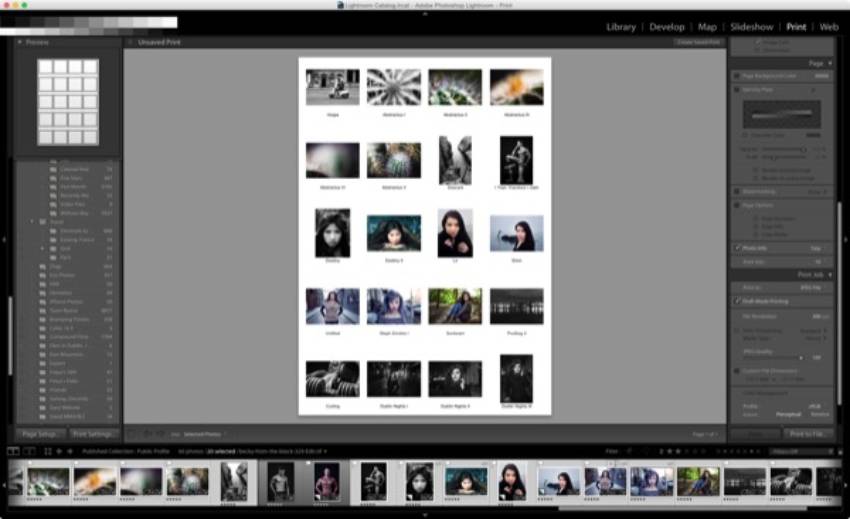
While contact sheets were a lot more important back in the film era, they’re still worth including when you're delivering photos to your clients. With a contact sheet, it’s really easy to glance over all the images included in a delivery. Also, depending on how you work, a contact sheet might be all you initially send to your clients. You can then send full images on request.

Again, Lightroom offers a solution. The criminally underused Print module is the best way to create great contact sheets from templates when you want to send photos to clients. I suggest you modify Lightroom’s presets so that the contact sheets you send to clients include each image’s title and caption.
Although it’s called the Print module, you can save anything you create to a PDF file, which is perfect for a digital contact sheet. It's an excellent touch to remember if you're just learning how to find the best way to deliver digital photos to clients.
Add a ReadMe File
In addition to a contact sheet, you should also include a text file called _ReadMe.txt. This file should include all the information your clients need to know about you, the shoot, and the images. It's the best way to make sure your clients can easily scan all the relevant details.
Before you start delivering photos to clients, make sure your ReadMe file includes:
- your name and contact details
- the client's name and contact details
- information about the shoot such as date, location, and number of models
- a list of the images, including their file name, title, and caption
- image usage guidelines for clients
- copyright information
Although you can do it by hand, the LR/Transporter plugin makes creating these readme files easy.
Send a Professional Email
Email is far from the best way to deliver the photos themselves to clients. But once you’ve packaged the image files for delivery, you should always contact them so they know how to access them. Once you have the images together with additional files like the contact sheet and readme file, it’s time to get in touch with your clients.
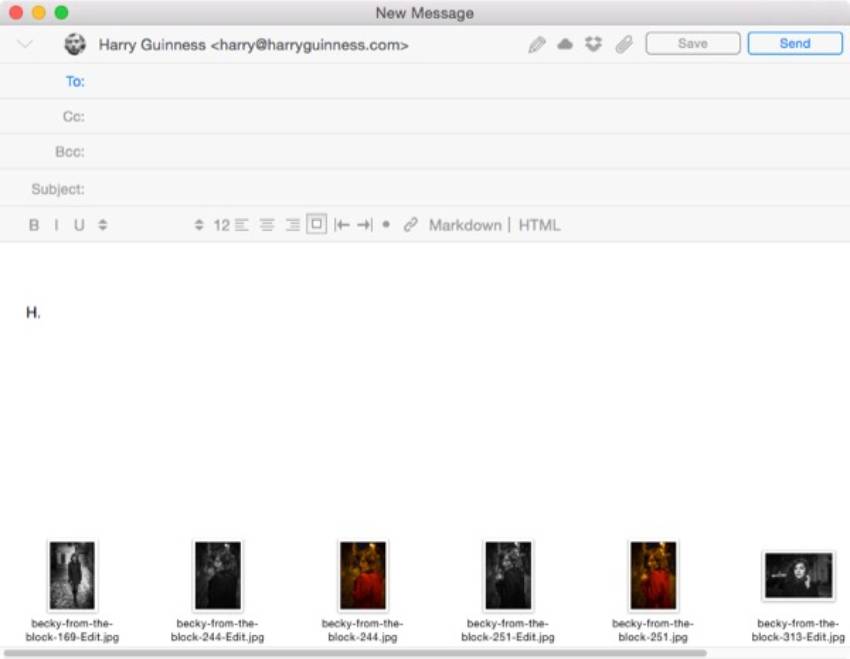
If you want to learn how to send and deliver digital photos to clients in a professional manner, take some cues from this sample script for what the email should look like.
Dear [Client],
I’ve finished processing the images from the [descriptive title] shoot on the [date]. They’re now ready for you to review. You can access the files by visiting [weblink] and clicking download.
Included in the folder are:
- A readme.txt file.
- A contact sheet showing all the images.
- 294 full-resolution image files.
If you have any issues accessing the files, please don’t hesitate to contact me.
Kind regards,
Harry Guinness.
This last bit of care will show your clients that you know how to send digital photos to clients professionally.
Now You Know the Best Ways to Share Photos With Clients
The days of delivering printed photos to clients are gone. Now, the best way to share almost all images is to share digital photos with clients. If you want to do it in a professional manner, this article has covered many of the things you should consider, including:
- how to deliver files
- how to name your files
- the importance of adding metadata
- what additional files to include
- how to send the delivery to your client
Did you enjoy learning how to send and deliver digital photos to clients? Luckily for you, we've got more cool ways to work with your photos. Check out this free Lightroom tutorial from our Envato Tuts+ YouTube channel.
We also have some great written tutorials and guides right here on Envato Tuts+, courtesy of our talented instructors. Read them, bookmark them, and use them to grow as a photographer and photo editor.
 How to Sync Presets From Lightroom Classic to Lightroom Mobile
 Jamie Evan07 Sep 2022
 How to Use Screen Modes in Lightroom Classic
 Jamie Evan15 Oct 2022
 How to Correct Exposure in Photos With Lightroom Mobile
 Duncan Clark20 Dec 2022
 How to Crop a Photo in Lightroom Classic
 Andrew Childress30 Nov 2022
 How to Remove Moiré Patterns in Photos Using Lightroom Classic
 Jamie Evan20 Jul 2022
 How-to Rename Photos Automatically in Lightroom Classic
 Andrew Childress22 Nov 2022
 How to Use Batch Processing in Lightroom Classic
 Andrew Childress30 Nov 2022
 How to Enhance Portrait Photos Using Vibrance in Lightroom Classic
 Jamie Evan15 Nov 2022


