
 Lessons: 15Length: 1.8 hours
- Overview
- Transcript
5.1 High-Volume Processing
In a headshot session you may take hundreds of photos just to get a few keepers. There are a couple ways to go about getting great results. In this lesson you will learn how I process a large shoot with over 50 headshots in just a few minutes.
1.Introduction
1.1Introduction01:49
1.2What is a Headshot?02:37
2.Getting Started
2.1Actor Headshots09:13
2.2Corporate Headshots09:05
2.3Anybody Headshots03:26
2.4The Business of Headshots09:35
3.Basic Skills and Equipment
3.1Equipment09:22
3.2Second Nature04:52
3.3People Skills08:11
3.4Personal Style12:32
4.Make the Shot
4.1Natural Light12:25
4.2Studio Light06:47
5.Post-Production
5.1High-Volume Processing06:01
5.2Retouching10:24
6.Conclusion
6.1A Look Back00:37
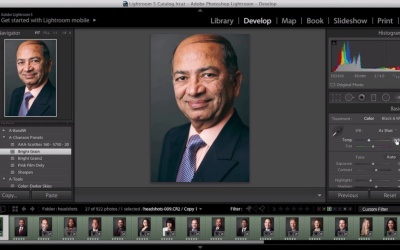
5.1 High-Volume Processing
Welcome back to Head Shot Photography. In this lesson, I'm going to show you how I process my high volume corporate head shot jobs. In our example today, I'll be showing you a shoot I did last year that included head shots for over 50 people. This is what I started with right here. This is over 900 images that I took throughout the day. It was about a six hour day of shooting. And as you can see there are just a ton of images. And in the end, this is what I ended up with. It's somewhere around 52 or 53 just great finished head shots ready to go. Now the process from getting from here, to here can seem really daunting and really time consuming. But if you have the right plan going in then it's really not that bad. So that's what I intend to show you through the rest of this. So let's move on to the first step. To start with, I always shoot tethered on these jobs, which means I connect my camera directly to my computer, in such a way that the files are downloaded automatically as I take them. After I take about 15 or 20 shots, I invite my client around the back to look at the computer. And this is pretty much what he will see. Basically, we'll just go through the images, and if I or he sees one that we like, we mark it. And we'll just keep going through the images. Not those ones. I like that one. And I like that one. Usually, I like to give them about three or four images to look at. Then, we go back here and we sort them, so we only see those ones. And then I blow them up. And I go through them again. And I say, okay, this is image one, this is image two, and this is image three. Which one do you think you like best? Let's try it again. Image one, image two, or image three? Now usually they'll tell me, I like this one best and we're all done, and they can go back to work, and I can go back to shooting the next client. Sometimes, what will happen, is they won't like any of them and we'll shoot a little bit more. But, for this example, I like this one the best. So we'll un-mark this one and this one, and that leaves us with this image. So, I pretty much just repeat this throughout the day with each client as we go along. And, what I end up with is 53 head shots that are ready for processing. Let's go ahead and open up Lightroom. So here's our first image in the series, and I think it looks pretty good straight out of the camera. But there's a few little things that I'd like to do to tweak it to get it just perfect. The first thing that I do to all of my images is I apply my preset bright grain. This just adds a little bit of something to it that kind of defines my style. And I love the way it looks. But still, there's a little bit that needs to be done. We can adjust the temperature a little bit which I think it needs to be a little bit cooler. Probably somewhere around there. And then I'll probably bring the exposure up just a tad. And maybe bring our shadows down just a little bit. Right there. I think that looks perfect. At this point you might think the thing to do is to just move on to the next image and to do kind of the same things. And to adjust it in the same way. And then just do that for each image along the way. But this would actually take forever. Instead, what I like to do, is I just select my first image that I got just the way that I wanted it. And then I just scroll down and I select every other image, and then I hit sync. And this is gonna synchronize the settings from that very first image, through all of the images in my shoot. You can go through all of these little tick marks and pick the ones that you want. I usually don't do the local adjustments and the crop, but everything else I leave ticked. You just hit synchronize, and give Lightroom a second to update all the settings. And now all of your images basically look the same. This is the real time saver. What I like to do at this point is to look at the images in more of a gallery setting. So I can see if any of them stand out as too bright, or if any of them need little tweaks here and there. It looks like maybe this image here is a little bit too bright. Maybe I brought the light in a little bit too close so I just gonna go into this one and just bring the brightness down, just a little bit. There, that's perfect. And I think the one after it might have been a little bit bright too. This is usually the only tweaking that needs to be done. It's just that some people are taller, or shorter, or maybe they were too close to the light. Another one here, this one's a little bit bright. That's perfect. This one here looks a little bit dark, so we'll just bring it back up. There, I think that looks perfect. And now, all of my images are done and they all look the same, and they're all ready to go. Once I'm happy with the way all the images look and that they all match each other. It's just as simple as clicking the export button and then, finding a folder, this head shots folder, and then export those files to that folder. And now, Lightroom is gonna take its time and export these files and create a nice folder for me full of great head shots. At this point I'll usually get up and make myself some tea and wait for it to finish. Once it's done, all I need to do is compress that folder and put it onto my Dropbox and send it to my client. So, that's just how easy it is to process a full day's worth of photos in just a few minutes. In our next session, I'm gonna show you how I process an actor's head shot session from start to finish.


