
 Lessons: 5Length: 39 minutes
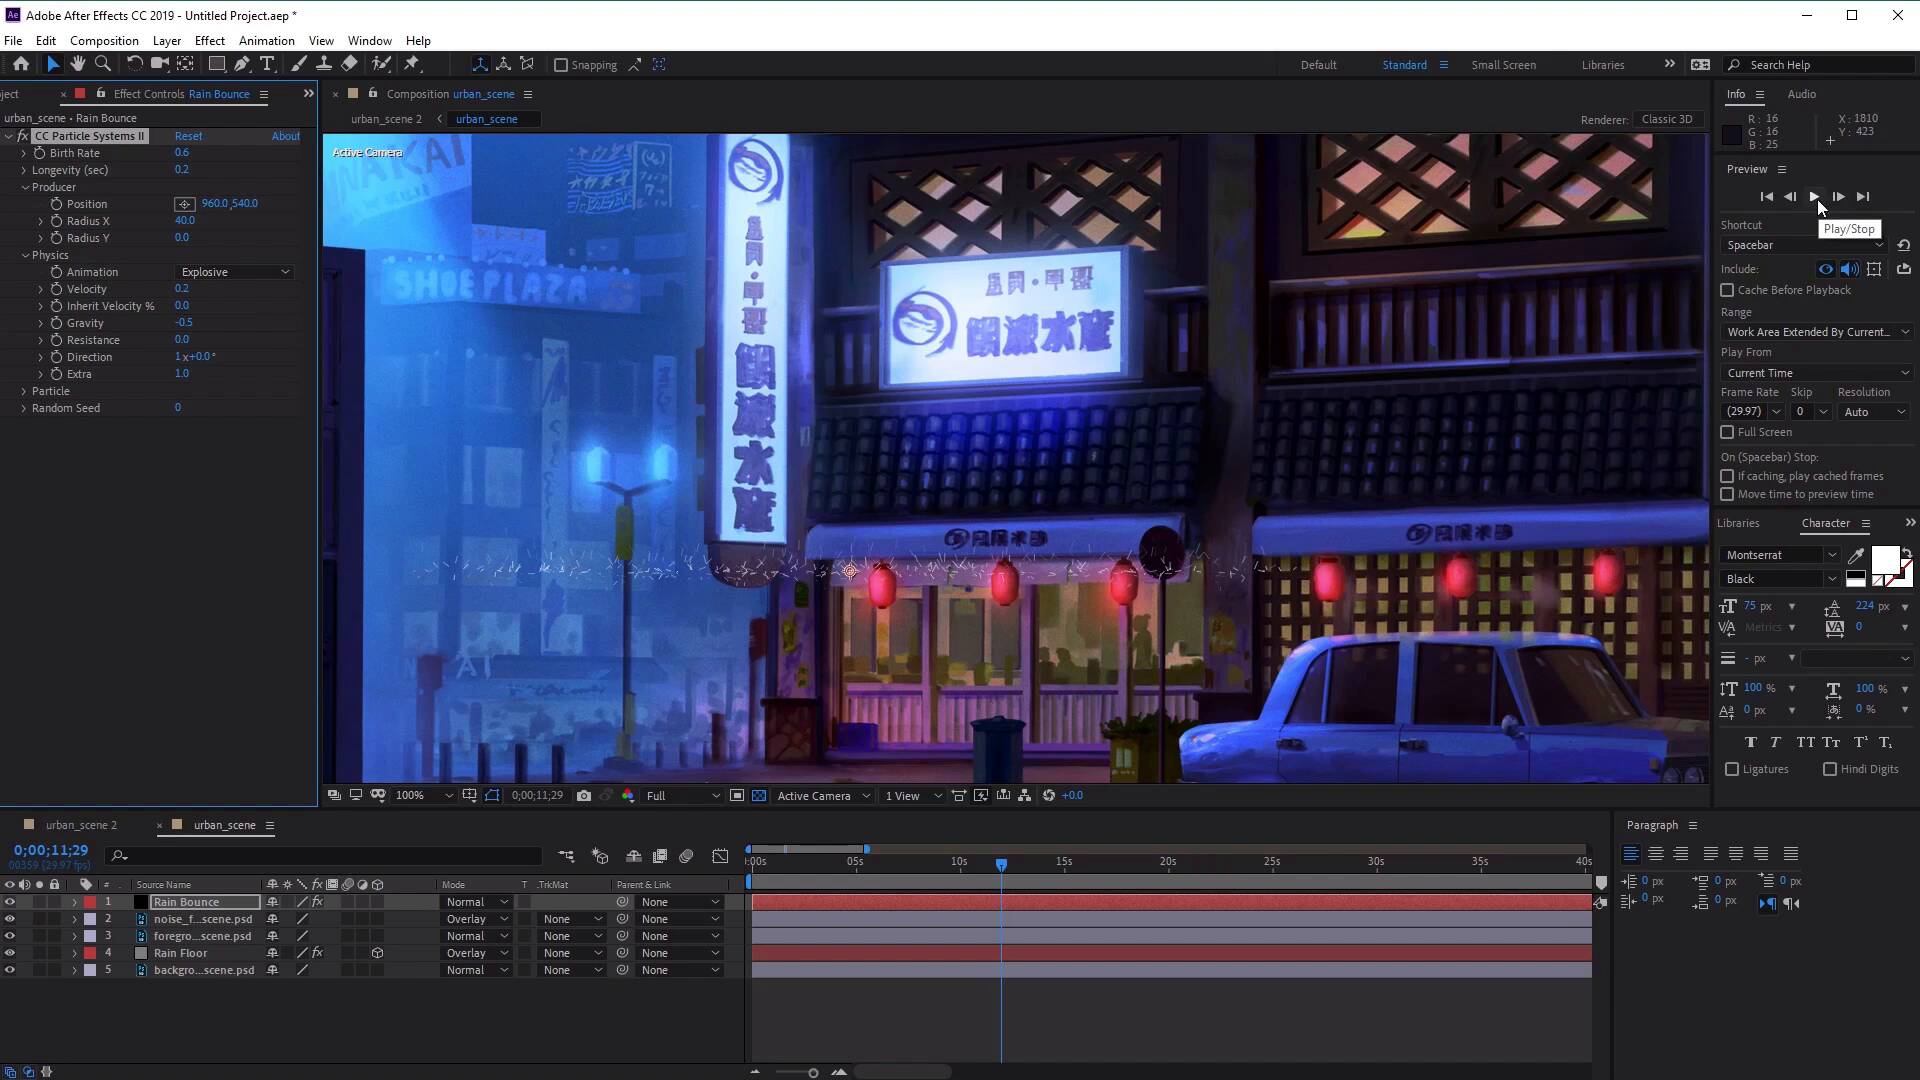
- Overview
- Transcript
2.2 How to Animate Bouncing Rain From Surfaces
Let’s take things further and make our rain appear even more authentic. In this lesson, you will learn how to animate rain particles bouncing off a solid surface using CC Particle Systems II.
2.2 How to Animate Bouncing Rain From Surfaces
Hi everyone, and welcome back to the urban rain animation course. In this lesson we'll learn how to animate some rain particles bouncing off some hard surfaces, such as the top of the car here and also the top of the rain covers here. So let's start by creating a new solid again. So go to Layer > New > And select Solid. And in the solid settings, let's rename this rain bounce. And here we want to change the color to a pure black like so. Once you're happy with that, go ahead and click OK. Now with the layout still selected, we wants to go to Effect go to Simulation and we want to select CC Particle systems 2. Now free zoom out here and this, zoom out here and move the timeline further along, you'll see that the particles have been added to this layer and what they look like. Now in its default setting, you'll see that it looks like a fountain of yellow lines like so. So in order to change the look of these particles, we need to go to the Effect Controls panel here. And we wanted to go ahead and open up the particle options, which is found here. Now once you've opened this up, the first thing that we want to change is the color of our particles. So let's go ahead and change the birth color from yellow to pure white, like so. And then for the death color, let's go ahead and select the death color here. And we want to change the death color to a sort of grayish blue. So something like B, B, A, C4, like so. And then click OK. Now let's go ahead and change the producer options. So let's go ahead and close this and open up the produce options here. And this is where the particles comes out from. So opening this up, you can see that we can change the radius of the x and the y as well as the position of the producer. So let's go ahead and change the x radius of our producer here. And this will you'll see how this is making the producer look like the particles are coming out from a flat plane or a surface instead of a single point like we had before. So let's go ahead and stretch this out to something like 40. So we can also add a value here just by clicking on the value and inputting it into our keyboard. And from here, let's go ahead and decrease the birth rates. So from here, let's select the birth rate and change it from 4 to something like 0.6, just to reduce the amount of particles shown here. Now once we've done that, the next thing we want to do is play about with the physics options. So let's go ahead and open up the physics options here. And from here, we want to change the gravity. Now you'll see how the particles are sort of moving downwards and we want to create a bounce so the particles need to move Upwards. So let's change the gravity here and move it down. So you'll see how the particles are now slowly moving up, so let's change it to minus 0.5, like so. And now you'll see that particles are moving upwards. And will also change the longevity here from 2 to, let's say 1, like so. Just to reduce the amount of particles and reduce the lifespan of our particles. And this will also help hopefully make the rain bounces look a little bit more realistic just bouncing up from the surface instead of flying up in to the sky. Now from here, we also want to change the velocity. So let's change the velocity from 1 to 0.2. And you'll see now how the particles are getting smaller and smaller. And hopefully they will be able to fit in with our landscape here. And then at this point all it is, is just playing about with the values of the options that we just discussed. So things like the birth rates, and the longevity, just to come up with a look for the bouncing rain that you want that suits your image. So I'm just going to change the birth rate to 0.6, and let's change the longevity all the way down just to reduce the height of our particle bounces changes to 0.2. And let's go back to the producer here. And we wanted to change make sure that our radius in the Y is set to 0, just to make sure that our surface looks as flat as possible, depending on the look of your painting. And then all we need to do here is just click on the Play button to see what our bounces look like. Excellent. So I'm quite liking the look of that. The next thing we want to do from here is we want to apply this in to our painting. So to do this we need to select our rain bounce layer and pre compute by right clicking, and then selecting Precompose. And then we want to just name this rain bounce again. And make sure to select move all attributes into the new composition. Select this and then select OK. Now with this comp, we can use the Select and Rotate tools again, just to move it into place. So let's use the Select Tool. Make sure we've selected the Rain Bounce Composition, and then just move it into place. So let's begin by moving it along the Rain Covers here. I'm just going to use the rotate tool here just to rotate it slightly, so that it fits in with the angle of the cover like so. And once we're happy with that, we want to go ahead and select the pencil here. And we're going to use the pencil to mask out the areas that we don't want it to be shown. Now you can see that we've got an area here to the left and to the right, where the rain bounces are still showing. This doesn't make sense. So let's use the pencil to mask those bits out, Like so. And then once you've done that, all we need to do is go ahead and duplicate this. So press Select the rain bounce composition, press Ctrl+D to duplicate. And then just use the Select tool to move it along to the next cover, like so. And then we can adjust the mask, So that it fits the next roof. And then we can duplicate this again so press Ctrl+D to duplicate. Use the selection tool to bring it to the top of the car here like so. And then again, using the selection tool, we can adjust the mask, like so. So it just covers the top of our car. And we can also do the left and the right of the car as well. So that's press, Ctrl+D again to duplicate your Selection tool, move it along and then just using our mask to cover this up, like so. And then press Ctrl+D, move it to this side of the car, And let's extend it. Excellent. Now another thing you we may want to do as well is we can up our composition, open up Mask, open the mask again. And we can also feather the mask as well just to give it a little bit more of a softer gradients going out. So we can do that to all of our comps. So let's do that to this one as well. So open up mask. And then just feather it's by about let's say 60 to 70. And then the same for the top of the car. So open this up, open up the mask, and we can just input a value of 70 like so. Same for the next one. So let's go for the last to open up the mask options. Select further, input a value of 70 and then same for the last one. And input a value of 70. Now you'll find that if we did this for the first composition, we wouldn't have to go through and do the same for all the others as well. So now that we've added a feather, let's go ahead and duplicate our next composition and add this to the top of our vending machine here. Just use the rotate tool to sort of change it to the same angle as what's on the painting. And then just move it into place like so. Duplicated again. And then same thing here for the other side. Then just move it into place. Excellent. Now just fix it to the composition. And now finally, once we've done all of the rain bounces the next thing we want to do just to aid and reduce the amount of clutter that we've got down here. Let's go ahead and select all the rain bounce compositions. Right-click, Pre composition. And let's just name this Rain bounce comps. Select OK. And now from here, we can select the play Preview button to see what our animation looks like. Excellent. So you can see here how our rain bounce animations are all working with our ripple effect animations on the floor. Awesome, so that's it for this video. In the next one, we'll learn how to create a stormy rainfall in the scene. See you all there.


