

Take your editing skills to the next level with this free advanced Premiere Pro course to help you level up in just a few hours.
Introduction
1. What You'll Learn
In this quick introduction video, I'll tell you about what we'll cover in the next 4 hours. You won't just learn Premiere Pro, you'll master it, with instruction on edit techniques like source patching and track targeting. You'll learn how to work with footage of all kinds and how to use LUTs and color-checker cards. We'll even cover audio by looking at fixing audio drift, using multiple compressors, loudness normalization, and more.
"You'll learn techniques to help you work faster and create projects that look and sound great."
Download all the Premiere Pro plugins and other resources used in the course:
Advanced Editing
2. Source Patching and Track Targeting
In this lesson you'll learn about track targeting and source patching. Track targeting controls things like copy/paste, match frame, and navigation commands, so that the asset ends up where you want it on the timeline.
When you have a clip that you're inserting into your project, you bring it up in the source monitor and if you then want to use insert or overwrite, this will help you control where that clip is placed, or 'patched in'. This is where source patching comes in.


3. Track Lock and Sync Lock
By default, in Premiere Pro, sync lock is enabled for all tracks and track lock is disabled. If you have an audio track you're happy with and you leave those options as default while you continue editing, you can get gaps in your audio. I'll show you how to change the settings so that you can leave certain assets untouched while you edit but still allow you to select them for certain things, like adding effects.


4. Three-Point and Four-Point Edits
These edits relate to putting a clip in a spot in the timeline in a precise way. If you just patched in your video, it might not fill the gap you have. This is where three and four point edits come in, so you can tell Premiere you want it to fill a space in the timeline, and exactly which part of the footage you want in there.
5. Dynamic Trimming
Dynamic trimming is just one way you can approach trimming your clips in Premiere Pro. I've set up a basic sequence with two clips in this video, to show you how dynamic trimming works.


6. Automate to Sequence
Automate to sequence is really simple. I'll demonstrate this useful tool by selecting some stock footage and showing you the options you have to be able to add those to your timeline. You can choose how they're placed—whether that's sequentially or a custom value that you decide with markers. I'll go through markers in more detail in an upcoming lesson.


7. Slow Motion
Slow motion is a great tool so in this lesson I'll show you how you can achieve this great effect, including using conventional 24/25/30 fps footage, and slow it down. I'll go through which settings you'll need to know to make it look right.
8. Speed Ramps
In the last lesson we looked at slowing down footage entirely. In this video, we'll look at how you can alter the speed over time, so it might start fast and then go slow, or start in slow motion and then speed up.
9. Scene Edit Detection
Sometimes when you're editing, you don't have all the footage exactly how you might want it, you might have been sent footage that's been edited already, like a long clip of various bits of b-roll. Breaking that up used to be a pain, but there's a newer option in Premiere that helps sort it all out quickly and easily, and that's Scene Edit Detection.


Raw, Log, and Color
10. Raw Footage
You'll learn how to work with RAW footage in Premiere in this lesson. I'll show you two pieces of RAW footage including .braw, which is RAW footage from Blackmagic.
11. Log Footage and LUTs
Log footage is a way for a camera to store the information from the sensor in a non-linear way. It's a way to map the luminance values of the image to get more information into the video file. This makes the image look flat and lifeless. I'll show you how to bring that footage back to life, using Look Up Tables (LUTs).


12. Using Color-Checker Cards
In this lesson I'll show you how you can use a color-checker card like the one in the picture below, and make adjustments in Premiere Pro to get the most accurate colors for your footage.


13. Shot Matching for Color, Part 1
In the example in this video, I have two clips that were part of a multi-camera shoot. They were from different cameras, so the footage doesn't look the same. This is something you might come across when filming, so I'll show you how to get your shots matching.


14. Shot Matching for Color, Part 2
This lesson picks up on the last, and this time we'll work on the background of the image to get the two pieces of footage to match.


Premiere Pro Update 2022 | A Quick Guide to What's New
Adobe has released a new Premiere Pro update, and it's dividing the community. We'll tell you what we love, how to get back some old familiar workspaces, and generally what's new in the Premiere Pro 22.3 update! Check out our Premiere Pro tips in this video.

Audio Editing
15. Fixing Audio Drift
Audio drift—where what you're listening to will start to drift out of sync with the visuals—is something that can happen when you're recording on devices that don't have the same synchronization clock for audio. That could be different cameras, a camera and a separate audio device, and so on. I'll show you an example and how to fix it.


16. Merge Clip
Learn how to merge audio and video clips in this 5-minute video. Say you have a project where you have a video clip with scratch audio and then you have separate audio, and you need to use them in multiple sequences. Premiere has a feature that lets you do that without having to drag everything in manually.


17. Multiple Compressors
Find out how and why you might want to use multiple compressors in Premiere. Sometimes you can't use one compressor to do more than one thing. I'll show you an example in this lesson.
18. Master Bus Effects
The Master Bus is what all your audio gets routed to/through before it gets rendered out. I like to put at least two things in there: something to protect the levels so they don't clip, and an effect to keep an eye on the overall loudness of my project. I'll show you how.


19. Loudness Normalization on Export
You have a few normalization options on export in Premiere Pro. It can be hard to know which is the right to choose, so I'll talk you through the one you should select, and then how to customize that so you get a good end result.


"Switching between apps on a single screen is really annoying and distracting, it breaks my flow."
Edit Enhancers
20. Using Multiple Monitors With Premiere
I use two additional monitors plus a laptop displaying the same thing as my program monitor. I'll explain why that is, and how you can use your own multi-monitor setup with Premiere to help you work faster.


21. Third-Party Video Effects
Premiere Pro comes with a lot of stock effects, things like adjustments, blur, sharpening, and so on. You've probably got your basics covered with the ones included; you can even combine them. However, sometimes they just won't cut it, and it's faster and easier to use third-party effects. I'll show you some great ones in this video, and how you can use them.
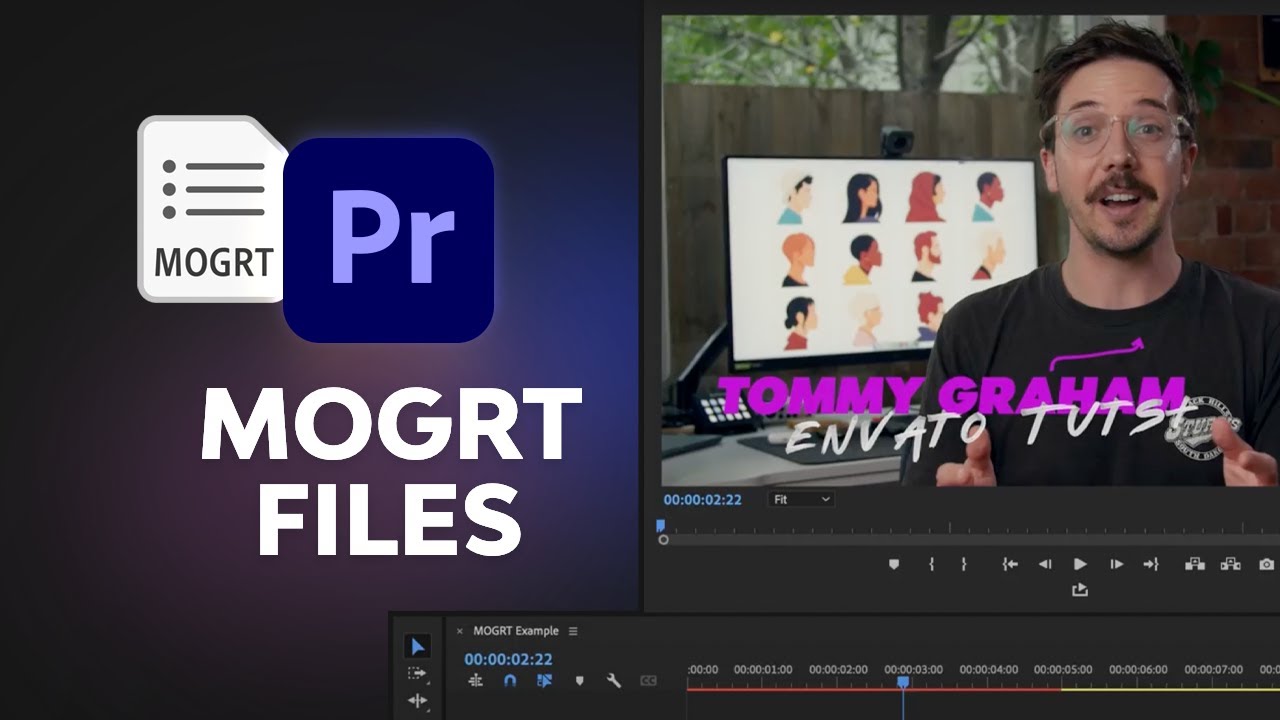
22. MOGRTS
A MOGRT is a motion graphic template. It's a way to get complex-looking titles and transitions into your project without having to know anything about animation and without needing to use After Effects. I'll take you through the Essential Graphics panel, where you'll work with your MOGRT templates.


23. Post-Production Camera Moves
These are not really camera moves! I know. It looks like one, but it isn't, we're faking it to some degree and it's a handy trick to know because you can give your shots more movement that isn't really there. Intrigued? Watch the video to find out how you can do it.
24. Creative Edits: Multi-Box
Sometimes, you might need to show more than one thing happening at the same time, so in this lesson you'll learn how to create split screen and multi-box effects.


25. Creative Edits: Music Markers
Footage timed to music can create a cool, rhythmical edit. I'll walk you through some different ideas that you can use to create these so that you have a better idea of the process if it's something you want to try.
A Few Tips When Adding Music Markers in Premiere
- Duplicate Your Sequence.
- Delete Footage From the Duplicate: If you don't want to delete it, just toggle off all the track outputs so that Premiere doesn't slow down on a clip.
- Disable Track Targeting: Make sure you don't accidentally have clips selected and create clip markers instead of sequence markers.
Conclusion
26. The Wrap-Up
You've completed the course! Well done, and thanks for watching. Hopefully, you've learned some new ideas, techniques, and skills that you can put to use on just about every project you do.
Learn More About Premiere Pro
If you'd like to learn more about how to use Premiere Pro, try some of our best free Premiere Pro tutorials and courses!
If you prefer to follow along with something written, we've got a huge library of free Adobe Premiere Pro tutorials to help you learn Adobe Premiere Pro.

 20 Top Premiere Pro Slideshow Video Templates for 2023


 20 Best Premiere Pro Project Templates (Free & Paid for 2023)

 How to Make a Slideshow Video in Premiere Pro


 20 Top Text and Title Templates for Lower-Thirds in Premiere Pro + 10 Free

 How to Use Transition Templates in the Essential Graphics Panel in Premiere Pro


 How to Export Premiere Pro Projects to DaVinci Resolve for Colour Grading


