
 Lessons: 9Length: 42 minutes
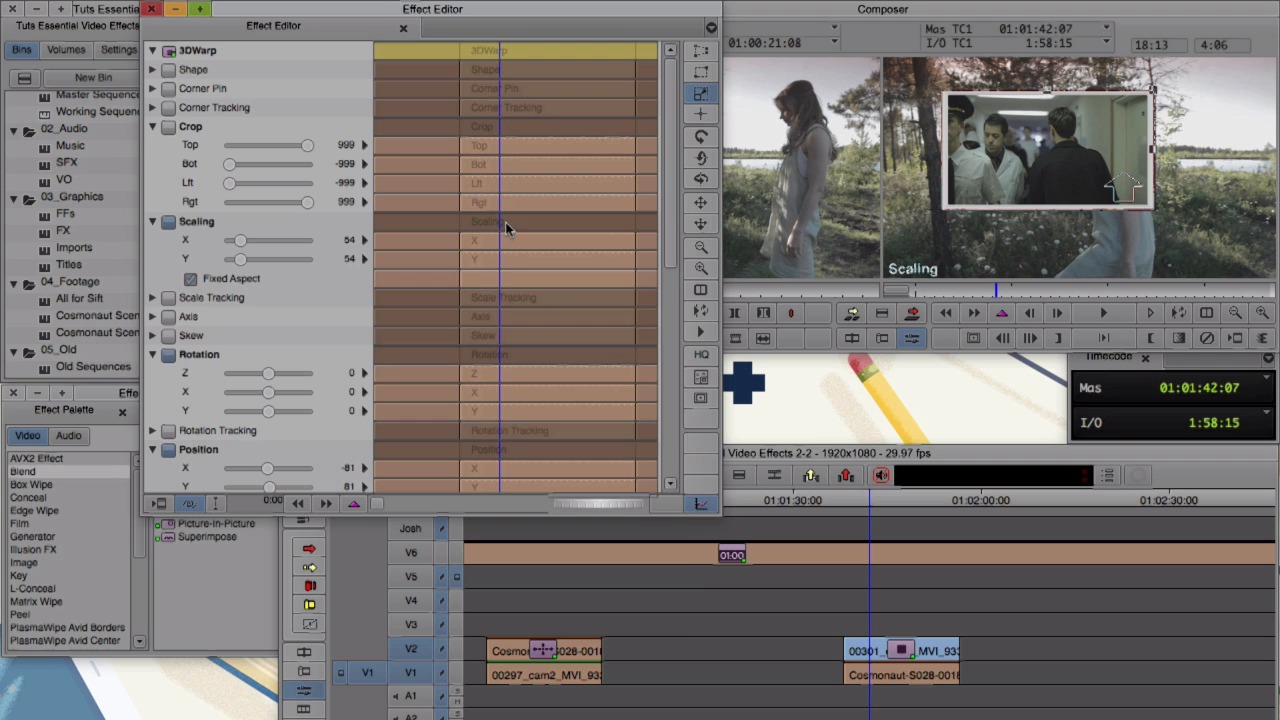
- Overview
- Transcript
2.2 3D Warp and Keyframing
3D Warp is the most powerful and simple effect to learn. In this lesson you'll learn what it can do, how Keyframing works, and how it can be used with other effects.
1.Introduction
1.1Introduction00:32
1.2What You Need02:05
2.Essential Video Effects
2.1Get Familiar With Effects05:59
2.23D Warp and Keyframing11:19
2.3Paint Effect05:57
2.4Animatte04:13
2.5Transitions06:03
2.6Timewarp05:05
3.Conclusion
3.1Conclusion00:55
2.2 3D Warp and Keyframing
The first effect we're going to dive into is 3D work. We're also gonna jump into keyframing since the two of these go hand in hand a lot of the time. There is so much you can do with 3D work, if you want to resize a video, like to scale it down, or rotate it, or change its position, this is the effect you want to use. Let me just note something you do not wanna use an effect called resize. And I'll show you why real quick. This clip has a 3D warp on it and it scaled down to 50%. There's a clip underneath it on V1 and as you can see, you can see, the clip on V2 and the clip beneath it on the want. So what 3D work does it affect just the clip that it's applied to. Over here we have a clip with a resize on it and it's also scaled down to 50%. And just like before there's the same clip underneath it, but guess what? We can't see it. What resize does, it effects the entire canvas as a whole and effects everything from that clip and everything underneath it. Just trust me, stick with three warp when you want to change the position or a size of a clip instead of resize. Let's apply a three warp to this clip over here. If you remember, pull down command or control and hit eight to bring up the Effect Palette if it's not already up. Under the Blend folder, you'll find 3D Warp. Click it and drag it onto the clip. Jump into effect mode and let's take a look at the effect editor. If you don't have this area here click on this icon in the bottom right corner. This is where we're gonna use key frames and I'll get to that in a minute. Now there a ton of options with 3D work. Let's go through the biggest ones and the ones that i find that i use most often. Let's start with crop. So if you click this triangle here, it'll twirl all the properties for this parameter open, and we have a top, bottom, left, and right. And with each one of these it'll crop either the top, or the bottom, or the left, or the right. I'm just going to hit command or control z to do these. All right. Next is scaling. So we control the stem. We have x and y, scaling and this check box for fixed aspect. So if unchecked this I can adjust them separate from each Or if I have this checked, I can scale the x and the y together at the same time. Let's look at rotation. And in rotation, we have three different axises that we can rotate our clip. We have the z axis. And right here I'm just using the arrow keys to go left and right. And that'll bring the numbers up and down, or I can also type in a number, let's say 25, and hit return. Or zero, and hit return. And then, we also have the x axis and we can do all sorts of flips. And the y axis. Let's look at a couple more parameters. We have position. And we can go along the x axis, along the y axis and in z space. Under Border we can give our clip a border. So we can give it just a solid black bar, we can change that color by double clicking. And then choosing a different color or there's a couple presets. It can be metal or bubble one, bubble two. And I find these look a little nicer with a black or gray. And you can also make the border soft the last parameter I use most often is the drop shadow. And when you turn this on, by default it makes the drop shadow a bit far away. So I always bring this a hair closer, so I usually keep it around 5 for the x and the y. And the drop shot is much closer now, and you can also change it's opacity. I could probably spend an entire course just like this one talking about key framing. If you've worked in a program like After fix before. Then you might be familiar with key framing already. Keyframing in media composer works a bit different than in after effects and some other software. To start let's add a keyframe to a parameter. You can do this a couple of different ways. You can click this purple triangle and choose one of these options. Or, this is what I like to do. Is you can right click on a parameters graph, and pick from here. I'm going to undo that, and let's add a key frame to the first frame. And let's have this clip scale up from zero, so go to the first frame. Right click, let's click Add Keyframe. And let's drag the sliders down to zero. And let's go a little further into time. And now, we must add an another key frame and have it active first before we change the parameters settings. So this is unlike after effects. Like In after effects if you were to just take the x or y slider. A key frame up automatically get set, instead it actually affects the key frame on the first frame the one that's active right now. So, right click, add key frame and now let's bring this up to 50%. We can close the effect editor. And after a quick render, we can watch it scale. So I'm going to select an and an out around the clip. And I'm going to right-click, and I'm going to choose expert render in to out. I'm going to select the drive that i want to save it to and I'm just going to select to render the entire selection. And click OK. You can keyframe pretty much any parameter for 3Dwarp, so the combinations of effects are endless. I'm just gonna walk you through a couple more things about keyframing. If you want to move a key frame there's a couple ways to do it. You can hold down Option or Alt, and click on the key frame and drag it. What I like to do is, right click and choose align key frames. And you can do that with multiple key frames so if I select the first one, hold down Shift, click the second one. And I right click and choose align key frames. The first one will move to the spot. And the second one will stay in proportion and move over as well. Speaking of moving key frames, there's two types of key frames. There's fixed, and elastic. So I'm just going to go ahead and move this first key frame back to the first frame. And I'm going to move the other key frame actually to the end. Okay, and both of these key frames right now are elastic. So what that means if I trim this clip either shorter or longer those key frames are gonna stay put at the first and the last frames. I'll just show you that real quick. So I'm going to enter trim mode. And let's just cut this clip short just a little bit. Go back into effect mode. And we can see they're still on the first and the last frame. So now, I’m gonna make these fixed key frames. So what that means is that these key frames are gonna stay right here on these frames of video. So this is on the first frame and let’s say this is on frame in a 427. Instead of expanding with the clip it's gonna stay right there on frame 427. So let's roll this back out. Go back into effect mode and we can see that key frame did not move. So I tend to use fixed key frames over elastic key frames more often than not. Generally, I'll throw the 3D warp effect on. And it make my edit and let's say it's thirty frames long, whatever the transition is. And then later on I go back and I trim that clip by a frame or two or ten frames or fifteen frames. I know that those key frames aren't going to move. Besides, having fixed or elastic key frames, you can also change the key frames velocity or how it animates. So there's four different kinds. And if we right-click them, we can see there shelf, linear, spline, and. So if we do shelf, what that means is that it will pop. So right now at the scale is at zero. And when we get to other point, it'll pop on. Whatever that was at 50. [SOUND] And if we change it to linear, and when I script through this is a perfect line. So if we want to see this graphically we can twirl this down. So you can see this line goes completely straight and there's also spline and beds here. And with these, you're going to get a little smoother of a transition. Kind of like an easy in or an easy ease over an after effects.


