
 Lessons: 9Length: 42 minutes
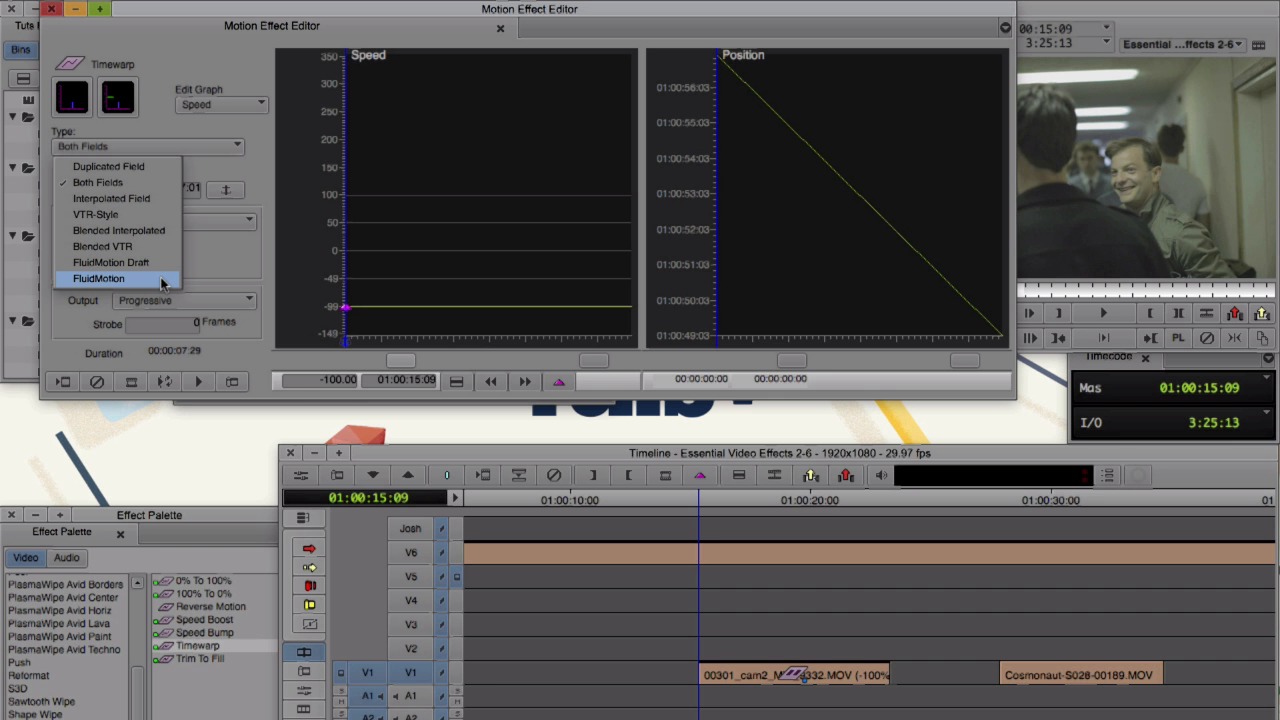
- Overview
- Transcript
2.6 Timewarp
Timewarp can speed up or slow down a clip, and you'll learn how in this lesson.
1.Introduction
1.1Introduction00:32
1.2What You Need02:05
2.Essential Video Effects
2.1Get Familiar With Effects05:59
2.23D Warp and Keyframing11:19
2.3Paint Effect05:57
2.4Animatte04:13
2.5Transitions06:03
2.6Timewarp05:05
3.Conclusion
3.1Conclusion00:55
2.6 Timewarp
This lesson is about manipulating time. When we manipulate time, we either make a clip faster or slower and we can do this a couple ways. In our Effect Palette, scroll down until you find Timewarp and the Timewarp effect. Take that, and drop it onto your clip. And we have this clip here of these guys walking through a hallway. And right now, we can see it's at 100%. It's at its full regular speed. If we go into Effect mode, something new happens. Instead of our Effect Editor popping up, our Motion Effect Editor opens. This might be a new window for you. I wanna point out a couple things on it. Go ahead and click these two icons here and we get our speed and position graphs. The position graph represents how much footage that we have in our clip and speed is the speed of the clip. If we wanna make our clip faster, let's say, twice the speed, we wanna raise that to 200%. And we can either click and pull this up, and we'll get it close to 200. Or, we can come down here and type in 200, Enter. And when we take a look, our clip is moving at double speed. If we wanna make our clip slower, let's say 50%, come down here, and let's watch our clip at half speed. If we want to have our clip go backwards, we need to go into negative territory and let's say we would just want to go at -100 we need to see a little bit more room. So we can take the slider and drop it down and pull this down and we get to -100. To see a clip backwards, we need to actually render it, and you can tell by this blue little dot here. And we also wanted to determine what type of rendering we want and this also applies for when we adjust a suitable clip going forward as well. I find it best to use either interpolated field or fluid motion. Fluid motion's going to take a little bit longer to render and give you a little bit bigger file size, but I find that generally gives the best result. But for now, I'm just gonna select Interpolate Field. And let's go ahead and render this guy. And if we wanna take a look, we see him walking backwards. And in time warp, we can do a whole bunch of things we can speed them up, slow them down and we can do that all in one clip. So let's restart, back at a hundred. We can go further into the clip. And let's add a key frame. And we can drag this up, let's say close to 200. It's moved further down, another key frame, slow down. And further on, let's add another key frame and bring it back up to full speed. Let's give that a quick render and let's take a look. Timewarp is a great tool, but it can be a little complex. If you're trying to get a clip that's a certain length to fit into a certain space, there's a really simple way to do that. So let's say we have a clip that is only this long. And we wanted to fill all this space. In the Effect Palette in Timewarp, find Trim To Fill and go ahead and drop that onto your clip. Let's close out of the Motion Effect Editor and let's just zoom in a hair. And we can see our clip is at 100%. If I go into trim mood and drag it out, it will automatically expand to fill this space. And we see we're at 61%. I use this all the time if I know I have let's say a five second clip that I need to fit into a six second hole. I'll go ahead and drop the five second clip then, and throw on trim to fill, and drag it out. You can have a lot of fun manipulating time in MIDI Composer. I encourage you to get in there, and mess around, and see what kind of fun things you can do with Timewarp and some of the other timing tools.


