
 Lessons: 12Length: 1.2 hours
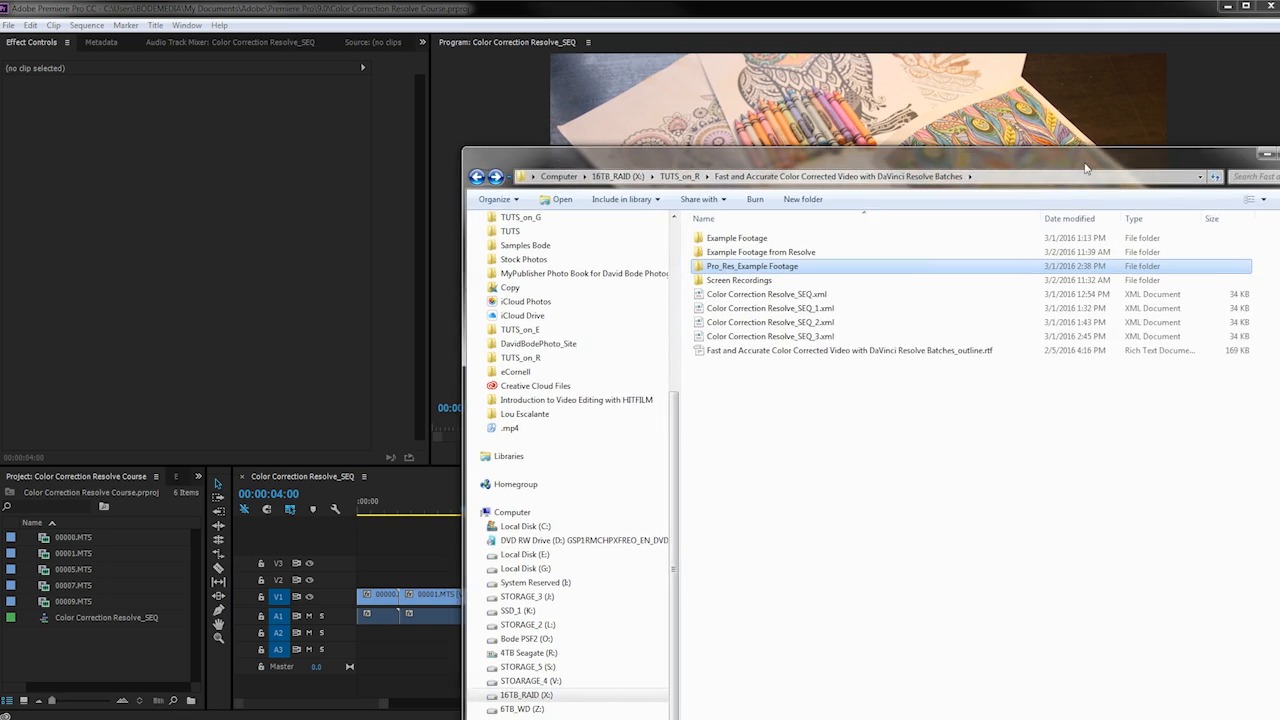
- Overview
- Transcript
4.4 Export
In this lesson you will learn how to export your clips so they can be relinked in your editor.
1.Introduction
1.1Introduction01:12
1.2What You Need05:05
2.Getting Started
2.1What Is Color Correction?06:14
2.2When to Correct06:02
3.The Process
3.1Resolve Interface05:53
3.2Scope Basics07:01
3.3Import08:47
4.Color Correction
4.1Match Color06:37
4.2Copy the Adjustment and Apply02:59
4.3Tweak Individual Clips05:46
4.4Export08:12
5.Conclusion
5.1Conclusion06:26
4.4 Export
In this lesson you will learn how to export your clips so that they can be relinked in your editor. So now that you've made your color adjustments here, and got everything looking great with these color targets, and made your final adjustments and tweaks using the color wheels and any of the other controls here in Resolve. It's time to get the clips out of Resolve so you can get them back in your editor and finish up your project. Now from any one of these three pages you can jump over to the deliver page and that's where you're going to export your clips. From here you can render out your clips and get the settings dialed in so that everything's going to match up nicely with your editor. Right over here underneath Format, this is the area that you wanna focus on. Where it says render timeline as, you want to choose individual source clips. If you haven't set a single clip it's going to render your timeline as one continuous video file. And although that may work, that's probably not what you want. What you want is to export each individual clip with the new color corrections that you've done in Resolve. So to do that you need to select individual source clips. Now under under Video Format, you have a lot of options. By default, it's set to MPEG4 here on my system but I want to use DNxHD. Now if you're on a Mac, you probably have some ProRes options. There's also CineForm. All three of those are great options. DNxHD gives very high quality results, ProRes is fantastic, and CineForm is great as well. Because I'm on a PC I don't have a ProRes option, so I'm gonna go with DNxHD. And because my footage was 8-bit to start with, I'm going to choose this DNxHD 1080p 220/185/175 8-bit version. That's going to make files that are pretty large but they're essentially gonna be lossless in terms of their video quality. Our frame rate is set for our project so that is fine. Underneath Audio, I'm gonna export the audio. Now there isn't any audio in any of these example clips, but for you, you're probably gonna wanna export audio if you had audio with your clips as well. My clips only have two channels of audio so I'm just going to render two channels although I could choose same as source. And then audio bit depth, the source clips have a 16 bit depth to them so that's what I'm going to choose. Now underneath File, we have some options. By default it may be set to use Custom Filename. Probably what you're gonna wanna use is Use Source Filename. That's going to rename the clips to exactly what they were before. They'll have a different file extension. So before in my case, they were .MTS files. And now they're going to be .MOV files because they're in a new codec in a new wrapper, but that's fine. As long as they have the same file names, I'll be able to re-link them and it should be very, very quick. Finally, I need to set a destination, so I'm gonna browse here and I'm gonnao set up a new folder, Example Footage from Resolve, and choose OK. There's an option to create an additional output. If you wanted to export these in another codec, maybe a smaller proxy for whatever reason, you have that option here as well, but I'm not gonna do that. I'm just gonna choose Add to Render Queue. And you can see that the job is going to come right up here, and all I need to do is hit Start Render, and it's gonna churn through these files. So, that was very quick, 27 seconds. Already, so here is my original project in Adobe Premiere Pro and I just wanna show you how easy it is to relink these files. Now the process is not going to be exactly the same for Final Cut or Avid or whatever program you are using, but it should be fairly similar. What I'm gonna do is go to my source files here which are in this folder, and I wanna rename this folder. And when I go back to Premiere, it's gonna say, uh-oh, yeah, missing all of these files. So now what I'm going to do is locate them. And I'm going to point it to my new files, which are right here in this file. So it's looking for 00000.mts, and I'm gonna tell it, that's actually this file right here, .MOV, and hit OK. And it's gonna find all the other files, and shazam! My files have been relinked, and it's just that easy. And you can see the new coloring is here, the files look fantastic, there's essentially no loss in quality and I'm good to go. And really quickly I wanna show you how to export your project if you imported that XML file from your editor. So, this is in another project, I reimported an XML file with those ProRes encoded files so everything is working in Resolve the way it should. Over here, in the color page, I have gone ahead and color matched the clips. So with these clips, how do I get these back into Premiere? Because if I just transcode these and reimport them into Premiere, it's not going to work because these are already trimmed. So I'm going to come over here to the deliver page. I'm going to export these just like before when I chose individual source clips DNAxHD. I'm going to use the source file name and I'm going to put them in that example footage from Resolve DNAxHD. I'm gonna add this to the render queue, start rendering and that's it, it's all done. Now I can jump back to the Edit page. I'm gonna come over here to File > Export. And in that same folder here, example footage from Resolve DNxHD, I'm going to export an XML file from Resolve and that's it. Now when I jump over to Premiere, I can go to File > Import. I'm going to come to that folder right here. And right here I'm gonna select this file to import, and when I do, look at what I have. I'm gonna throw these in a separate folder here. I now have a new sequence right here and if I double click on this to open it up, you can see that now I have the color corrected clips and they've already been imported. That was all contained in that XML file there, and I have essentially the same sequence that I had over here. You can see they line up and they're frame accurate, but now these have been color corrected. Now I don't have handles on these. These clips have been trimmed which means I can't make these clips any longer. The edit is essentially locked to this point. I can only make the clips shorter. I can't make them longer. But super fast to get these color corrected and bounce back and forth between Resolve and Premiere. As long as your videos have a codec that will play nicely when exported via XML, you can export out of your editor, import that into Resolve, do your color corrections, jump over to the deliver page here, export those clips in either DNxHD, CineForm, or ProRes, whatever you like, something that's high bit rate and looks fantastic. Export the XML file here, reimport it in your editor and you should should be good to go. Everything is lined up and it looks fantastic. Coming up in the last lesson in this course, you're going to get some final tips and tricks to make all of your color correction batch processing using Resolve a success.


