
 Lessons: 12Length: 1.2 hours
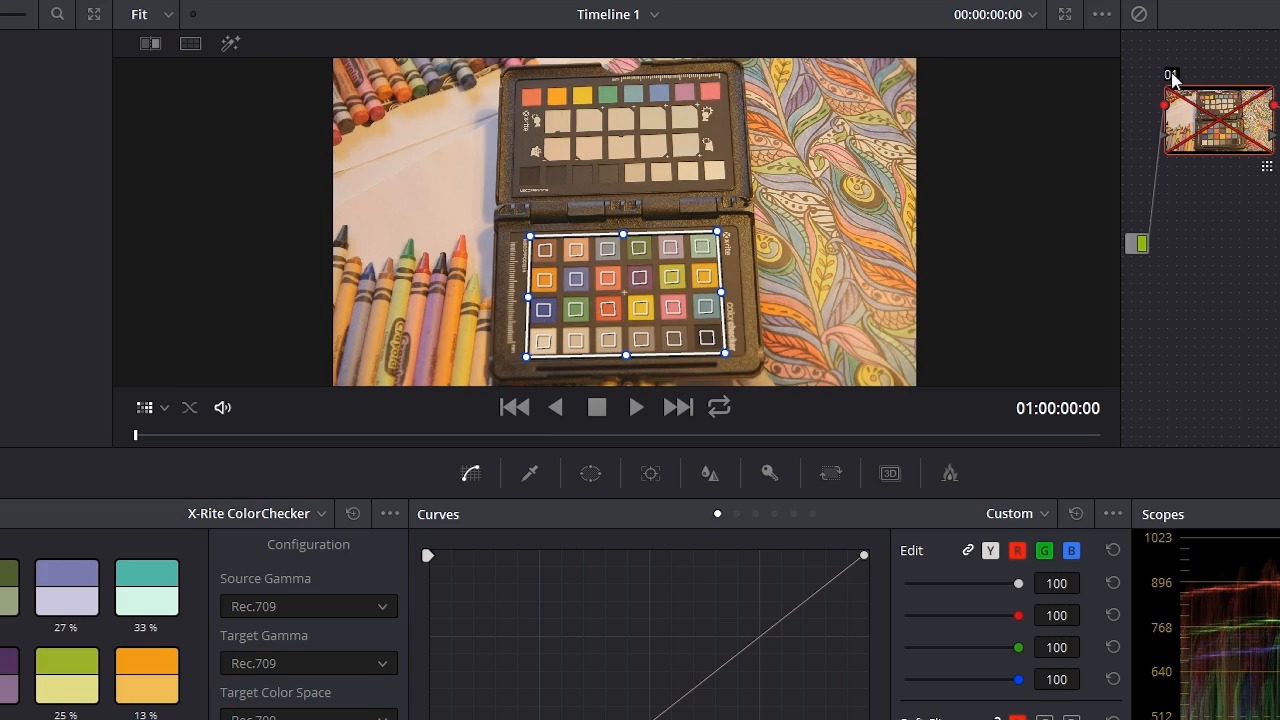
- Overview
- Transcript
4.1 Match Color
In this lesson you will learn how to select your clip and use the color match feature.
1.Introduction
1.1Introduction01:12
1.2What You Need05:05
2.Getting Started
2.1What Is Color Correction?06:14
2.2When to Correct06:02
3.The Process
3.1Resolve Interface05:53
3.2Scope Basics07:01
3.3Import08:47
4.Color Correction
4.1Match Color06:37
4.2Copy the Adjustment and Apply02:59
4.3Tweak Individual Clips05:46
4.4Export08:12
5.Conclusion
5.1Conclusion06:26
4.1 Match Color
In this lesson, you learn how to select your clips and use the color match feature inside of resolve to quickly color correct and neutralize your footage. So, like I mentioned before, all the clips that you want to color correct have to be in a timeline, now I've already added all of my clips in my project to this timeline here. In the next step is to use this color target here to do a color correction. So I'm gonna jump over to the color page here. And things look a little bit squished, so I'm gonna make this viewer take up more space so you can see exactly what's happening. Now I do have resolve shrunk down in my monitor here so that it's a little bit easier for you to see. The interface should look a lot better on your monitor when it's scaled properly and maximized to fit the screen. So I want to use this color target here to get a really quick and accurate color correction on this footage. What I'm gonna do is right over here in the color page, I'm gonna click this color match button and that's gonna bring up this color match control panel here, and I've got a couple of options. There currently four different color targets or reference targets that resolve can use, the ChromaDuMonde 24+4, the Datacolor SpyderCHECKR, the DSC Labs SMPTE OneShot, and the X-rite ColorChecker. The X-rite ColorChecker is the one that I'm using here, so I have that selected. Over here in the viewer, I'm gonna change the tool to the color chart, and you're gonna see that's going to put a grid right on the screen. Now, I'm gonna use the corner pins here to just line this box up, you can see I'm just gonna scroll my mouse to zoom in here, and see that there's these little corner alignment marks here, so I'm gonna line up the four corners on there. The middle-mouse click and hold, and click and drag, you can move this around and that's what I'm doing here. Now you don't have to be super precise as long as the squares line up in the color boxes. And now right here under configuration, you have some settings, you have the source gamma, the target gamma, the target color space, and the color temperature. I'm going to leave all of these on rec 709. You can see there are a bunch of other different options here you may have to experiment to find out what works best with your camera if you're shooting in a longer profile. You may want to change the settings here. These shots were filmed using the C 100s wide dynamic range so I can leave this set to rec 709 and now all I have to do is press the match one. And when I do, you can see a huge shift here in the colors. And over here, it will show you on each individual color sample how far the colors were off. And just to show you kind of an ab, I'm going to turn on and off the node by clicking the number here and you can see a huge shift in the colors and it may not look at first like it's correct, but let me take this color chart off here, but take a look at these gray scale values here, this is white and this is all the way black. You can see that now these are looking very, very neutral which is right. Now this particular clip was intentionally shot using some tricky lighting. There is some exterior overcast lighting coming in from this direction and overhead, there is three relatively low color temperature halogen bulbs and one 2700 Kelvin fluorescent bulb. So the light color's all over the place and I believe the camera was set to daylight, white balance. And so despite all of those variables, resolve is able to reign in the colors and make them look neutral which is great. This is a fantastic starting point for any further color adjustments. Now, I'm gonna click the timeline here and I'm gonna jump to this clip right here. Let me get rid of the timeline. Now, I'm gonna do the same thing to this clip. Now, the target is much smaller, but that's okay. The main thing you need to get this to work is for the color target to be lit evenly in the lighting that you're going to use. So if I had a different color background light I obviously wouldn't want to have that shining on my color target here. All right, now I'm going to click match and there you go. Now we've match these colors. Now to make this easier on yourself, you may want to jump over to the editor and wherever you're lining up this chart, you may want to drop a marker and that way you'll be able to find your spot again if you want to make any adjustments, you don't have to mess with kind of realigning this here. I want to make a change to the color temperature, maybe pushing this down, to let say 5500, I can click the match button again and you'll see what that's going to do here, it's gonna make this quite a bit warmer, but I'm gonna leave it at the default 6500 because I think that's pretty close. So you can see here the colors aren't quite as far off as they were before, but it's still a pretty dramatic shift. You can see over here on the scope, that there definitely was a lot more blue in the picture without this being corrected, because you can see the blue is jumping up right here, especially in the background here. And with it corrected the red, blue, and green are lining up much more evenly and that's because that's supposed to be black which does not have a lot of excess blue in it. And that's really all there is to it. Now coming up in the next lesson, you're gonna learn how to take these adjustments and copy them to the other clips in your timeline. So check that out coming up next.


