
 Lessons: 11Length: 55 minutes
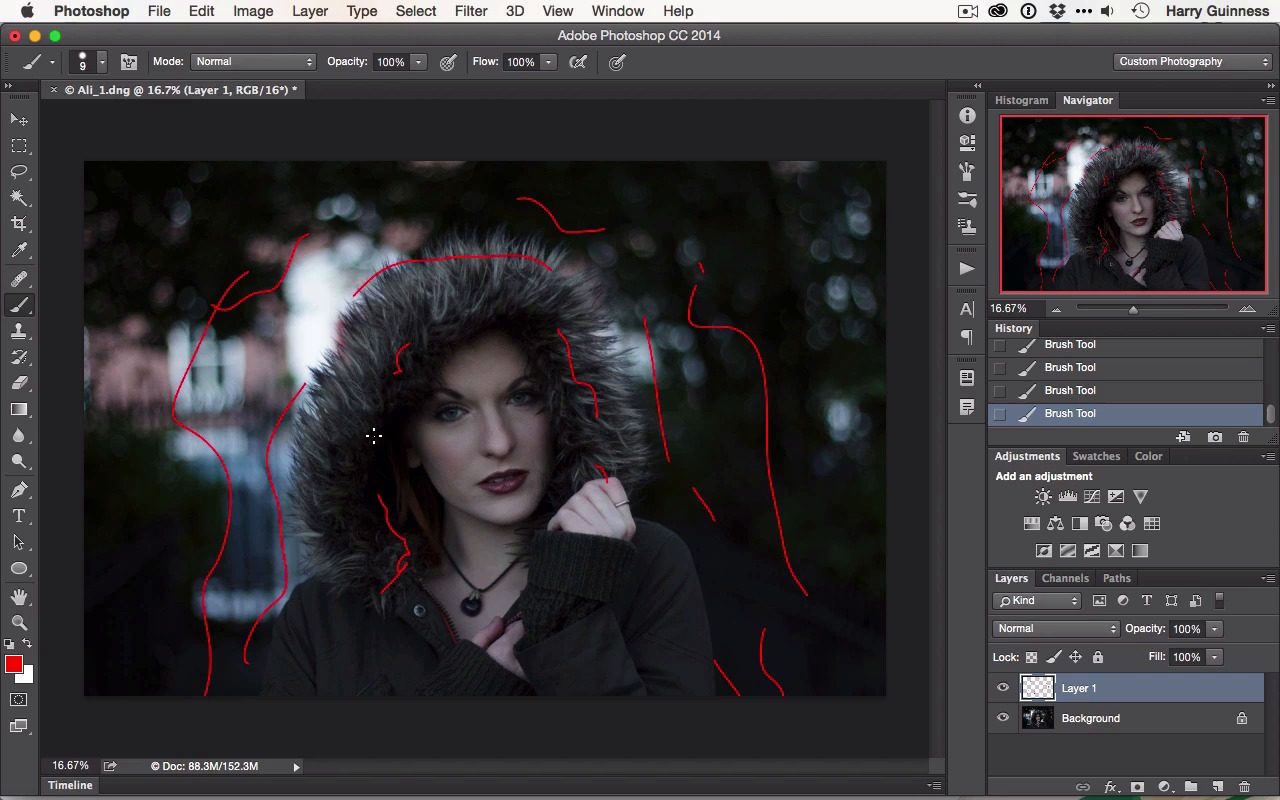
- Overview
- Transcript
2.1 Assess the Image
Before editing an image, it's important to assess what you have to work with and decide what you're going to do. In this lesson we'll assess the sample image for this course and make a plan.
1.Introduction
1.1Introduction01:29
1.2What You'll Need02:26
1.3The Kodak Gold 100 Look04:41
1.4Intention and Consistency04:30
2.Lightroom, VSCO and Emulation
2.1Assess the Image04:33
2.2Bring the Image to Neutral05:54
2.3Apply the Preset05:26
2.4Local Adjustments12:30
2.5Finishing Off08:16
2.6Consistency in Lightroom03:10
3.Conclusion
3.1Conclusion01:51
2.1 Assess the Image
Hi and welcome back. In this chapter, we're gonna actually get into the image editing and look at creating the Kodak gold look. The image I'm gonna be working with is on your screen in front of you now. This is a shot I took of a friend of mine. Ali, she's a fantastic model. I shot this with my Canon 650D, used the 50mm at 1.8. And you can see the setting on the top left. It was for 1/180 of a second at f 1.8 and ISO 400. The image is a little bit underexposed but because it's a raw file there's still plenty of data there for us to work with. Before jumping into editing an image, it's always important to step back and assess what changes you wanna make. Before I do anything I'm just gonna fix the crop. I want to tighten up a little bit so I'm just gonna push R in Lightroom, and then just crop it in a little tighter. Keep the aspect ratio. Push return to accept that. Perfect, that´s just the cropping we´ll be working with, there´s no need to worry about the extra data on the outside. So now it's time to assess it properly. I like to jump over to Photoshop to do this. So we're gonna open the image in Photoshop. That way I can use the Brush tool and a new layer just to circle any changes I wanna make. So you're gonna grab a new layer. There one will do, grab the Brush tool, them I'm gonna select a nice red color that you'll be able to see. First thing is I really like the dark vignetting and the so I wanna make sure I preserve that. But I also want to bring some texture back into it. The other thing I need to do is I need to brighten up the center. Again, this is gonna emphasize the vignette. I really want to make the focus more an Ali. One thing I've got to be really conscious of is the texture in the hood here and around her hair and that sort of stuff. I want to make sure to preserve at least some of that without crunching it. I know the Visco Kodak Gold preset introduces quite a lot of contrast, so that's just something I'm gonna have to be conscious of when I'm editing it. We're gonna be working in Lightroom, so the tools aren't quite as powerful as we have here in Photoshop, but I'm also gonna clean up some of the blemishes and things on Ali's face. So we've got some like here, here, a little one on her nose, that might be a dust spot on the camera. Down by her lips, and things like this. I'll want to also brighten up areas of the eyes like that, I'll want to brighten up her eyes themselves. Add in some clarity I think using a brush tool to add some more effect into them. I'm also gonna dodge and burn a bit on her face. I'll want to enhance her cheek bones, so I'm gonna be burning in here and then dodging up above that. I'm gonna be doing the same on the opposite side. So it will be emphasizing the contours that the makeup's already doing. I'll be dodging there, dodging the nose, dodging there, I'll probably be burning a little bit in there, dodging on the lips and burning around the outside. I also think that her left hand, the one that's on the right of the camera there, it might be a bit too bright so I'm just gonna be conscious of that. I'll look at it as we go but I might be burning that to bring it back. I'm also gonna be potentially brightening up all of this as well, just to make sure the texture remains there. And I think we'll probably bring in some of the vignette in underneath here just to pull the focus in. That might solve the hand issue. As you can see, I've got a very rough and ugly plan of what I'm gonna do to the image, but it's an important step to take because it means I can look at this and work out whether I've done what I want to do with the image. I'm gonna save this. We're gonna be able to have a look at this later on in the tutorial to see if we've stuck to the plan or not. In the next movie, I'm gonna bring this image to much more neutral exposure so we can really see what we're working with.


