
 Lessons: 18Length: 1.8 hours
- Overview
- Transcript
1.5 A Flexible Workflow
Smart Previews allow you to keep working even when your master image files are nowhere nearby. Learn about the advantages of Smart Previews and how to use them in your collection.
1.Consolidate and Import
1.1Introduction01:00
1.2The Ideal Configuration03:05
1.3Import Your Images11:00
1.4Customize Lightroom's Appearance09:17
1.5A Flexible Workflow06:35
2.Manage Your Collection
2.1Collections and Culling10:18
2.2Star Ratings and Color Labels04:31
2.3Keyword Tagging05:39
2.4People Tags02:56
2.5Find and Filter04:07
3.Correct and Perfect
3.1Essentials of Image Correction06:45
3.2Image Adjustment10:02
3.3Correct Your Crop04:15
3.4Batch Processes Made Easy06:13
3.5Photomerge: HDR and Panorama04:43
3.6Spot Correction08:43
4.Out of Lightroom
4.1Concluding the Edit05:43
5.A Holistic Workflow
5.1Make Lightroom Work for You04:06
1.5 A Flexible Workflow
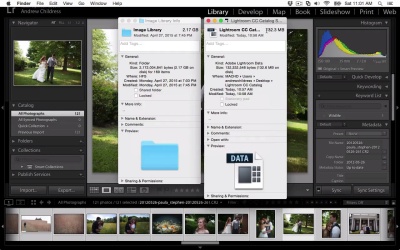
So, in the last part of our intro into getting started with Lightroom, I want to talk a little bit about some of the advanced image management and library management features that are available. And earlier on I was talking about how I really prefer keeping images on an external drive for a number of reasons, like the scalability, and the fact that it won't clutter your internal hard drive but that has one significant downside. Right now I'm not connected to an external drive. And you can see as I flip through some of the images in my collection that they're blurry and we don't have access to them. And that's pretty natural because if the images are stored on an external drive and we're not connected to that external drive, we can't really work on them by default. However, in Lightroom 5, Adobe introduced a new feature called smart previews that is a complete game changer for how you manage your catalog. And, when we build smart previews for our images, we don't even have to be connected to our original external drive to keep working on them. Basically it builds a smaller preview that we can continue working on, whether we're connected to the external hard drive or not. And the files are much smaller than the original images, so the smart previews are going to be a part of our catalog, and going forward we're not required to stay connected to the external drive to keep working on the images. So that's really the best of both worlds, right? We can take our computer with us and not worry about the external hard drive and keep on working on them. And we can also dock to the external drive for importing and adding new images. So the first that I need to do is. Go ahead and reconnect my external hard drive so that we can build the smart previews. Okay so I plugged my external hard drive back in, and you can see all of my images are back to working normally. They're completely visible, not blurry at all, and we don't get any errors over our images. So to build smart previews, what I'm going to go ahead and do is select all images. If I go to the menu and choose library, previews, build smart previews. Lightroom will start building them in the menu at the top here, and we'll let that process for a few minutes in the background and when we come back we'll have smart previews built. So, again, the key here is that we're building basically a version of the image that is smaller than the orignal image, and we can maybe keep on our internal hard drive, no matter how large our collection grows. While we might run out of room on our internal hard drive for keeping all of the images, using smart previews lets us take them wherever we go, because they're small enough to keep. Okay, so Lightroom just wrapped up on building my smart previews and you can see here that a new icon has been added in the histogram panel that shows me that I have both the original and the smart preview for this image. Now, if I disconnected my external drive, this would just say smart preview, but we would be able to keep working on it. You're probably wondering just how much space having a smart preview can save you. If we flip over to the finder here I want to show you a quick comparison. In my image catalog I have 121 images that take up a total of 2 gigabytes. And over here is the smart previews file that gets built. And that takes up just 130 megabytes, so that's a huge space savings. You have to keep the original images. That's very important. Smart previews are not a replacement for the original image. Instead they supplement using the original images. So, the key here is that once you have smart previews built you can keep working whether you have access to the original image files or not. It's kind of magic, the way it works, and it's one of the best features about Lightroom. And this is why I advocate this kind of system, where we keep our images on an external drive, but have a smart previews catalog with us at all times, so that we can always take our laptop and keep working, no matter what. Now one more thing I wanna show you about how I really like to set Lightroom up is so that we can keep working on our images if we ever stop using Lightroom. I think one of the main reasons that people don't like to use Lightroom or maybe avoid throwing all their images into it, is they feel like they're giving up the control. They don't wanna lock themselves into using Lightroom forever. And I completely understand that. One of the best things that we can do is build XMP Sidecar files, so that we can keep working on our images in Photoshop or another image editing application that can work with XMPs. When we do this, it ensures that if we ever switch away from Lightroom, our edit information is still stored in a sidecar file. To turn on XMP sidecar files, I like to come up to the Lightroom menu and choose catalog settings. From the catalog settings menu, come to metadata, and then choose automatically write changes into XMP. Now again, what this does for us is it saves our image edits not just in the Lightroom catalog, but also creates these sidecar files that let Photoshop, for example, keep working on the images. It doesn't really take up a lot of extra space or anything and is a good way to future proof our workflow. Now one last thing that I want to touch on is basically the system of how Lightroom's catalogue works. This is another big question. Question mark for a lot of people who are getting started with Lightroom, because it's not like some traditional photo editors. If I come to the develop module, real quick, I wanna show you one key thing that sets Lightroom apart, even though we're not into this part of the tutorial. As I drag sliders like exposure to adjust the lighting in the image, we're not actually making changes to the original image. And what I mean by that, is this is basically just simulating what the image will look like if we drag or modify any of these sliders. It's not saving the file as we go. In this way we call Lightroom a non destructive editor. The edits are saved in the catalog but when we're pulling the sliders the original file isn't being modified. Because of that we can keep pulling the sliders and changing the image as many times as we want without destructing the original file. Now, when we make those changes, like I said, the original image isn't being changed on the hard drive. And to get this version of the image after we've applied our edits out of Lightroom, we have to run an export. So, as we're pulling these settings, I like to think of it a lot of times as just running a preview of what we're gonna do to the image, and then when we export it we actually get a finished product. Now we'll talk about all this in detail as we progress through this course, but the key thing here is that Lightroom's catalog system is designed not to harm your original images or reduce the quality. And I think that that's the key advantage of using Lightroom. We can always come back later in the future and change our settings and apply different edit styles without any quality loss to the original image.


