
 Lessons: 18Length: 1.8 hours
- Overview
- Transcript
2.5 Find and Filter
After you’ve spent the last few lessons adding metadata to your images, learn how to filter and find your images using that same metadata.
Related Links
1.Consolidate and Import
1.1Introduction01:00
1.2The Ideal Configuration03:05
1.3Import Your Images11:00
1.4Customize Lightroom's Appearance09:17
1.5A Flexible Workflow06:35
2.Manage Your Collection
2.1Collections and Culling10:18
2.2Star Ratings and Color Labels04:31
2.3Keyword Tagging05:39
2.4People Tags02:56
2.5Find and Filter04:07
3.Correct and Perfect
3.1Essentials of Image Correction06:45
3.2Image Adjustment10:02
3.3Correct Your Crop04:15
3.4Batch Processes Made Easy06:13
3.5Photomerge: HDR and Panorama04:43
3.6Spot Correction08:43
4.Out of Lightroom
4.1Concluding the Edit05:43
5.A Holistic Workflow
5.1Make Lightroom Work for You04:06
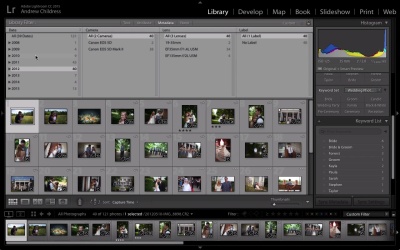
2.5 Find and Filter
As we begin to wrap the metadata section of this course that helps us get our library in order, I want to come back to kind of this key concept of first adding metadata, and then filtering based on it to find exactly the images that we're looking for. And in this lesson I gonna show you some advanced features about how we can filter through our images. We're working in the library module, and I wanna go ahead and show the filter bar by going to the view menu, and choosing show filter bar. We can also press the backslash to show this menu. Now this looks like a lot like the filter bar down here that we're already been working with earlier. But there's some other options available here. The default options that we see are ones that we're already accustomed to such as filtering based on flag status, rating, or color label. But there are some other options here about how we can filter. Let's try clicking text. You can see here one of the things that comes up is basically the option to search our image catalog. And that search can be any of a number of things. We can search based on the file name. We can search based on keywords that are attached. We could search based on the title of the image. So effectively, we have a mini search engine built into Lightroom right off the bat that allows us to search based on keywords or file names, or basically any text that's attached to the image. But what I really want to focus on here is the metadata filtering options. So let's click metadata. Now right away, we're hit with a lot of different options here, about how we can working through our images. And you'll see here that we basically have some different columns that allow us to filter images in ways that we haven't looked at yet. I'm gonna clean this up a little bit by hiding this panel to give us a little more room to work. So by default, it's gonna pull in some columns such as date. And if we click one of these year drop downs, we're gonna see descending levels of organization such as the months. So with this option what we can do is filter based on to the capture date of images. And you can see here I can click through a few different options to show when images were captured. So if you're looking for images that were captured in all of 2010 for example, I can easily click it and it'll instantly pull all the images in my catalog that were shot that year. You can also expand those menus out to search for all images of January 2010 or October 2010 and then break it to another level by clicking that drop down arrow. So, if this kind of filtering option allows us to search our images in new ways. And you can see here that there are other columns pulled in by default for other fields such as the camera that the image was captured with, or the lens, or the label attached. But even beyond that there are more options about how we can filter our images. If we hover over the title of one of these columns such as this date right here, you can see here that there are tons of options about how we can filter. And those can be kind of our standard filtering options that we've already talked about, such as flagged status or star rating. Or there are other options, such as the shutter speed or aperture that we've captured with an image. We can even filter for things such as smart preview status, such as if an image has a smart preview or not. And again, the key here is not that you need to know how to use all of these but if you have a special request for an image in a large catalog, and you're looking for it, you have these advance filtering options for how we can pull them. So if I want to do a quick roundup of images that were shot with my 5D Mark III, I can simply click it and they'll instantly be pulled. These filters aren't gonna necessarily be features that you use each and every day, but they can really save you when you need to find a specific image. So again, we can show the filtering bar by accessing the view menu and choosing show filter bar. And hide it in the same way, or press the backslash to show or hide it. Then choose filtering options from either the text, attribute, or metadata boxes. And then any of a number of fields to filter our image for exactly what we're looking for. And throughout this metadata section, that's what I hope that you've learned. When your image collection grows, it can be become really difficult to find exactly what you're looking for. You wanna capture lots of images as a photographer and build that library as large as possible. But you also need to implement some metadata filtering options to really help you find exactly the ones that you need.


