
 Lessons: 18Length: 1.8 hours
- Overview
- Transcript
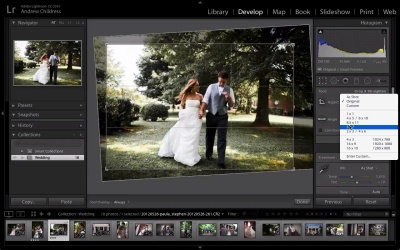
3.3 Correct Your Crop
Arguably the quickest way to improve an image is to apply a stronger crop. Learn more about Lightroom's effortless crop tools to improve your composition even after the shot is captured.
1.Consolidate and Import
1.1Introduction01:00
1.2The Ideal Configuration03:05
1.3Import Your Images11:00
1.4Customize Lightroom's Appearance09:17
1.5A Flexible Workflow06:35
2.Manage Your Collection
2.1Collections and Culling10:18
2.2Star Ratings and Color Labels04:31
2.3Keyword Tagging05:39
2.4People Tags02:56
2.5Find and Filter04:07
3.Correct and Perfect
3.1Essentials of Image Correction06:45
3.2Image Adjustment10:02
3.3Correct Your Crop04:15
3.4Batch Processes Made Easy06:13
3.5Photomerge: HDR and Panorama04:43
3.6Spot Correction08:43
4.Out of Lightroom
4.1Concluding the Edit05:43
5.A Holistic Workflow
5.1Make Lightroom Work for You04:06
3.3 Correct Your Crop
So we've gone through almost the panels on the right side of the develop module that allow us to edit and control our images. And I want to talk now about what I think may be the most important part of refining an image and that's the crop. To enter the crop mode I want to go ahead and press R on the keyboard or we can press this icon just below the histogram. Now when I enter crop mode there's this overlay that comes up and it's designed to simulate the rule of thirds. The rule that says we should place the exciting parts of the image at the intersection of those lines. That doesn't apply to every image, but it can certainly be a good starting point about how we want to crop our image. So the first thing that I almost always will correct in an image is counter correct for the till. That's not to say that I don't want any till in any image, but if we want to correct for it I'm going to go ahead and place my mouse cursor over here and you can see it turns into kind of this double arrow. If I click and then drag either up or down, it corrects the image by refining that crop in either direction. So once I get it the way I want I can press R to leave the crop tool, and now I've straightened my image. Now, the non-destructive part of Lightroom's really helpful with cropping because we can always toggle in and out of crop mode by pressing R on our keyboard and refine that crop just as many times as we want. So if we want to refine not just the tilt on an image but also you know, which parts of the image we're using, the way that I like to do it is to kind of grab one of the corners of the image and drag it down. One of the dangerous things about doing this is that our crop can turn into lots of crazy shapes if we're not being careful. If we're trying to maintain the same aspect ratio, or basically the same shape of the image as our original, we want to take a look at this aspect part of the crop panel, which is now popped up over on the right side. For aspect I'm going to set it to original and then lock this. When I lock it, if I start dragging the size of the window, it's locked. It doesn't just jump to any size or shape that we want it to. And I highly recommend leaving that on so that you don't get crazy crop shapes. Now the original aspect ratio is just one option we have, but there are lots of others. If we want to crop to specific shape like a one to one like a square post, we can easily do that by picking that from the drop down as well. There are other options such as 4, 3 or 16, 9 that really come in handy if you've got a specific purpose that you want your final image to go to. It helps us simulate kind of that final crop shape by choosing one of these custom aspect ratios. This is a really useful option when we're trying to print for a custom size. And if we want to just draw in our own custom crop, we can always choose custom, unlock this, and then click this icon to just drag your own custom crop into the frame. No rules apply in that mode. And once we press R, we'll leave the crop option and have a newly cropped image. So cropping is really one of those important tools for refining the way you want your final image to appear and Lightroom gives us allot of options about how to do it. Be careful to set your aspect to original though to maintain the same shape as your original image, unless you're going for something custom. The last thing I want to turn your attention to in the crop option is the option to change up the overlay or basically these lines that are showing on top of the image. While we have the crop tool open if we press the letter O on our keyboard we get all kinds of different crop options for ways we can crop our image. These are just guides that we can use to follow different composition styles, and they can make us think of our images in lots of different ways. This is the golden ratio that allows us to place our image at the heart of that spiral, for what some believe to be the perfect crop. One of my favorite ones is this last one though, that allows you to simulate lots of different shapes about how an image will show. You probably already know that if you print a 4 X 6 for example, it's a different shape than your original image, and this 2 X 3 box helps us simulate that. So, if you have a client that might print your image to a 4 X 6, this tool's really option to make sure the image will look great. Both in this 2 X 3 crop, or a 4 X 5, which could be like an 8 X 10, or a 5 X 7 option. In all, light room brings us a lot of different crop tools that help us nail our composition, even after the image has been captured.


