
 Lessons: 18Length: 1.8 hours
- Overview
- Transcript
4.1 Concluding the Edit
Lightroom holds your work in a database; to use your images outside Lightroom you’ll need to export them. In this lesson you’ll learn about Lightroom’s options for exporting images, including quality settings and renaming.
Related Links
1.Consolidate and Import
1.1Introduction01:00
1.2The Ideal Configuration03:05
1.3Import Your Images11:00
1.4Customize Lightroom's Appearance09:17
1.5A Flexible Workflow06:35
2.Manage Your Collection
2.1Collections and Culling10:18
2.2Star Ratings and Color Labels04:31
2.3Keyword Tagging05:39
2.4People Tags02:56
2.5Find and Filter04:07
3.Correct and Perfect
3.1Essentials of Image Correction06:45
3.2Image Adjustment10:02
3.3Correct Your Crop04:15
3.4Batch Processes Made Easy06:13
3.5Photomerge: HDR and Panorama04:43
3.6Spot Correction08:43
4.Out of Lightroom
4.1Concluding the Edit05:43
5.A Holistic Workflow
5.1Make Lightroom Work for You04:06
4.1 Concluding the Edit
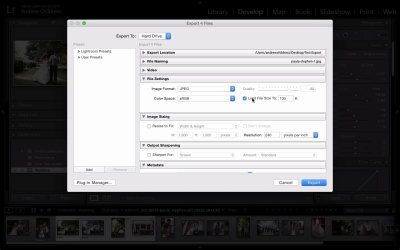
One of my favorite things about a well maintained digital library, is that we can find the images we need really quickly. With the metadata that we've added, it's easy to select the images for export, when a client calls us with an urgent request. However, exporting those images can be tricky. We'll need to understand where the image will be used, whether that's in print or on the web and the resolution and quality that the client's asking for. The last section of our Lightroom for photographers course is all about that final step, the delivery. We'll learn how to get images out of our Lightroom catalog and deliver no matter the request. All throughout the course, the changes that we've been making in Lightroom are clearly housed just inside of the catalog, and as we discussed earlier, when we want to get our edits out of Lightroom, we need to run an export. So, in this lesson, I'm going to show you how to export your images. The first thing we'll do is run through a quick and easy export then a move complex one. To get started with exporting, first pick the images that you wish to export. You can either select all of the images, such as in a collection, with an edit, select all, or you can choose any number of images by holding command on your keyboard or control on Windows and choosing a series of images. I picked these four images to export. Next, I'll control-click or right click on Windows. Then choose export, export. What pops up is a window with a lot of options about how we can export. So let's just go panel by panel. The first of these is the export location which is simply where we're going to send our finished images. I'm just going to go ahead and choose the desktop. >> And I'm going to put it in the sub folder titled "Test Export". So if you put in sub folder, it's basically going to create a new folder to put all your exports in. Let's go ahead and collapse that. Now, in the file naming section, we can apply certain custom rename rules as we export. So if we wanna rename, we can either choose one of the many templates that are built in or we can pick one that includes a custom name so that we can choose a custom naming option. I often pick custom name sequence for an export and put the client's name. So if I do that, I might pick the client's name and then make sure that a number is added after the fact. You can also untick the rename box in order to just do a basic export with no renames. Now in the file settings box, we can basically pick out the quality of the image that we're exporting. From the format list, we'll often do a jpeg if it's headed for web, print, or email. And the quality slider really depends on your target use case. I very rarely will set it to 100, but might set it to 80 if it's going online and 60 if it's for something very small or temporary. We can also tick the box to limit the file size if we'd rather do that option. This will make sure your image files aren't larger than whatever size you set. So if you're attempting to keep them a certain size, you can always tick this box and it will keep you from going over that, and you won't have to think about the quality slider. For Color Space, I always leave this set to SRGB if I'm exporting for the web. Next up, the Image Sizing box is all about the dimensions of the finished image. We can either leave this unticked and not apply a resize on export or tick it, and choose one of the number of options. Most often what I like to do is pick Long Edge and choose basically the size of the image on the longest edge when we export. So if I pick something like a thousand pixels, the exported images won't be longer than a thousand pixels on the long side, whether they're portrait or landscape. Resolution is relevant when printing images but it doesn't matter if you're going to keep it in digital. If you've not applied any sharpening already, it's not a bad idea to tick the sharpen for screen option, again, if it's headed for the web. Metadata water marking and post processing are advanced export options that you probably won't need on each and every export. So we've picked all of the basic settings and you can recap here to see that it gets a basic export name, a file size of JPEG 80% quality, and resize the long edge to 1,000 pixels. And once we press export, Lightroom will spend a few seconds crunching those images and then send them out to the folder that we specified. And if I flip over to finder, you can see here that it's exported them now. Let's return to the export dialogue real briefly just to check out some advanced options that you might want to use. Again, I'll go to export, export. And one of my favorite things to do here is to build export presets that are really handy so that you can save settings for later. So let's say that we wanna just kinda stick to the settings we just chose, but keep the image size a lot larger. Before, we were resizing to 1,000 pixels, but let's say we want to export for archive type purposes or for printing. We'll resize to 2500 pixels, set the resolution to 324 pixels per inch, which is a great resolution for printing, and we will tick "Don't Enlarge" just in case the original image isn't as large as the target size. That will make sure we don't get a distorted image in the end. And finally, we'll come back to our file settings and take the quality up to something more like 90. Now these settings can be whatever you want but the key here is that I want to show you how to use a preset. Now these are different than the develop module presets that we've looked at before and instead they're presets for saving these export settings. If I click add on the left side I can say, Print Preset. And then coming back and using this preset later will pull all of these same settings back into play. So what I'll encourage you to do is check out the built in presets such as, for email, which is like a really small image size, and also build out some of your own presets based on your client needs and your export needs. This is going to save you a lot of time later on.


