
 Lessons: 18Length: 1.8 hours
- Overview
- Transcript
1.3 Import Your Images
You must import images into the catalog before you can work with them in Adobe Lightroom. In this lesson you will learn how to perform a successful import from start to finish, including the rename and organization options.
Related Links
1.Consolidate and Import
1.1Introduction01:00
1.2The Ideal Configuration03:05
1.3Import Your Images11:00
1.4Customize Lightroom's Appearance09:17
1.5A Flexible Workflow06:35
2.Manage Your Collection
2.1Collections and Culling10:18
2.2Star Ratings and Color Labels04:31
2.3Keyword Tagging05:39
2.4People Tags02:56
2.5Find and Filter04:07
3.Correct and Perfect
3.1Essentials of Image Correction06:45
3.2Image Adjustment10:02
3.3Correct Your Crop04:15
3.4Batch Processes Made Easy06:13
3.5Photomerge: HDR and Panorama04:43
3.6Spot Correction08:43
4.Out of Lightroom
4.1Concluding the Edit05:43
5.A Holistic Workflow
5.1Make Lightroom Work for You04:06
1.3 Import Your Images
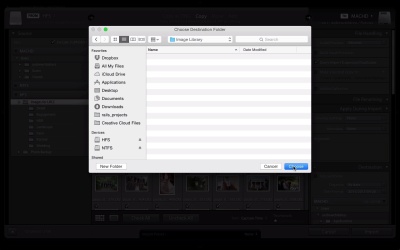
In the first few lessons, we wanna tackle the challenge of how best to store our images. Every photographer has some level of anxiety about organizing and keeping their images safe and sound. Our first section will help you design a system, or a set of repeated steps, for getting our images imported and organized. To get started working with images in Lightroom, we have to import them into the catalog that we're currently using. Now, I highly recommend working with your own collection of images as you work through this course. Because working with your own set of images is gonna help you tame that collection. And also, it's always best to learn on your own images. But if you're looking to learn Lightroom and don't have images at the ready, there's going to be a link in the notes to this video that has some open source images that you can use for your own learnings. The import dialog has a lot of different features and options, and I usually am working in the Library module when I use it. So I'm gonna go ahead and click Import. And you can see here that this is a pretty big window with a lot of options. And we're gonna work through it one by one, so that you know how to import your images, just the way you want. Importing them will bring them into Lightroom so that we can do all other parts of our workflow with the images. Now, the best way to think of this screen is as working from left to right, like you're reading a book. I almost always start on the left side where I set my first option and that is actually telling Lightroom which images we want to bring in. You can see here that basically what's going on is this is a file browser and we can click through our different folders and look through different images to bring in. But, ultimately, what we want to do is go ahead and point Lightroom to the images that are on my external hard drive. So this MACHD is my internal hard drive that's on my Mac and I have NTFS and HFS which are external drives that I've plugged into my Mac. Now as I talked about earlier, I really think it's best to keep your images on this external drive. But the point here is to just show Lightroom which images you wanna bring in. So I'm gonna go ahead and point it to my HFS drive and use this folder of images that I've carved out specifically for this tutorial. And I want to make sure that I've ticked include subfolders. So if I click include subfolders, if there are any folders inside of the folder I've selected, it'll also bring all of those in. If I untick this, it'll only bring in the images that are in kind of this base folder. So with include subfolders ticked, it's going to bring in the images inside of detail, engagement, hdr, etcetera, etcetera. Now, in the center part of the import dialog, we kinda get to choose the images and what we want to do with them. And there are really three key options here about how we wanna bring our images in. We can either copy, move, or add images. Now, if we copy images, it's gonna preserve the original file, but also duplicate it and place those same files somewhere else. So with copy it's kind of like copying and pasting the images you have. You wind up with two copies when you're finished. With move it's similar to copy in that we're taking the images and putting them in a new location, but the original ones aren't preserved. So it just takes images from folder A and moves them to folder B. And with Add, what Lightroom does, is it leaves the images untouched, as to where they're located. It just brings them into the catalog. So if your images are already sorted and organized as to which folder they're in, Add is a great option that leaves your folders untouched, and just adds the images into Lightroom. Now for the purposes of this tutorial, I'm gonna use the copy option so that I can show you some of the features about how we can rename images and get them reorganized as we're pulling them in. Now another option we have in this center panel is either all photos or new photos. And they're pretty self explanatory. If we choose all photo's it's going to copy all of the images that are selected below. And if we choose new photos it's going to filter to just the ones that don't already exist in our target location. So, I'm going to bring in all photos, and I'm also going to make sure that don't report suspected duplicates is checked. That's really the best of both worlds because it makes sure that we get all of the images. But if there any duplicates if won't double them up in Lightroom. Now in this same center panel we can selectively choose which images we want to bring in. These checkboxes show which of the images are set to be imported, and if I check them or uncheck them selectively it will just chose those images to bring along for the import. We can also Uncheck All and then chose one by one which ones we wanna bring in. We can also change up the view and view simply one image at a time. In the group view, we can also change up how we want the images sorted, such as when they were captured and we can modify the thumbnail size to get a better view of which images we are bringing in. So this screen is really designed to help us tame the import process. It helps us get a quick look at which images are coming into Lightroom. It helps us select them one by one and ultimately in that way this center panel is really the key part of the import dialog because you're basically choosing which images you wanna bring in. And finally on the right side we're gonna choose where our images are copied to. The first thing that we need to do is pick the drive that we want them to go to. I'm gonna click the MACHD that's selected by default and choose other destination. I'm gonna point Lightroom to the same HFS drive that we are pulling our images from and just create a new folder called Image Library. Now, you can obviously tailor this setup however you want. I'm just doing this for the purpose of this tutorial. And I'm going to use this as an example of how you can kind of create a new workspace for your images just by carving out a new folder and starting from scratch basically. When I click Create and click Chose, it's now pointing to that Image Library folder that we just selected. But again, you can really choose anywhere on your computer or any external hard drive where you want your images to go. Now, as we work our way down these panels on the right side, or these sections with the arrows next to them, they all change how our images are copied to our new location. So let's just go panel by panel and I'm gonna talk you through some of the options. In the file handling panel we have some options about how we want to bring our images in, such as how we want to build previews. Now we can build larger previews such a Standard or 1:1, but they take up more space. So for now, I'm gonna encourage to just leave that set to minimal. We're also going to talk about Smart Previews more later, so let's leave that unchecked for now as well. We're gonna leave, Don't Import Suspected Duplicates ticked. And we're not gonna choose Make a Second Copy or Add to Collection. So that pretty much knocks out the File Handling panel. Now, the next panel is the File Renaming panel and this may be something that's on your wish list. As you can see from my images below, my images aren't named consistently. Some have client names, some are the names of the files just as the camera put them out, and basically they're just a mess as to how they're named. So with the File Renaming panel, which is totally optional, we can choose how we wanna rename our image files. If I tick rename files, the template drop down gives us lots of different options about how we wanna rename images. And one of the options is that we use a date-file name setup, and if I do that, what it's gonna do is it's gonna apply the date that the image was captured, then a dash, then the original file name. That's what I'm gonna use as the template for this tutorial, but there are plenty of other options that you can explore more deeply from that template dropdown. You can even use an option such as Custom Name- Sequence and drop in your own custom text such as Andrew, for example. I'm gonna go ahead and change that back to Date-Filename. The key thing there is that with file renaming, you can use it to kind of tame your collection and apply a consistent set of file names across your entire Image Library. The Apply During Import panel are basically options and settings that we can apply while we're importing our images. We'll take a little closer look later on in this series so that we can see how to automate and batch some of our options as we import. Now, finally, the destination folder is basically another set of options about where images are moved to. We can tick the into subfolder option to just drop in a new folder, and basically it'll put all of the images inside of that one folder. And in the organize section, we can actually choose how we want to organize our images as we go. So if we want to put them all into different folders by date we could leave by date checked and then choose from a number of different date format options. So if I leave this the way it is, what it's gonna do basically, is it's gonna put each image into a folder based on the date that it was captured. So, I'm gonna go ahead and leave that as my set of options because I really like how it's gonna organize those. It's gonna really clean them up and get them into individualized folders that are organized according to date, which is a big improvement over my current set up. Now after I clicked the MACHD to collapse that, it updated where the images are gonna be copied to based on what we set up here. So here's basically the mock up of how images are gonna come in to the new setup. So when they're copied these are basically the new folders that are all gonna be created. You could see here that they're kinda grayed out and outlined and have these plus signs. That's basically Lightroom simulating the new folders that are gonna be created. I know this is a lot to think about and it's a lot of options but let's just kinda recap the basics of the Copy section. We chose where we wanted to put images up here with the drive. We chose some basic rename options for the individual files themselves. And then, in the destination panel, we can see how the images are gonna be sorted into individualized folders. So, just take it step by step and think in terms of those main options. And keep in mind, that if you don't want to mess with any of these options about renaming and organizing, you can always do an add and not move or copy the images at all. But I wanted to run through that structure so that you can see how you can begin taming your collection. If you have thousands or even tens of thousands of images, some of these advanced options like renaming and organizing into a certain folder structures are really a life saver as your image collection grows. So that's about it for the import panel. Again, we're gonna work in the import panel from left to right. We choose first which images we want to bring in on the left side, which images we want to bring in, in the center panel. And on the right side some advanced options about how they'll be organized and brought in. So I'm gonna go ahead and press Import and let Lightroom do its job. So a few minutes later, Lightroom finishes processing the import and getting the previews built. And if we go over to the hard drive, I'll illustrate here what that Copy action did. The images for LRCC were the folders that I had of the images I wanted to use for this course, and we sorted them into this Image Library folder. So, just like Library mocked up for us, you can see here that it created this whole tree structure of images based on our reorganization rules. And those reorganization rules can be changed on the same import dialog we were looking at just a minute ago. So again the key here is that we can use these rename and organization options to obtain even a mature collection into a well groomed one.


