
 Lessons: 18Length: 1.8 hours
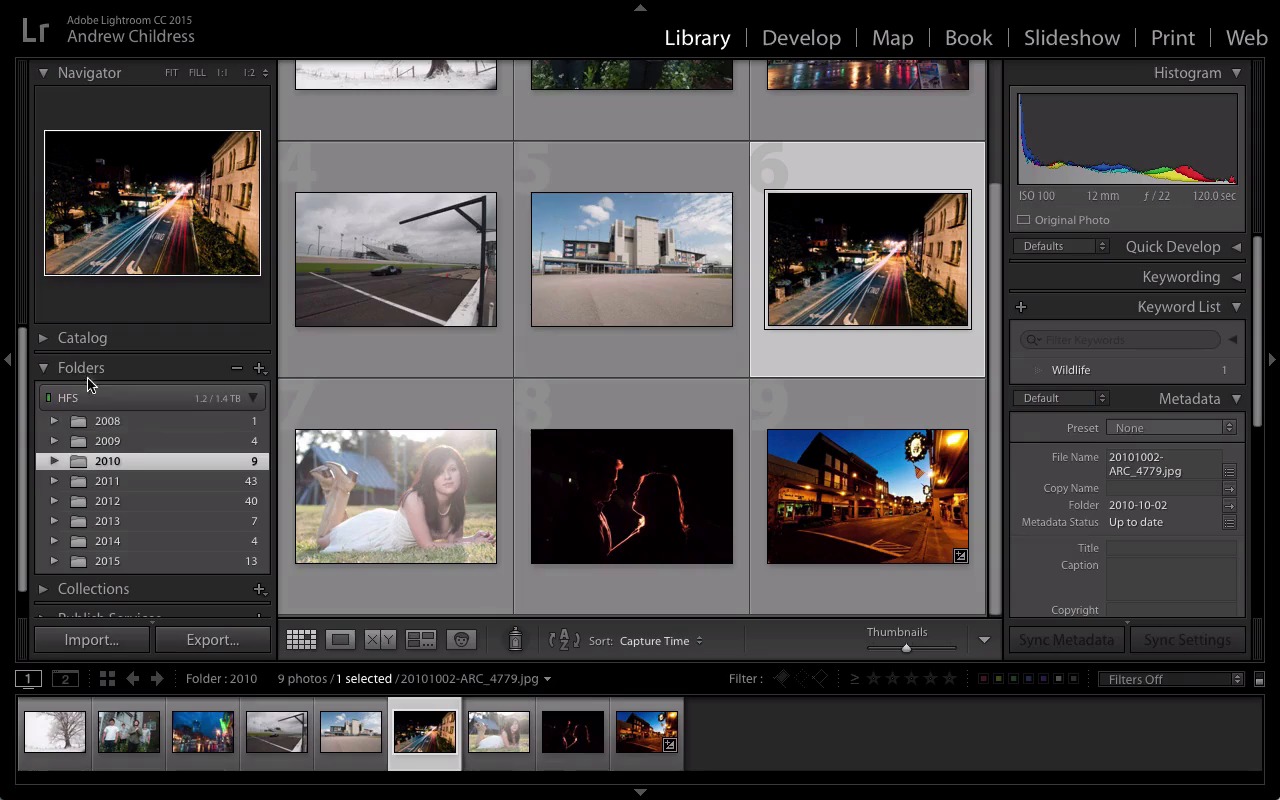
- Overview
- Transcript
1.4 Customize Lightroom's Appearance
You'll spend plenty of time in Adobe Lightroom, so customization is a must. You'll learn how to hide and show panels, leaving more room to work with your images.
1.Consolidate and Import
1.1Introduction01:00
1.2The Ideal Configuration03:05
1.3Import Your Images11:00
1.4Customize Lightroom's Appearance09:17
1.5A Flexible Workflow06:35
2.Manage Your Collection
2.1Collections and Culling10:18
2.2Star Ratings and Color Labels04:31
2.3Keyword Tagging05:39
2.4People Tags02:56
2.5Find and Filter04:07
3.Correct and Perfect
3.1Essentials of Image Correction06:45
3.2Image Adjustment10:02
3.3Correct Your Crop04:15
3.4Batch Processes Made Easy06:13
3.5Photomerge: HDR and Panorama04:43
3.6Spot Correction08:43
4.Out of Lightroom
4.1Concluding the Edit05:43
5.A Holistic Workflow
5.1Make Lightroom Work for You04:06
1.4 Customize Lightroom's Appearance
As we continue navigating Lightroom for Photographers, I wannna spend an entire lesson learning to think how Lightroom thinks and navigating the application. We're gonna tweak our views so that we can make sure you're always working in the most efficient setup. I think one of the reasons that sometimes people get hung up and don't learn how to use Lightroom completely is they try to self-teach, and they gloss over kinda the big picture of the application and how it works, so let's go ahead and let's get started at the top. In the upper right of the application, we have the listing of the modules that are part of Lightroom. Now, Adobe has all these different modules that help us interact with our images in completely different ways, and in this lesson, we're gonna just be working in the Library module, and later on we're gonna work with the Develop module, but there are, as you can see, a number of different ones that let you interact with your images in different ways, such as mapping your images, printing photo books, creating slide shows, printing your images, and even making web galleries, but these are all basically different workspaces that allow us to interact with our images. So we talked earlier about switching to full screen mode, so that we have as much room as possible to work, but if you've forgotten where that is, that's under the window menu, and then we can choose screen mode, full screen, and I really like that, just to have the most possible space to work with our images. So Lightroom is made up of panels inside of the modules, and we already saw panels in the import dialogue, the different boxes of how we change the import settings, and each of these modules is built up of different panels that fit together that allow you to interact with images in that way, so the Library module is gonna have panels that are geared towards taming your photo collection. There are also some panels that span all the different modules, like the Navigator, for example, which you can see up here. So, these panels, you can always show or hide them by clicking on the name, and they'll either break down and collapse or expand. So, in the Navigator module, what we can do is basically change the way that we move though an image, so, if I pull up an image with a lot of resolution to it, you can see here, we may want to zoom in on this and work with it in some different ways. By default, Lightroom is gonna show the image in a fit mode, and that basically just shows the whole image in the center panel, and the center panel is where we're usually working with an image or a set of images. If I choose fill, it's going to basically fill it in on one side. Now, on the Navigator, you can see this white box that outlines the part of the image that's in the center view, and we can even drag the box around to navigate it over the image. Now, there are other options in the view settings, like a one-to-one which basically gives us pixel level detail, or various settings such as three-to-one, which will go even deeper then that, and clicking the drop-down arrow will let us navigate the image at a variety of sizes, as small as one sixteenth and as tight as an eleven to one ratio. So basically this Navigator panel is really handy for kinda moving around and navigating our images. Now, in the center panel, one option that you're seeing right now is the metadata overlay, and that will show us what date the image was captured, the pixel dimensions, and you can cycle it on and off just by pressing the letter i on your keyboard. Now, when I press it once, it's gonna go ahead and show some more details about the lens, and the shutter speed, and the aperture were being used. And if I press it again, it's going to disappear completely. So those are just some basic different ways we can kinda interact with the Navigator and what's shown on the image. Now, the catalog panel has kinda some quick options about how we can navigate the images that are in our catalog, so we can switch between the all photographs view, quick collection, which we'll talk a little more about later, and the previous imports, so sometimes if you've just brought new images into Lightroom, it's really handy to click this previous import, and you can immediately switch to just the last set of images you brought in. Let's go ahead and collapse the catalog panel, and show the folders panel. The folders panel helps us see where our images are stored on our hard drive. So you remember, earlier, as we were importing, I put them on the HFS drive and it built these date folders inside of it. So the folders panel is gonna show basically where our images are stored on the hard drive itself, and only if the images are in the Lightroom catalog does it show up in the folders view. It's not gonna by default show all the hard drives that are connected to the computer, but instead, if an image is in the Lightroom catalog, it's gonna show in the folders panel, in regards to the folder that it's stored in. And we can break apart these folders and choose individualized folders to see what images are actually stored in them, so this is basically a file browser inside of Lightroom, which can definitely get handy at times. As I collapse the folders panel, we'll move on to the collections panel, which is something we're gonna explore later. Collections are like virtual folders for our images. They aren't folders that are on our hard drive, but they are ways that we can organize images within Lightroom, and the publish services panel is not one we're gonna cover in this course, but But you can push images directly to different services like Facebook or Flickr, as you can see. So if we want to hide kind of this whole collection of panels, there's this arrow that you can see on the left side, and if I click it, it's gonna make the whole, basically, stack of panel will disappear, and clicking it again will bring it back, and that applies to both of these sides. So if you're trying to get some extra screen real estate to work with, very handy tip to hide away those panels, and I'll give you a great keyboard shortcut to do that as well, and that's tab, which will make both of them disappear. You can bring them back temporarily just by hovering over top. So it's these types of little tricks that really help me work more efficiently in Lightroom, and it's worth taking the time to learn so that you can use them and navigate your collection more effectively. So right now I wanna recap with something we talked about with folders. You could see down here I've got just a small set of the images selected, and you might be wondering hey, where did the rest of my images go? If we wanna jump back and basically pull all of our images back, we can always drop down the catalogs panel and choose all photographs, and it will bring them all back. I've had clients and people I edit for panic at times when they accidentally filter down on images and then can't get back up top, so that's a great little quick tip for how you can navigate which images are being shown. Now, as we move along, one of the key things here that I've kind of been dancing around is the film strip, which is at the bottom. Really key part of Lightroom, this film strip. It shows images at the bottom of the screen that you're currently working with, so if we are working in a folder, it will only show the images in that folder, like I was just showing you. But this film strip, which you can actually change the size of by clicking and dragging up right here on this break line, helps me kinda navigate throughout the various modules of Lightroom, and whether I'm working in the library module or the develop module the film strip is gonna be present. So you can always scroll from left to right here to see kinda all of the images that are in your collection that you're working with, and selecting one will change which one is selected in this center panel. To wrap up our initial walkthrough of the Lightroom Library module, I wanna take you through a few different options about how we can view and interact with our images. Right now, we're in Grid view, which is the default view, but we can change between a number of different views that change how we interact with our images. We can do that by clicking some of these icons on the toolbar. Now, if your toolbar isn't already showing, press T on the keyboard to toggle it on or off. Now, by default, like I said, we're in the Grid view right here, and we can change the number of images that are showing with the thumbnail slider. That thumbnail slider either increases or decreases the size of the thumbnail, and effectively changes the number of images that are shown on screen. Now, if we want a single-image up close and personal look, we can double click on any of these images to enter the Loupe view, or we can press E on our keyboard or even click this second icon to enter into it from the Grid view. When we're in Loupe view, we can concentrate on just one image at a time. If we wanna compare images and maybe choose which of two are our favorites, we can use the Compare view, this XY icon right here. Now, when we're in Compare view, we can choose between two images that we might wanna deliver to a client, and, basically, having them side by side can maybe help us determine which one is our favorite. And, finally, similar to that is Survey view, which is going to get several images up at once. And, if I shift-click a series of images, it shows them all at once, or I can control-click on Windows or command-click on Mac to select non-sequenced series of images and show them all at the same time. Now, the last icon is for facial tagging, and we'll talk a little bit more about that later, but these are kinda the basic views of how we can interact with our images, and each one is gonna serve us differently, depending on how we're working. The Grid view might be really useful when we're trying to pick out our favorite images from the set, and the Loupe view might be really more useful when we're trying to work just one-on-one with an image and choose our absolute favorites, and in that way, Lightroom is a flexible tool. We can start with a number of different objectives and use the different views to help us meet them.


