
 Lessons: 19Length: 2.6 hours
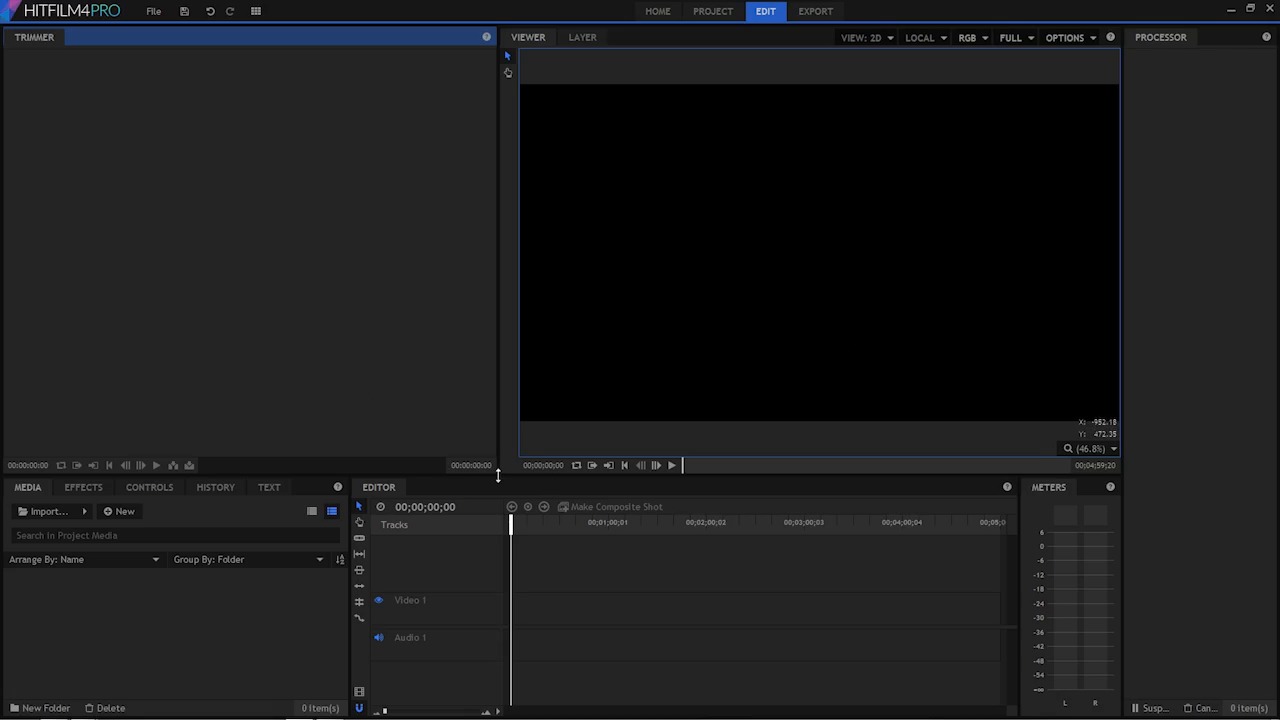
- Overview
- Transcript
2.2 A Quick Tour of HitFilm
I am sure you want to start editing right away, but before we do, we’ll take a tour of the parts of your non-linear editor. This will help you to follow along as you move through this course.
Related Links
1.Introduction
1.1Introduction01:10
1.2What You Need05:03
2.Getting Started
2.1File Structure09:39
2.2A Quick Tour of HitFilm09:30
2.3Import and Organize09:53
3.Set Up Your Project
3.1Proxies and Transcoding09:24
3.2What Is Video Editing?09:50
4.Editing Basics
4.1The First Cuts Are the Deepest10:02
4.2Add Clips to the Timeline07:37
4.3Refine the Edit, Part 110:20
4.4Refine the Edit, Part 208:51
4.5Add a Cutaway Shot08:19
4.6Build on the Basic Edit12:37
5.After the Edit
5.1Color Correct and Grade09:39
5.2Sweeten the Audio08:03
5.3Video Effects and Transitions08:53
5.4Export04:35
5.5Compression09:06
6.Conclusion
6.1Conclusion01:08
2.2 A Quick Tour of HitFilm
Before we jump in and talk about the nuts and bolts of video editing, it'll be good to get a tour of the interface that you'll be working with for the rest of this course. That way, it'll be easy for you to follow along, as you move through the rest of the lessons in this course. So the editor that I have open here is HitFilm and specifically this is HitFilm 4 Pro. Now, there is another version of HitFilm it's called, HitFilm 3 Express, I'm gonna be demoing the Pro version because it has everything and I can give you a little taste of what this application has to offer. So when you first open it up, you're presented with this screen right here. And we have a list of some previous projects over here. You have an option to create a new project or open a previous project. There are four tabs, right in the middle here. The home one is activated at the start, but once you open up a project, you'll be able to switch between these different tabs here. But what I'm gonna do first is start a new project. So I'm gonna click the New button, right here. This brings me to the project settings window. And this is where you basically set up the parameters for your project. Now, you don't really need to get too specific here, because this is something that you can go back and modify later. In this dropdown list here, there are a bunch of presets. A couple of things to note here. There's a few presets up at the top here. 1080p Full HD at 24 frames per second. Frames per second is something that can get a little bit confusing, because if you shot all your footage at 24 frames per second on a particular camera, you would think, I wanna choose this setting right here. So if I click that right there, you'll see it is indeed 1920 by 1080, that's the Full HD resolution. But on the fine memory it says 24. Now, you may be thinking that 24 frames per second is actually 24 frames per second. And this option right here with a frame rate of 24 will give you literally 24 frames a second. The problem is though, some cameras when they're set to 24p, actually record at 23.976 frames a second. You don't really have to understand why, but if you have a camera that's marked 24p or 24f, or something like that, you may just wanna look in the specifications to see what is actually shooting. Again, it's not a huge deal either way, but it's best to match up your project to the footage that you are working with. Now, you can work on multiple resolutions of footage. Maybe you have some ST footage some 4K footage, that's gonna be no problem. Most of my footage happens to be 1080p at 23.976 frames a second. So I'm going to change this and I've already created a template, and I've named it 1080 23.976, and it's actually called up that preset there. So, that's basically it for the video options here. Under audio, the only option is really sample rate, and 48 kilohertz, or 48,000 hertz, is the standard for video. Unless you're shooting with some gear that records really high resolution audio, 48 kilohertz is the one you wanna be on. Under rendering, we have some options for color depth, anti-aliasing mode, reflection map size, most of this is going to be dealing with the compositing side and the 3D side and the. Motion graphics side of this application. That's not something we're really going to get into in this course, so we really don't have to worry about this, but again, this is something you can go and change later. Finally, we have two options, one will take you to the compositing timeline and the other one will take you to the editing timeline, but again, it doesn't really matter because you can get to either one, once you've started ,so I'm going to click on the start editing button. It says my settings have been modified, I'll just save my settings. And then it's going to take me into the application here, and I'm going to be set up with the editing timeline here. Now the interface that you're looking at here is called a work space. This is basically the space in the application where you do your work. And the work space is made up of these containers here, these kind of areas, where you can put these panels here, which kind of look like tabs. Everything in this user interface, everything in this work space is customizable and you can make changes and you can save your work space, you can spread this out over multiple monitors. You can get rid of some panels that you may not want, so there is a lot of customization that can be done. In this work space. Although this interface is specific to HitFilm, this type of layout here is very similar to what you will find in other video editing applications. So if down the road you move onto something like Final Cut or Adobe Premier Pro or maybe even Avid, you're going to have a very similar work space layout. Almost all of the tools, and techniques, and ideas are going to be useful in any other editor. Right up at the top here, we have just a few menu items. We have File, Save, Undo, Redo and then we have Workspace. Under Workspace, you have some options for the panels that you want to bring out into your workspace and you also have some predefined workspace templates. So we have one that's All Panels, we have one that's labeled Classic, Compositing and finally, Editing. I'm gonna leave this set on the editing workspace for now, and I'll show you what we can do to customize this. Now, in between these containers, you'll see there's a little arrow here. We can re-size these containers like this. You can also move the panels around, so let's say, I wanted to take this audio meter's panel and I wanted to put it up here, maybe. I can either put it right next to here on the tab, next to this trimmer panel like that, or if I hold it in the middle here, you can see I have some docking options and I can dock this to the side, which will kind of make a new container right here, or I have some other options. I can dock it to the top or the left or the bottom. So you can move these around, basically, wherever you need to. You can also float the panels. By right click here, I can chose float panel. Now, I can moves this any where I want. Its just kind of floating. I can drag it over here to a second monitor or over here to a third monitor. That will really help to spread things out, and give me the maximum amount of real estate for the stuff that I am working on. I'm just gonna reset this workspace by going back to workspaces and choose Editing. Let me give you a quick tour here of these panels. One of the first ones we're gonna be looking here is the Media Panel this is where we're gonna be importing and organizing your assets, your footage, photos, your audio, your graphic elements, everything's going to be loaded in the media panel. The effects panel is one way that we can access effects, audio effects, 3D effects, video effects, color correction, there's many, many effects that come with HitFilm, and the effects panel is something that we're going to be, going to quite frequently. Controls, this is where you're going to go to edit parameters for your assets. Which you're going to see in more detail in the next few lessons. You have a history panel here, this gives you a list of the things that you've done, and you kind of go back in time. Up here, we have the trimmer panel, now this is currently empty because I don't have any media loaded, but this is where you're going to load your clips and trim them, before you add them to your editor. Right here, we have a Viewer Panel, and this is basically linked to this panel down here, which is the Editor Panel. The Viewer Panel shows you what's going on here in your Editor Panel. The Editor Panel has the main Timeline here for video editing. And this is where you build out your projects. This is where you assemble your clips, and you make fine tunes on your edit. And so, most of the time you're going to be working in your editor and watching what's going on up here in the viewer. There's a layers panel here that's linked to the viewer panel. Again, there's nothing in here because this is a brand new project. The Layers Panel is something that you're going to get into more in the compositing side of this application. It's not something that we're going to be looking at too much in this course. And finally, the Meters Panel, right down here, this is an audio meter. This is going to give you a representation of the audio level which is going to be kind of the master track, so we can add multiple tracks of audio. So we may have a dialogue track here, another dialogue track, a music track, sound effects. We can get a bunch of different audio elements happening at the same time. And one of the things that you're going to have to watch out for, is the level for each individual track that you have playing at the same time. And that's something that we're gonna look at in more detail in an upcoming lesson. There's a little bit more to each one of these panels, you can see that there are some buttons or tools along the side here, there are some play buttons right here, in each one of these panels they're maybe just a little bit extra that you might wanna know about but that's something that you're gonna pick up as we move through this course. Now do you understand the basic layout and workspace, you're already to move on the next lesson. Where you're gonna learn how to import and organize your footage


