
 Lessons: 19Length: 2.6 hours
- Overview
- Transcript
5.5 Compression
In this lesson you will learn about video compression and what formats to use for getting your video online.
Related Links
- Tom Green’s Understanding Video on the Web Course
1.Introduction
1.1Introduction01:10
1.2What You Need05:03
2.Getting Started
2.1File Structure09:39
2.2A Quick Tour of HitFilm09:30
2.3Import and Organize09:53
3.Set Up Your Project
3.1Proxies and Transcoding09:24
3.2What Is Video Editing?09:50
4.Editing Basics
4.1The First Cuts Are the Deepest10:02
4.2Add Clips to the Timeline07:37
4.3Refine the Edit, Part 110:20
4.4Refine the Edit, Part 208:51
4.5Add a Cutaway Shot08:19
4.6Build on the Basic Edit12:37
5.After the Edit
5.1Color Correct and Grade09:39
5.2Sweeten the Audio08:03
5.3Video Effects and Transitions08:53
5.4Export04:35
5.5Compression09:06
6.Conclusion
6.1Conclusion01:08
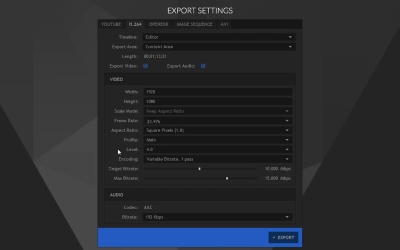
5.5 Compression
In this lesson, you will learn about video compression and what formats to use for getting your video online. If you're primarily going to export to YouTube you have a very easy path to do that because there's a YouTube tab here and you can set up your account. You can create your title, the description, your category, put all the tags in, and just a few extra options here, and it's very, very easy to get that going. For most projects that are shot with HD cameras, keep aspect ratio is the option that you wanna choose. That's not going to alter your video, and it's gonna look the way you expect it to look. You have an option to make this video private, and you have an option to broadcast the video to the hitfilm .com movie law, and it's your choice to do that or not. Everything else is pretty much taken care up in the background, you don't have any settings to adjust, any presets to select, all that's done in the background. So let's talk about some of these other options here. And again, if you're on a Mac, you're going to have a QuickTime option. It's not something that I can cover in this video because I'm on a PC. But it's gonna be a very similar process to some of these other codecs and export settings where you select your codec, your resolution, your audio, so let me walk you through a few of those. At this point in time the most popular option to export your video both online and for just kind of home use is H.264. This has been around for a while it's what most camera's record to if you remember at the very beginning of this course we talked about how some cameras can be a little bit finicky if they record to AVCHD. Well, AVCHD is a flavor of H.264. And there are several settings here which make it look perhaps a little bit more confusing. But it's really not too much of a big deal. You have your standard height and width. This is your resolution. For most projects you're gonna leave this at the default. If you wanted to scale this down for whatever reason, you could punch in a different resolution here. There are several other settings here, there's a scale mode. Scale mode's not really gonna come into play until you change your resolution. Now, I have some options on how to scale it, and that's not something that I wanna do, so I'm gonna change that back. Most of the time your not gonna have to worry about that. Frame rate, your probably gonna wanna keep that the same, whatever your project is set up as. So mine is 23.976 and so I wouldn't adjust that. The aspect ratio, again, it's not something that you need to adjust. For almost all the cameras that are available now, you're gonna be dealing with square pixels. Now, this stuff down here, Profile, Level, Coding, Target Bitrate, Maximum Bitrate, Audio Codec, which you can't really change, and Bitrate. These are things you may want to do some investigating to figure out which settings work best. For example, if you were trying to upload to Vimeo, you could do a quick Google search for Vimeo encoding and you'll find a page that has compression guidelines for your video so you can see under H.264. You're gonna wanna choose High Profile, the frame rate, I recommend you maintain the native frame rate, so you don't need to change that, unless you have higher frame rate video. For example, if your video exceeds 60 frames per second, that may be something that you want to look at changing when you export, but you can export up to 60 frames per second. The Bit rate, they have some recommended guidelines here. It says right here, if you're video editing software gives you the option to choose a variable bit rate, you can select from the values below. And you can see for 1080p wanna shoot for a bit rate of between 10 and 20 Mb/s and it gives you the standards for video resolution so you can see there isn't an option for a 2.7k but there is one for 2k and also 4k. And there's some audio options here, as well. So it recommends this codec here, AAC-LC which is low complexity, a data rate, 320 kilobits per second, and a sample rate. There are some tutorials for specific video editing applications so you can see premieres listed here. iMovie, Final Cut Pro, many options. There's not one for HitFilm, but in time there may be. So those are things you want to check for. If you're uploading to a specific web destination, that's something that you want to look into, because it's very likely they're gonna be looking for specific settings. And if you don't upload the video with the right settings, what their computers are gonna do is re-encode the video, and you don't want that. Because when they re-encode the video, it's going to throw more information away, and that's not going to be the best for image and audio quality. So for example, if I was going to Vimeo, I would choose a Profile of High. I would leave the Target Bitrate at 10 megabits, and a maximum at 15, although I could bump this up as much as 20. And I don't have an option for the AAC audio codec, but I could choose 320 Kbps, and that's fine. That should be compatible for Vimeo. If you're exporting for, let's say a client, you can ask them if they have particular standards that they're looking for and make sure that you get those all locked in right here. You can see there are some other options here. We have an image sequence, we have open EXR and AVI. Open EXR is not intended for real time playback. It's specifically designed to be a high quality interchange format. So this would be more appropriate if you were doing some visual effects work and you wanted to send that off to someone else to work on the file. This is going to be a very, very high quality in code that works on many, many systems, but it's probably not something that you're gonna use when you're just starting out in cutting up video. You have the option for an Image Sequence. This will essentially create a single image for every frame in your video. Again, this is not really something that you're probably gonna use for general video editing. This is something that is more appropriate for visual effects and compositing. Finally, you have AVI. There's not a tremendous amount of options in AVI. You have DV and PAL. Both of those are, essentially, 100% useless. There's an option for uncompressed. This is probably the only option that I would use on PC, to export my video in a very high quality format, and then use a different application to encode the video. For example, if I was unhappy with the way that HitFilm was exporting in H.264, what I would probably do is export in AVI and then use something like Handbrake which is a very advanced x.264 encoder. It's a bit more complex than what you find in most video applications. What I would do is export this as an uncompressed AVI. The file would be massive. Depending on the length of your project, you're talking about tens, possibly hundreds of gigabytes. Then I can take that Uncompressed file load that into HandBrake or some other video encoding application, and I could use the settings that I like in that other application, because I'm working with something that is essentially lost, it's not compressed. I'll just jump back to this H.264 tab here. Once I have everything all set, I'm just gonna click the Export button, choose where I wanna save this. And it's gonna get to work exporting, and encoding my video. For most projects, for most folks, using the standard H.264 encoder built into HitFilm, it's probably gonna be fine. Or if you're uploading to YouTube, you have a great option that's built right in here, very convenient, and that should work great for you. Once you've been editing for awhile, if you wanna experiment with AVI on the PC or QuickTime, which is not actually a codec, but like we talked about in the transcoding and proxy lesson, you can use something like ProRes on a Mac. Or a whole host of other codex and put it inside a QuickTime container, and that gives you a lot of other options for exporting your video. Hopefully HitFilm will be updated to support more codecs under AVI and perhaps they'll offer some QuickTime support in the future, but for now there are plenty of options that should suit your needs. And in other video editors, if you are working on something else, the process is almost exactly the same. You're gonna set your resolution, your frame rate in all the other settings exactly how you would here, it's just gonna look a little bit different. Make sure to check out the last lesson in this course where you're gonna get some final tips and tricks to make all of your editing projects a success.


