
 Lessons: 19Length: 2.6 hours
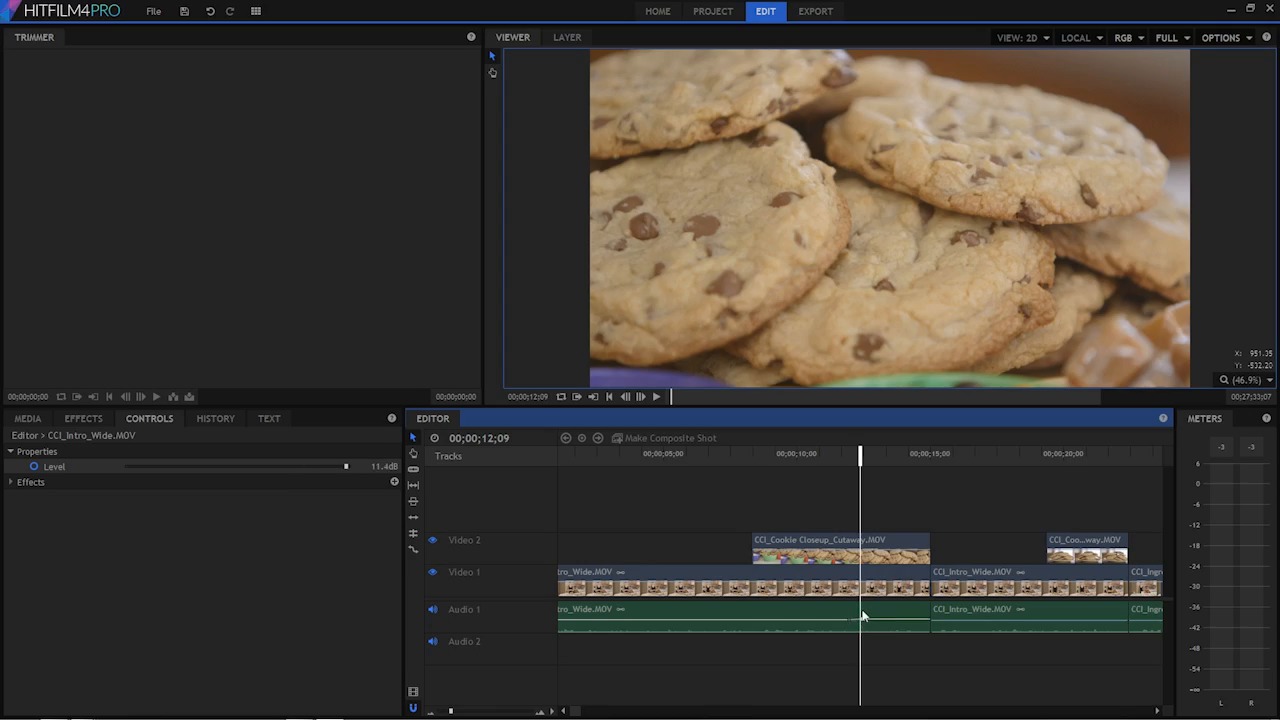
- Overview
- Transcript
5.2 Sweeten the Audio
In this lesson you will learn about your options to adjust and perfect the audio in your clips.
Related Links
1.Introduction
1.1Introduction01:10
1.2What You Need05:03
2.Getting Started
2.1File Structure09:39
2.2A Quick Tour of HitFilm09:30
2.3Import and Organize09:53
3.Set Up Your Project
3.1Proxies and Transcoding09:24
3.2What Is Video Editing?09:50
4.Editing Basics
4.1The First Cuts Are the Deepest10:02
4.2Add Clips to the Timeline07:37
4.3Refine the Edit, Part 110:20
4.4Refine the Edit, Part 208:51
4.5Add a Cutaway Shot08:19
4.6Build on the Basic Edit12:37
5.After the Edit
5.1Color Correct and Grade09:39
5.2Sweeten the Audio08:03
5.3Video Effects and Transitions08:53
5.4Export04:35
5.5Compression09:06
6.Conclusion
6.1Conclusion01:08
5.2 Sweeten the Audio
In this lesson, you will learn about your options to adjust and perfect the audio in your clips. In the previous lesson, you looked at the picture side of the equation, how to adjust and make some color corrections, and some basic color grading. In this lesson, you're going to learn how to adjust the audio and sweeten things up a little bit. The two main areas that you want to focus in on are the audio level and the audio EQ, how does it sound? What tweaks can you make to enhance the way that it sounds in terms of it's frequency response? The level is something that you can keep an eye on as you're working on your project by looking at this Audio Meters Panel right over here. This will give you an indication of the audio level at any one point in time. And there are some clip indicators up here, which show you the peak level that you are at. If you right click over here, you can reset that and then if I come over to the editor and I play, you're going to see the levels rise and fall and you're also going to see the peak which is the loudest point and you're gonna get an idea of how loud this is. Now, in a digital audio world, we really can't anything above zero decibels. So that's what You wanna watch out for primarily. This meter may show you levels that rise above zero decibels, and if it does that's a problem and it's something that you need to adjust. >> It can be daunting trying to find just the right recipe, not flat, not too dry, delicious flavor, picture perfect, and best of all, easy. >> The peak changes every second or two. If you want to find out what the loudest peak is, you can right click here and choose Hold Peaks. And this will hold the maximum peak that was reached. >> Have you ever had a recipe for chocolate chip cookies that left something to be desired? It can be daunting trying to find just the right recipe. >> So in that section right there, the loudest peak was negative 7 decibels. And we could probably bring that up a little bit. Just like you saw in an earlier lesson, there's a bar that goes across this clip here that represents the opacity for this clip. Then on the audio side, there's a bar down here that represents the audio level. So if you click this up, you can increase the audio level. If I come over here to the Control Panel, you can see that in the Properties here for the audio portion of this clip it's turned it up 12 decibels. So it only goes up 12 decibels, and you can pull it down to negative 60. I'm just gonna reset this here to 0 decibals. So if you remember the first two clips here had a maximum peak of negative 7, so what I could do is come over here to this first clip here and increase the level, now I don't know exactly how much I just increased that so I'm gonna click on this clip and then come to the properties here. And you can see the bar is moving. I'm just gonna push that up maybe 4 decibel or so. And now let's see what the Audio Meters are telling us. >> Have you ever had a recipe for chocolate chip cookies that left something to be desired? So you can see that now my new peak is negative three, which makes sense because my old peak was negative seven. I increased the volume by four decibels, and now it's negative three which is still relatively safe. Now you can get more granular control by Ctrl clicking in here. Let me just undo that. If you Ctrl, click on this audio bar here, you create key frames. And so between two key frames you can make a change. With one key frame you can't really do anything, but with two key frames you can have a start point and an endpoint for some kind of animation. Now, in this particular case I'm going to animate the audio level. So, here I'll start it at around four, and then it goes up. >> Picture perfect and best of all easy. >> It goes up to 12 at the end there. Now, that is probably not what I wanted to do but I just wanted to illustrate that you can use these key frames here to increase a part of your clip that may need a little bit more volume. So that's some basic kind of audio level managing. It's something your definitely going to want to keep your eye on. The other thing that you probably want to look at is some basic equalization, where you're adjusting the frequencies to make them sound better or to fix some problems. If I jump over here to the effects tab, twirl down the audio folder, you'll see there's a handful of audio effects. So let's look att he equalizer really quick, and I'm going to drop in on the first clip. The equalizer gives you control over a handful of frequencies in the audio spectrum. So, 16,000 hertz is very, very high, and 31 hertz is very low. Now you don't need to know a whole lot about audio to understand a few basic principles here. The first is that anything that doesn't need low frequency information should have that low frequency information removed. For example we have someone speaking here and there are no really low frequency elements that we need to keep. We don't have explosions, we don't have any base guitar or kick drum or natural kind of ambient noise that needs a lot of low frequency information. So it's best to safeguard against any low frequency information that may actually be there that we don't need by removing it. And that's useful because the human ear, over many thousands of years, has developed to be the most sensitive. To kind of upper mid-rangy frequencies where speech intelligibility lives. And so if there's too much what I would call junk in the low end, if there's too many low end elements say you have low end in this track and then you put a music track underneath. The low end is gonna become very congested and it's not going to be very clear, it's gonna sound like a big rumbly mess. So it's best to just get rid of anything that does not need low frequency stuff which is actually quite a lot. So with this EQ on here, what I can do is take 31 Hz and just get rid of it. I could take 63 Hz and pull that all the way down. >> Have you ever had a recipe for chocolate chip cookies that left something to be desired? It can be daunting trying to find just the right recipe. >> Now there probably wasn't much of a change there and that is totally fine. So the other frequencies you can use to kind of adjust your sound. You may want to give it a little bit more high end sizzle here. >> Chocolate chip cookies that left something to be desired. >> But be careful on boosting frequencies, because this also goes up to 24 decibels, and because our ears are very sensitive to this high frequency information too much of this high frequency stuff becomes extremely painful pretty quickly. So you probably don't want to boost more than maybe six or ten decides. If the track needs a lot of help, feel free to push things around until it sounds good. But, just be warned if you push this up a lot. >> It can be daunting trying to find just the right recipe >> It's gonna sound bad pretty quick, so I would be pretty conservative with things that sound decent out of the box. So I just kind of played and made a adjustments. Unfortunately, you can't make adjustments while you're playing, because every time you do it stops. But make a small adjustment, play for a few seconds, make a small adjustment, play for a few seconds, until it sounds good. And then you should be set. So now that you have an understanding of doing some basic audio sweetening, you're ready to move on to the next lesson, where you're gonna learn about video effects and transitions.


