
 Lessons: 19Length: 2.6 hours
- Overview
- Transcript
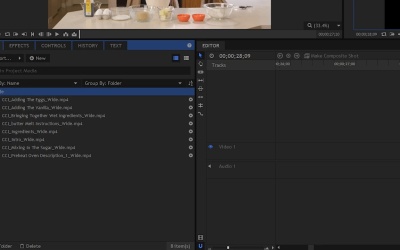
2.3 Import and Organize
In this lesson you will learn how to set up a project and import your footage and other assets into HitFilm.
1.Introduction
1.1Introduction01:10
1.2What You Need05:03
2.Getting Started
2.1File Structure09:39
2.2A Quick Tour of HitFilm09:30
2.3Import and Organize09:53
3.Set Up Your Project
3.1Proxies and Transcoding09:24
3.2What Is Video Editing?09:50
4.Editing Basics
4.1The First Cuts Are the Deepest10:02
4.2Add Clips to the Timeline07:37
4.3Refine the Edit, Part 110:20
4.4Refine the Edit, Part 208:51
4.5Add a Cutaway Shot08:19
4.6Build on the Basic Edit12:37
5.After the Edit
5.1Color Correct and Grade09:39
5.2Sweeten the Audio08:03
5.3Video Effects and Transitions08:53
5.4Export04:35
5.5Compression09:06
6.Conclusion
6.1Conclusion01:08
2.3 Import and Organize
In this lesson, you will learn how to import your footage and other assets into HitFilm. So now that you have a new project started, the next thing that you wanna do is to save your project. By default, it doesn't save. So we wanna do this first. So I just click the Save button, and I'm just gonna name this. Cookie instructional, and I'll save it. Now, I did wanna show you one other thing here. If you jump up here to File, and go to Options, you will see there are a handful of things that you may want to run through a few important things, are the auto save frequency, and making sure that you have an autosave path set up, so it autosaves projects to a different location, it's gonna autosave every ten minutes, and that's good, I think that's a pretty good frequency to start. There's some other things in here that you can explore. There's a few kinda general settings here, how many undo levels you want. The default timeline duration, the default shot composition duration. All of these are probably fine in their default positions, but it's something you may wanna go to. Also shortcuts this is probably an area that you're going to want to visit from time to time. To find what shortcuts are and to reprogram shortcuts to something that's more convenient to you. I would recommend leaving them at their defaults for now, and then changing them down the road once you get some editing experience under your belt. So, now that I have my project saved, the next thing that i wanna do is import my assets. Now, assets can be video footage, it can be clips without audio, clips with audio, it can be audio clips, sound effects, voice over, music. It can be graphics, files, PSDs, PNGs, JPEGs, photos. You can even import 3D models and image sequences, but for right now we're just gonna be dealing with some footage so we can start working with it. So, a few different ways you can do that. You can double click right in the media panel here and that will bring up an import window, you can also go right here to import and you can press this button and that will bring up the same exact window. There is also little menu button right here and you can pick what you wanna import. Sometimes this can be helpful if you are trying to import something specific. So those other import methods may not import an Image Sequence properly. So if that was something that you needed to do something from after effects, you want to go to this menu right here to make sure you can get the right option so that you can see when I bring this up. This is Import Image Sequence and it's gonna be looking for file names with sequential numbers. You can also navigate to a folder and just drag in your assets, and that's what I have right here. So you're gonna be working on a short cookie instructional video that I put together with my friend Cheryl. And this was shot with two cameras, and so I have a folder here called wide and cutaway. So if I go into my wide folder here I can take these assets, I can slack them all, and I can just drag them right in to HitFilm. And you can see I have a little thumbnail in the file names here and that's pretty easy. That's pretty much all there is to it. It works the same way if you click the import button here, so can select multiple files and import that way, HitFilm does not let you import a folder, so if I went back here and I wanted to import the cutaway shots, I can't just drag in this folder. It doesn't let me do that. So, one of the things that you're gonna wanna do in your media panel is to organize your footage because, if you just have a few clips, maybe two or three, two videos, a couple of photos, and maybe an audio track, it's not a big deal, you don't have to put those in separate folders. But once you start getting multiple assets in your project many, many video clips from a few different cameras, different sound effects, different voice overs, graphic elements, photos. You're really gonna wanna have those organized inside your project. You don't wanna list of 200 assets because that's gonna make finding your clips in your media a real pain. Now sure you can search in here, but not all files have intuitive file names, so that may not be so easy. So the best thing to do is to create some folders inside of HItFilm. So I wanna make some room here so you can see exactly what's going on. I can also change my view here from preview mode to list mode. And that'll kind of shrink things down a little bit. If I select all of my wide clips and they all have wide at the end you can see here on the file names, I can take all of these and drag them down into a new folder. And now I can take this folder. And we're gonna press F2 on the keyboard and that's gonna bring up the rename. And I'll just call this wide and I know what that means that's good enough for me. Now I can collapse this and get it out of the way. So if I'm working with other clips, I can just see the clips and the assets that I wanna work on. Now the next thing I need to do is I'm gonna import the cut away footage. So I'm just gonna navigate to that and drag it in. Now you can just drag that right on a new folder and that's very convenient. And when we jump back to hit film it's already selected here to rename. So I will name this cut away. And that's essentially the basics of organization it's really not too much of a big deal. Now what I like to do is as my project grows or as I'm adding different elements I like to group things by their asset type. So for example if I was adding a lot more footage, and audio, and photos, what I would probably wanna do is take both of these and put those in a folder and then rename this Footage. Because if I also have audio in here, that's gonna get confusing. So what I would probably do is create a folder called Footage. I create another folder and call that audio. Inside the audio folder I might put music. I might put sound effects, not under the music but under the audio, might create another folder and call that voice over and so on and so forth. All of those are empty right now but you get the idea. The same thing for graphics. I might have a folder called graphics. I might create another folder and put Titles in there. So then I keep things as organized as possible. I like to have things all grouped up so that I don't have just a huge list, of assets here that gets very messy, very quickly especially as your projects get more complicated. Now, when you're just starting out you're not gonna be dealing with hundreds and hundreds of assets. But it's a good practice to start with because as your projects grow you're going to wanna be in the habit of having good organization. Now inside of HitFilm, you can take these clips and you can rename them. That may be helpful depending on what the file names are. When you rename them here, if I rename this let's say Bob, that's not a very clever name but just to give you an example we can pretend for a second that this is some ridiculous camera filename like 000001.mvi or something. Oftentimes, those are not very helpful in your project because you don't really know what those are. And if you're shooting with multiple cameras, you can have the same exact file names. For example, these files that you will be working with are not the original files that came off of the camera because those are massive. This whole project for this video shoot here was shot with four cameras and a few external audio recorders. I think it's like a 190 gigabytes or something, it's fairly large. So two of the cameras that we shot with are same exact camera model. And so, the filenames that came off those cameras are exactly the same. So in the project, if you loaded up the original files, what you'd have is a folder that you might name cutaway. And inside of there, you'd have 00001.mvi, 00002.mvi. And then in the wide folder, you'd have the same exact filenames. And that can get really confusing really quickly. So, if you rename them, inside of the application, that can be very handy because you can rename it to what the clip actually is, and then it's going to be easier to search, and then once it's out here in the timeline, it's going to be a lot easier for your eyes to figure out which clips are where. If we jump back to the folder here where these files actually live, you can see that it didn't rename the actual file. And that's good. Because that's something that you don't want. For one I deleted the file extension here, and that would be very bad. But also if we use these in other project or other applications, renaming the files here is gonna screw up the linking in other applications. So we can rename them inside of HitFilm, I'm just going to undo that because I've actually already renamed these to something that's fairly appropriate and pretty easy to search for. So that's pretty much it in terms of importing and organization. You don't have to import all of your footage at once, you can import just what you need to get started, and then as you move throughout your project, maybe you need a different music track, maybe you need some sound effects. You can add things in at any point in time, and that's totally fine. But you do wanna make sure that you're keeping things organized. In the next lesson, you're gonna learn about proxies and transcoding, which may help you to get some better performance out of your video editor. So check that out coming up next.


