
 Lessons: 19Length: 2.6 hours
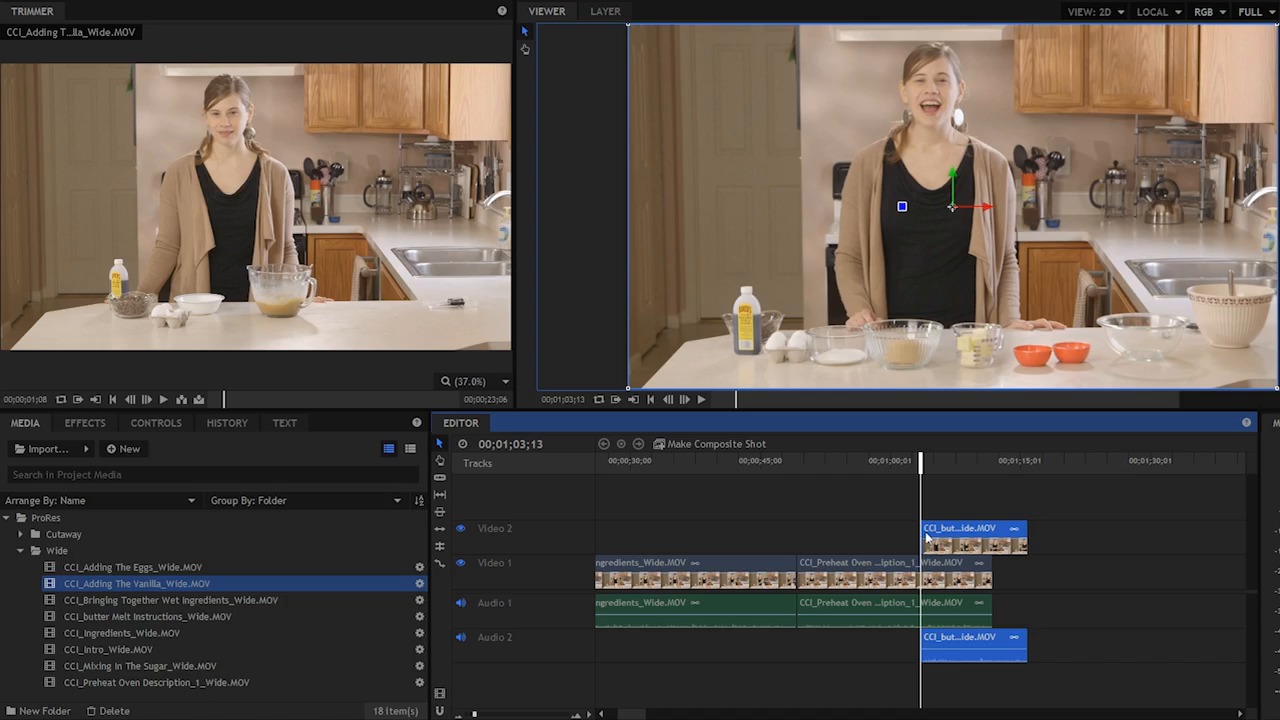

- Overview
- Transcript
4.3 Refine the Edit, Part 1
Let's start turning these assets into something interesting! In this lesson you will learn how to perform some basic edits on your footage to refine your story.
1.Introduction
1.1Introduction01:10
1.2What You Need05:03
2.Getting Started
2.1File Structure09:39
2.2A Quick Tour of HitFilm09:30
2.3Import and Organize09:53
3.Set Up Your Project
3.1Proxies and Transcoding09:24
3.2What Is Video Editing?09:50
4.Editing Basics
4.1The First Cuts Are the Deepest10:02
4.2Add Clips to the Timeline07:37
4.3Refine the Edit, Part 110:20
4.4Refine the Edit, Part 208:51
4.5Add a Cutaway Shot08:19
4.6Build on the Basic Edit12:37
5.After the Edit
5.1Color Correct and Grade09:39
5.2Sweeten the Audio08:03
5.3Video Effects and Transitions08:53
5.4Export04:35
5.5Compression09:06
6.Conclusion
6.1Conclusion01:08
4.3 Refine the Edit, Part 1
In this lesson, you will learn how to perform some basic edits on your footage and refine your story. What I want to show you in this lesson is how to use some of the tools in the editor to refine your edit. Like I mentioned before, trimming your clips up here in the trimmer is kind of a rough estimation of the in and the out point. You don't have to be super critical or very specific, because a lot of the timing and the fine tuning is going to happen down here in the editor, once you see how these clips interact with the other clips. It would give you an idea of flow, and kind of the emotion, and story, there may not be a tremendous about of emotion in this kind of instructional video here, but a lot of those other elements that we talked about are going to come in to play, as you use these tools to refine the timing and the pacing. So let's talk about some of the tools that you have at your disposal here for making these refinements. Now by default, you should be using the Selection Tool. And you can see, there are a handful of other tools here on the side. You have the Drag Tool, which is H on the keyboard. That is the keyboard shortcut. Keyboard shortcut for the Selection Tool is V. You can see that in the parenthesis, there. You have the Slice Tool, which is C on the keyboard. You have the Slip Tool which is Y, the Slide Tool which is U, the Ripple Edit Tool which is R, the Roll Edit tool which is E, and the Rate Stretch Tool, which doesn't have a keyboard shortcut. So just with the Selection Tool. You can make some refinements and you can change things here in the editor. You can click and drag clips, and you can move them around. You can move them from left to right. You could also move them up and down, and put them on another track. Now when you have a video on a second track and you have audio on a second track, you can see that those two are linked together. The video portion of the clip is up here and the audio is down here. And when I click and drag them, they get moved together. If I place this clip right here over another clip, what's going to happen If I don't modify anything else, you're only going to see this top clip. And that's because this clip is taking up the entire size of this frame up here. It's kind of filling up the space. And it's also 100% opaque. Now, there's a little line right in the middle of this clip here, if I zoom in just a little bit. And this is the opacity. Now if I click and drag this down, I'm going to make this less opaque and slightly transparent and now you can see both clips. You can see this clip right here and the clip underneath. Most of the time you're gonna want this up all the way, so that the clip on top is a hundred percent opaque. And as long as it's filling up this entire frame here, you're not going to be able to see anything underneath. Now, I can move this to the side, or apply another effect to make it so it's not filling up the entire space, but that's not what I need right now. So I'm going to undo that with Ctrl+Z on the keyboard. On the audio side, it doesn't work exactly the same. Because it's very rare for audio to fill up the entire frequency spectrum and all of the range you have in terms of the amplitude. If you did have a clip that was like that, you probably couldn't' hear anything else and it would also be very nasty sounding because that's essentially white noise, very, very, very loud. Most of the time in audio, you have a range of frequencies and a range of amplitudes, which means that even though we have two audio clips playing at the same time, we're not gonna have one that blocks the other, which is kind of what's happening on the video side here. If I play this, you're gonna be able to hear both of these audio clips at the same time. >> [CROSSTALK] >> Now that's Obviously not what we want here, but I just wanted to show you that, because it's going to come into play in an upcoming lesson. So again, with the Selection Tool, we can move clips around. You'll notice that when we get close to the edge of another media item, or we get close to the CTI, the clip will jump. In snap and that's called snapping, it's a very useful feature and you can turn that on and off right down here there's a button for snapping, it's this little kinda magnet icon. It's also S on the keyboard. Most of the time I leave snapping on, because it's very helpful to align your clips. Sometimes though, when you have a lot of assets loaded up here in your editor and you want to make a very small adjustment, you can see I can move my mouse a little bit and the clip won't move. If that's the case, if you need to make a very small adjustment like that with the mouse, you can turn snapping off. So I just hit s and now if I click and drag, I can make a very small adjustment and snapping's not going to pull that clip into this edge here. But again, most of the time, I do leave this on. Also with the Selection Tool it gives you access to the Trim Tool, and with the Trim Tool you can perform a Trim Edit. You see the trim tool when you hover your mouse over the end of a clip. And with a Trim Edit, I can click and drag. And essentially, what this is going to do is make my clip longer. And shorter. Or in other words, I'm going to change the outpoint in this particular case, or if I go to the start of the clip here I'm going to change the inpoint. And the way it's configured, I can't push this clip here onto this clip. In other words, I can't use the Trim Tool to make this clip longer or give it a new inpoint, and cut into this clip over here. I can click and move it over there, and when I do that, If I move it back, this clip right here has been trimmed. So, by moving this over those frames that used to occupy this area in this clip right here, have now been kind of been trimmed out. So this clip now has a new outpoint. I'm gonna undo that because that's not what I want to do. So you are going to be moving clips around and doing some trims from time to time. But lets say for example, lets come right here, and lets say that you want to trim out. A little bit of space right here. There's a little breath, it looks kind of, maybe a little awkward, and you wanna get rid of that. You can use the Trim Tool, so let me zoom in here just a little bit. And I can use the Trim Tool, right here. You can see the Trim Tool's kind of a curly brace. And so when the curly brace is open to the right, it means that I'm going to be trimming the clip to the right, when it's open to the left, means I'm going to be trimming the clip to the left, so, if I were to trim this in, and that's going to be tough because snapping is on, so let me turn that off. I was to trim this in, I would be able to trim up the beginning of that clip and get rid of that awkward pause at the beginning of this clip. >> Before you start. >> And now it's much nicer, I like the way that flows, but I have a gap here. Now I can get lid of that gap by selecting these clips here and moving them, oops, but I turned off snapping, so let me turn that back on and now I can move it back but that's a lot of extra steps. Now, let me undo that. I can also just right click in this gap here and I can do a Ripple Delete and this will ripple delete the gap. So that will get rid of the gap. But again, that's unnecessary step because there's another tool that will allow me to do that same sort of edit much faster. So let me delete this and I'm going to put those frames back and I am going to grab the Ripple Edit Tool which is R. And this is a tool that I use quite frequently. Let me zoom up here. If I want to trim this clip up, and I want to give it a new inpoint, I am going to use the Ripple Edit Tool and when I do that, you can see that these frames kind of skooch down, and this audio down here kind of moved to the left. Let me back up, and I'm gonna zoom out. And I wanna show you what happens. I'm gonna deselect those clips, and I'm gonna do a more drastic trim. And what your gonna see is that. That edit, that Trim Edit has rippled down the timeline, so that all of the other clips have moved to fill in the gaps. I can do that opposite here, I can make this longer, and instead of this clip extending over into the clip to the left, so instead of me pushing in on these frames right here, what's going to happen is this clip is going to get that new inpoint that I just selected and everything else to the right is going to adjust accordingly. That edit has basically rippled down the timeline. Let me undo that and I'll undo that again. And I can do the same thing, for example, I'm gonna press the Home key to the beginning. I'm gonna Ripple Edit this very first clip. I'm going to make it longer. I'm going to select an inpoint that's to the left. Now watch what happens to the rest of the clips. Everything gets pushed down and this is a very useful tool. And it's one that I use quite frequently. So again the Ripple Edit Tool is used to trim the in or outpoint of a single clip while adjusting the timeline to ensure no gaps or overlaps are created. The Selection Tool, the Trim Tool, and the Ripple Edit Tool are key to refining your edit. But there are a few more tools, and you definitely should now how those work, as well. In the next lesson, you're gonna see how to use the rest of these tools to refine your edit.


