
 Lessons: 19Length: 2.6 hours
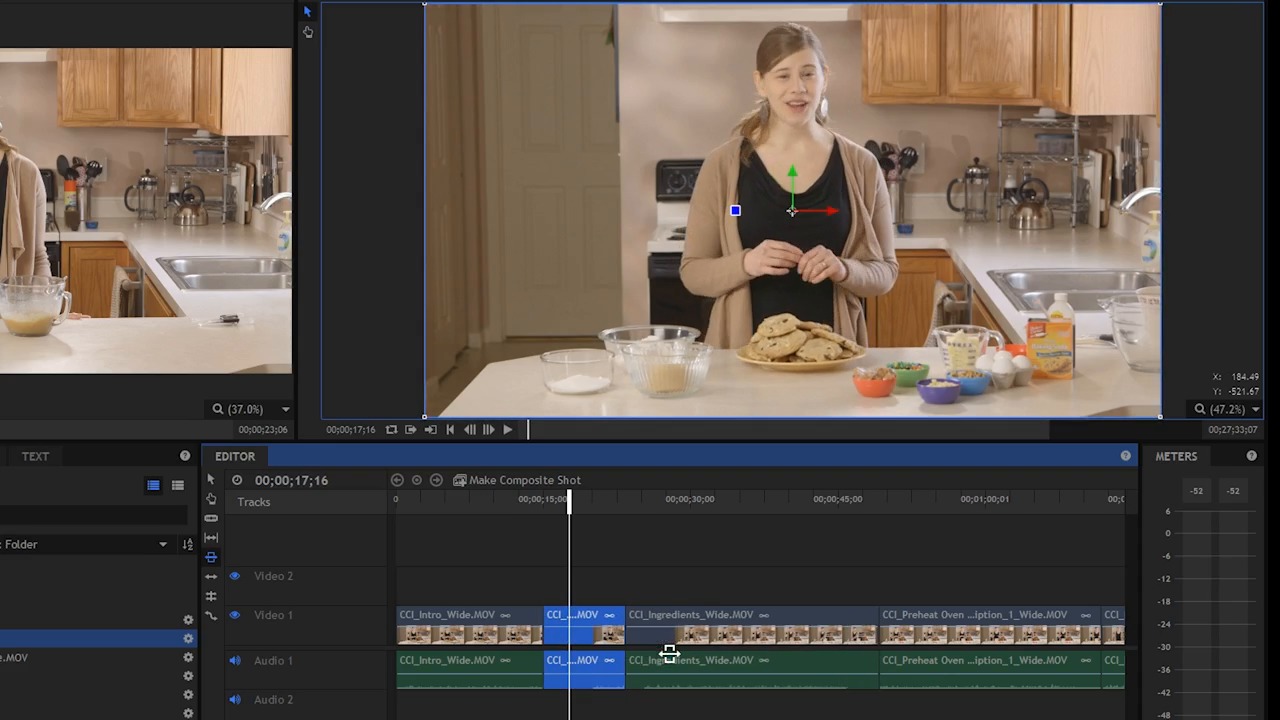
- Overview
- Transcript
4.4 Refine the Edit, Part 2
Let's start turning these assets into something interesting! In this lesson you will learn how to perform some basic edits on your footage to refine your story.
1.Introduction
1.1Introduction01:10
1.2What You Need05:03
2.Getting Started
2.1File Structure09:39
2.2A Quick Tour of HitFilm09:30
2.3Import and Organize09:53
3.Set Up Your Project
3.1Proxies and Transcoding09:24
3.2What Is Video Editing?09:50
4.Editing Basics
4.1The First Cuts Are the Deepest10:02
4.2Add Clips to the Timeline07:37
4.3Refine the Edit, Part 110:20
4.4Refine the Edit, Part 208:51
4.5Add a Cutaway Shot08:19
4.6Build on the Basic Edit12:37
5.After the Edit
5.1Color Correct and Grade09:39
5.2Sweeten the Audio08:03
5.3Video Effects and Transitions08:53
5.4Export04:35
5.5Compression09:06
6.Conclusion
6.1Conclusion01:08
4.4 Refine the Edit, Part 2
In the previous lesson you learned how to use the ripple edit tool, the selection tool and the trim tool. In this lesson, you're gonna learn how to use the slip tool, the slice tool, the slide tool and more. The slice tool, which is c on the keyboard, this is used to basically create an edit point or you can think of it as slicing a clip. So, let's say for example you had a clip here and you wanted to cut this clip in two, maybe you wanted to take some frames right out of the middle here. Well, hos do you do that? I go back to the selection tool. There is no edit tool that will let me just remove frames from the middle. What I first need to do is create an edit point and I can do that with the slice tool. So I just click in the middle here, that's going to cut this clip into two clips. Or in other words it's going to create an edit point. So now i have a point. If I switch back to the selection tool, now I have a point where I can make an edit. If I just leave this alone and play it. >> Three quarters of a cup of melted butter. >> You notice nothing happens because I can put 100 edit points in here and as long as I don't modify them, nothing will really change. So just because I put an edit point on here doesn't mean anything's going to look different or sound different, but it does give me the opportunity now to go ahead in here and make some kind of edit. So that's gonna be another useful tool that you're going to use again, that's the slice tool which is C on the keyboard. The slip tool, which is y on the keyboard, is used for making a slip edit. So what the edit tool is going to do is it's going to adjust the clips in and the outpoint without adjusting it's position on the timeline. So watch what happens when I click and drag with the slip tool. What you're going to see up in the viewer is the new end point and the new out point. So let's say, for example, I just push this all the way to the left. Down here in the editor it looks like nothing happened, the clip didn't move. It didn't get longer or shorter. What happened was it got a new in and a new out point. Which means the contents inside the bounds of this clip moved. So now when I start this clip >> Ingredients, pre-heat your oven to 325 degrees. >> It's in a different spot. Let me just undo that. Now that wasn't very drastic because there wasn't a lot of space at the end of that clip. But if I come over here to this clip right here, and I do a slip edit here. You're gonna see now, again, it didn't move. It didn't change it's length, but when I play this clip >> Melt chocolate chip cookies. >> You can see that it starts from a completely different spot, so the slip edit changes the in and the out point without moving the clip or adjusting its length. Very very useful tool, I'm gonna undo that. The slide tool is used for making a slide edit. And that's when you want to quickly move the position of a clip on the timeline relative to those before and after it. So let's say, I wanted to move this clip down. I like this clip's duration but I just want to push it down the timeline to the right. If I do that with the selection tool, very easy to do. Let me just click and drag it to the right. But what happens is I have a gap here, and that's not really what I want to do. When I do a slide edit, using the slide tool, it's gonna do a very similar thing, except that there's no gap here. So, I'm moving the clip down and I'm filling in the space behind it with a new out point for this previous clip. And you can see the other clips in the timeline are not affected, they stay in the same position. So with the slide tool, I'm not adjusting anything else except for the clip that comes before this and after this. Everything else remains the same. So I can do the opposite, I can push it up this way. And what will happen is this clip here will get a new end point. And this clip here will get a new out point. It basically fills in the gaps. And it's useful for fine tuning the timing of your clips. [SOUND] I'm just gonna undo those changes. The rolling edit tool, which is right down here, that's E on the keyboard, the roll edit tool is used to trim two continuous clips at the same time. The outpoint of the first clip, and the in point of the second clip will be trimmed simultaneously, changing the duration of both clips without moving their positions in the timeline. So look at these first two clips here, what I want to do is change where this edit point is. And I'm going to do that with the roll edit tool. If I click right here in this edit point and I drag, you can see that the edit point got moved. This first clip here has a new out point. The in point didn't change. We didn't move it on the timeline. It's just shorter, and it has a new outpoint. On this second clip here, I moved this endpoint to the left, which means this clip here got longer. But if you look at both of these clips together, you can see that the duration of both these clips didn't really change. I just moved the out point of this clip and the in point of this clip right here. It doesn't change anything else. It's just basically moving this edit point. So if I push this back, I'm making the second clip longer, giving it a new end point and I'm making the first clip shorter, giving it a new out point. Let me undo that and finally, we have the rate stretch tool. The rate stretch tool is used to increase or decrease the playback speed for specific clips. So let me come down here to the end. I'm gonna grab with the rate stretch tool here. I'm going to click and drag this clip here to the right. Now what I did is I made this clip slower. If you can imagine, I did not change the end and the out point of this clip but you saw that the clip got longer. Now if I didn't change the in point and the out point that means the contents in this clip is the same it's just occupying more space and thus it plays back slower. >> Three quarters of a cup, which is the same as one and a half sticks. >> Now that was pretty drastic. I can also right click on this clip to come up to speed and duration. And I can make a fine tune adjustment here to the speed percentage or the duration. I'm just gonna put it back to 100%. Using the rate stretch tool is very very handy to manipulate clips and basically bend them to your will. Sometimes you'll have a b roll clip that is just too short, but if you can make it a little bit slower it'll fit exactly where you need it, and it's a very handy tool that's used all the time. Finally, the last tool here is the drag tool, sometimes called the hand tool, that is h, it's also h in many many other applications. And that is used to kind of move along the timeline here. You can select clips with it, not really something that I use a whole lot in this editor, but I did wanna show it to you there. All of those tools are good to know. It's usually my practice to switch back to the selection tool when I'm done using one of the other tools and I can reach most of the shortcuts here without moving my hand a whole lot. I'd like to keep my first three fingers of my left hand, on L, K, and J so my index finger's on L, my middle finger's on K, and my ring finger is on J. And I can reach most of the other shortcuts here with my pinky, but a lot of times you'll be kinda playing back and forth here in the editor and so having access to J, K, and L is very very handy. Again, using the keyboard shortcuts is going to make your life a lot easier and it's going to definitely make you more productive in the long run. I know when you first learn a program, the keyboard shortcuts seem foreign. But the great thing is that if you learn the keyboard shortcuts in this program a good number of them are the same in a lot of other applications, which is very, very handy. You're gonna see many of these tools used as I go through and build out some more of this edit in the next several lessons. But for now it's time to go on to the next lesson, where you're going to learn how to add a cut away shot.


