
 Lessons: 19Length: 2.6 hours
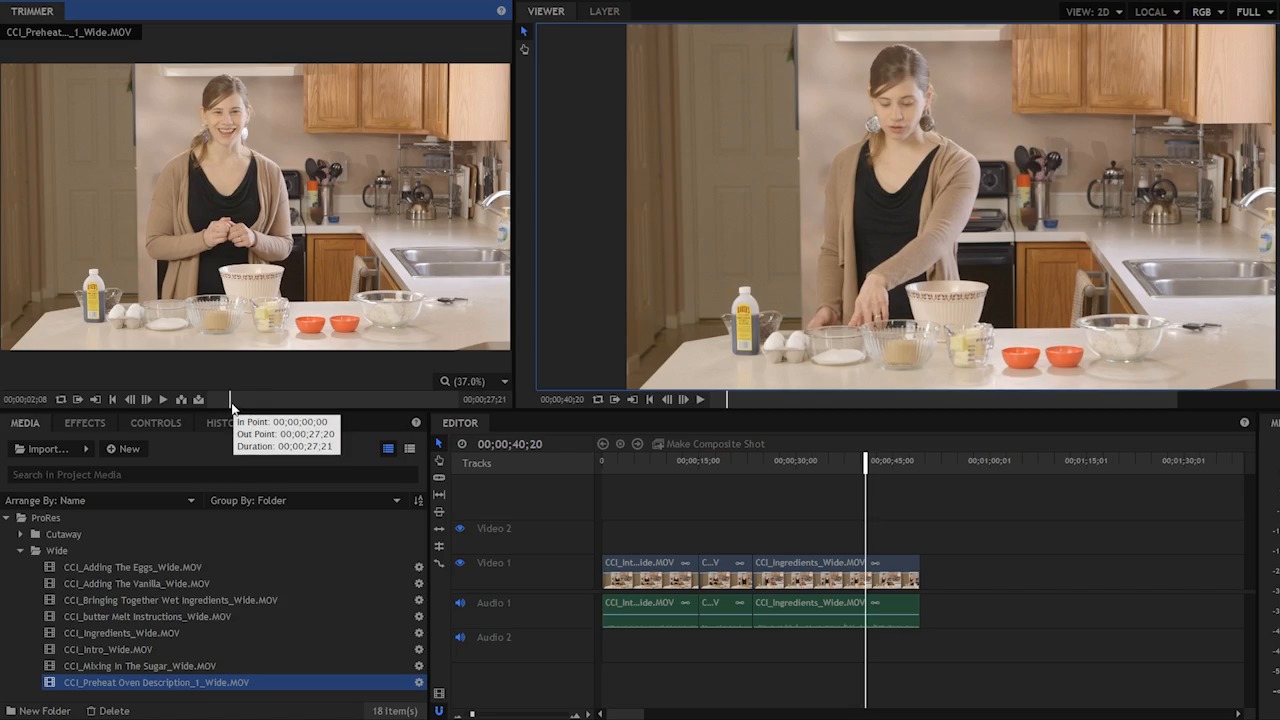
- Overview
- Transcript
4.2 Add Clips to the Timeline
In this lesson you will learn how to add clips to the timeline and combine them to make a rough story.
1.Introduction
1.1Introduction01:10
1.2What You Need05:03
2.Getting Started
2.1File Structure09:39
2.2A Quick Tour of HitFilm09:30
2.3Import and Organize09:53
3.Set Up Your Project
3.1Proxies and Transcoding09:24
3.2What Is Video Editing?09:50
4.Editing Basics
4.1The First Cuts Are the Deepest10:02
4.2Add Clips to the Timeline07:37
4.3Refine the Edit, Part 110:20
4.4Refine the Edit, Part 208:51
4.5Add a Cutaway Shot08:19
4.6Build on the Basic Edit12:37
5.After the Edit
5.1Color Correct and Grade09:39
5.2Sweeten the Audio08:03
5.3Video Effects and Transitions08:53
5.4Export04:35
5.5Compression09:06
6.Conclusion
6.1Conclusion01:08
4.2 Add Clips to the Timeline
In this lesson, you will learn how to add clips to the timeline and combine them to make a rough story. So right now we have these two clips in our editor timeline here. As you can see over here in the media panel, I have a cutaway folder, with various cutaways and close ups. And I have this wide folder. The wide folder contains shots like this. They're static, the camera doesn't move and it's basically Cheryl talking about making the cookies. So what I wanna do is add a few more of these shots and build out a rough sequence. So we have the introduction here. The next thing is where she talks about the ingredients. So I'm gonna click this and load this up into the trimmer. I'm gonna come to the beginning of this clip. I'm gonna play it down and find the in and the out point. >> Okay, sure. [LAUGH] >> Perfect, and action. >> All right, so I'm just looking at this clip here, and I remember from shooting, and so after I say action, I'm pretty sure she's gonna start talking about the ingredients right now. So I'm gonna back it up just a hair, and I'm gonna mark the in point right here. And I'm doing this because I know right after she takes a breath is when she's gonna start talking. So I'm gonna play this down, I've marked my in point, and I'm gonna look for the out point now. >> First, let's go over the ingredients. You will need two cups of all-purpose flour. Half a teaspoon of baking soda. Half a teaspoon of kosher salt. Three-quarters of a cup of melted butter. One cup of packed brown sugar. Half a cup of white sugar. One egg, and one egg yolk. A tablespoon of vanilla extract. And two cups of chocolate chips. >> Okay, so right about there I can mark the out point. And now I can just add this to the sequence here, I'll put it right after the last clip. So now I have this. >> First let's go over the ingredients. You will need two cups of all purpose flour. Half a teaspoon of baking soda. Half a teaspoon of- >> All right, so obviously that doesn't flow together very well but again, we're gonna be fixing that in an upcoming lesson. The next thing is I believe this preheat oven description, so I'm gonna click this and it's going to load up here in the trimmer. If I am down here, you can see there's kind of a blue highlight here in this container and if I click on the clip to load it in the trimmer, I can't use JKL until I actually select the trimmer panel. But I can play it with a space bar. >> On the outside and not extra. >> As soon as I come up here and click in the trimmer panel, now I can use JKL, which is what I like to do. I'm gonna hit the Home key to bring the play head back to the beginning here and just play this down. I'm gonna again mark the in and the out point. >> Okay, no problem. >> All right, so right here, I'm going to mark the in point. But I'm just gonna play this again so you can see exactly where that is. >> Okay, no problem. Before you start assembling the ingredients, preheat your oven to 325 degrees. >> Okay, so right there I'm gonna mark an in point. Now as you start to edit more and more, you're gonna get a really good sense of where to mark these in and these out points. You can usually tell, especially if it's stuff like this kind of instructional video and someone's talking to camera, or even if it's got a regular dialogue between two people, you're gonna get a really good sense of when people start talking. Cuz they usually take a breath and you can just kind of tell by their posture and their expression on their face. So this becomes a lot easier as you get more experienced editing. >> Okay. >> So I'm gonna mark the in point right here. We don't have to be super precise here, because the timing and the fine tuning of this edit is gonna happen down here in the timeline in this kind of sequence of events. That's not something you can really get a great idea of looking at single clips, you really have to see how clips play from one clip to another to get an idea of that rhythm and that pacing. Which is something that we talked about in a previous lesson. >> Before you start assembling the ingredients, preheat your oven to 325 degrees. This temperature is a little bit lower than the standard 375 degrees, because we're making extra large cookies. So we wanna take the low and slow approach. We want the cookies to be perfectly baked on the outside and not extra brown, while the inside gets the perfect texture as well. >> Okay, so somewhere here, I'm gonna mark the out point. Now I can add this to the timeline. Now there are a couple of tricks here in the editor, Page Up and Page Down will jump to the next edit point. So instead of clicking this and dragging it and aligning, I can come down here to the editor panel, hit the Page Down button and that's gonna jump the CTI to the next edit point, which happens to be right here at the end of this clip. Now I can come up to the trimmer and choose Insert Clip. And that's just gonna insert it right here. There's no other clips that I have to worry about, so that's a really quick way to do it. Over time, what you'll learn is in video editing it's gonna be much faster for you to use keyboard shortcuts rather than doing things manually with the mouse. So using that Page Up and Page Down to jump between edit points here is gonna be a really fast way to navigate, especially when you're adding these clips. So now the CTI is right here at the end of all of my shots. It's ready for me to insert the next clip. And I'm actually not exactly sure which is the next clip so I'm just gonna preview a few here. >> And, action. >> The next step is our butter. We're starting off here with three- >> This footage is from over a year ago, so I can't remember exactly the timing of the sequence here. But just previewing these clips, I can see that we need to have the melted butter, and then this clip here bringing together the wet ingredients. So I'm gonna back to this melted butter clip or butter melt instructions. I'm gonna come up here to the trimmer, hit the Home key. I'm gonna mark the in and out points. >> The next step is our butter. We're starting off here with three-quarters of a cup, which is the same as one and a half sticks. I like to melt it in the microwave just 30 seconds at a time until it's barely melted. >> Good, right there, and then I can just hit Insert because my CTI is already at the end of my sequence here. And there you go, it's just that easy. I'm gonna come down here and zoom out here on the timeline, so I can see my clips. So, I have the intro right here, I have her going over the ingredients, I have her talking about something here. If I hold Control and use the mouse wheel I can zoom in. Okay, so this is preheat oven, and then I have the butter melt instructions. So after this last shot here it's going to be bringing together the wet ingredients, mixing the sugar, adding the eggs, and adding the vanilla. So you can go ahead and add these just the way I did. Find a rough in and an out point, and then add them to the sequence here. Coming up in the next lesson you're gonna learn how to take this rough assembly of clips and you're gonna learn how to do some fine tuning and refinement to this edit. So check that out coming up next.


