
 Lessons: 19Length: 2.6 hours
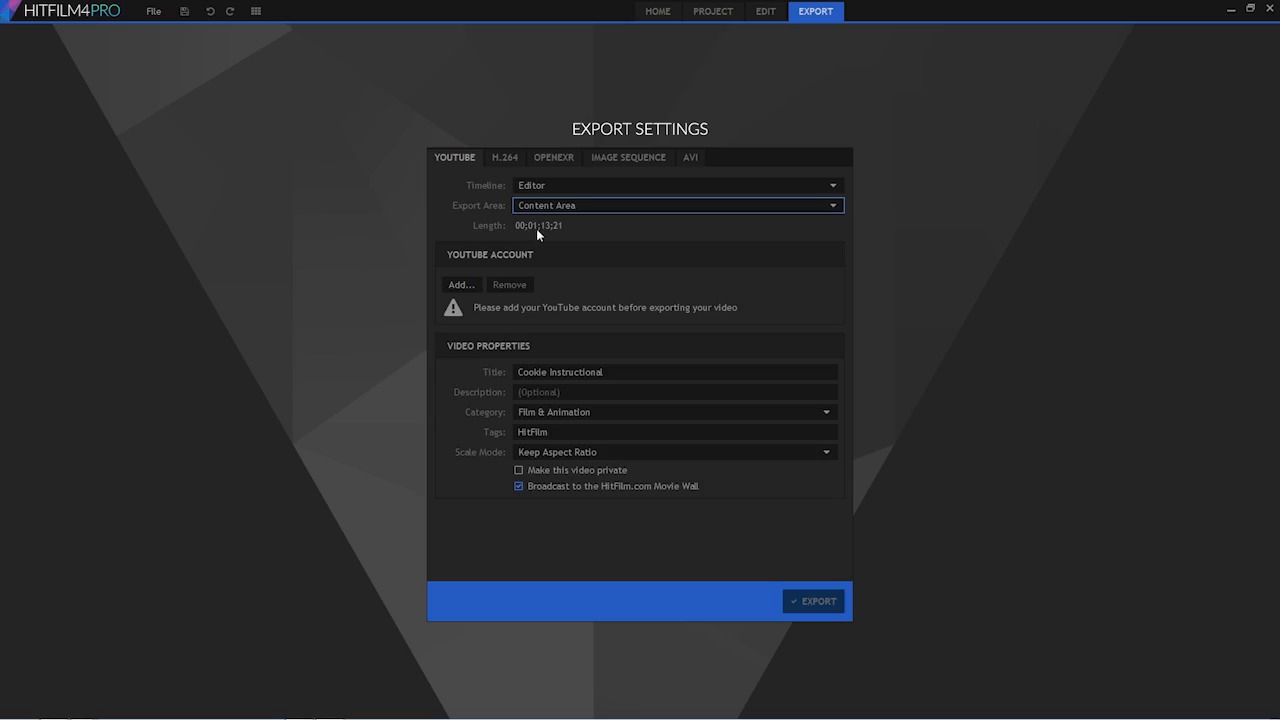
- Overview
- Transcript
5.4 Export
In this lesson you will learn about the different export options for your video and which to choose.
1.Introduction
1.1Introduction01:10
1.2What You Need05:03
2.Getting Started
2.1File Structure09:39
2.2A Quick Tour of HitFilm09:30
2.3Import and Organize09:53
3.Set Up Your Project
3.1Proxies and Transcoding09:24
3.2What Is Video Editing?09:50
4.Editing Basics
4.1The First Cuts Are the Deepest10:02
4.2Add Clips to the Timeline07:37
4.3Refine the Edit, Part 110:20
4.4Refine the Edit, Part 208:51
4.5Add a Cutaway Shot08:19
4.6Build on the Basic Edit12:37
5.After the Edit
5.1Color Correct and Grade09:39
5.2Sweeten the Audio08:03
5.3Video Effects and Transitions08:53
5.4Export04:35
5.5Compression09:06
6.Conclusion
6.1Conclusion01:08
5.4 Export
In this lesson you will learn about the different export options for your video, and which to choose. So when you're done with your edit it's going to be time to get your project out of your video editor and into the real world. You need to put it somewhere so someone else can see it. And once you're ready to export the process is quite simple. There's a button right down here in the editor. There's a link right at the very top here. So you can go right to the export settings. Now here you have a few options for how you're going to export your video and what you're going to export your video to. There's a YouTube option, there's a H.264 open EXR image sequence and AVI. If you're on a Mac, there's going to be a QuickTime option, which has a whole host of different codecs available. If you are a YouTuber and you want to upload your project to YouTube, that is pretty easy to do. The built in exporter in hit film will upload a 1080 p resolution to YouTube. If you wanna upload something in higher resolution, maybe you have a project that's shot in let's say 2.7K or Four K or higher. You can do that, but you have to export it a different way and then upload that manually. So the YouTube exporter is only for projects that are up 1080p resolution. At the very top here in all of these different options you have a few options for what you want to export. There's a timeline menu here. Currently there's only one option for that, and that's editor. Like I mentioned before, hit film has a whole compositing side, which we haven't looked at. But if you've created any composite shots, those are going to show up here in this timeline menu. There's only one editor available at a time for any one project, so right now, that's the only one that shows up here. Next you have an export area, and this will let you choose between a few options. You have your content area, you have your work area, then you have the entire timeline. As I select these different options you can see what's happening down here to the length. If I choose my content area, it's only going to export 1 minute, 13 seconds, and 21 frames. And that's because the content area intelligently exports only the section of the timeline that contains actual layers or clips. So it's not going to export any blank frames or any extra junk because if I jump back to my edit here. And I just down through my edit using page down, the very end of my project is one minute 13 seconds and 21 frames. So, what were those other options there? We have the entire time line. Well, the entire time line, I jump back to the edit here Is everything, that goes all the way over to here which is 27 minutes. Then there's another option here for a work area, which you can see is 21 minutes 22 seconds and 19 frames. The work area is this light grey bar up here. You can see if I hover over the end of it and get this double arrow tool and I can move that around. The work area can be adjusted and you may want to use this to export just a portion of your timeline, or a portion of your sequence. Maybe you have a few shots that you like that you need to send to somebody else for approval. Or you want to see just what a portion of something looks like, and it's not playing back smoothly. While I'm in the Editor I can set the work area the same way I would set the in and the out point for individual clips. I can press I on the keyboard, and that'll set the in point for my work area. And then, I can press O on the keyboard, then also the out point for my work area. And now, if I jump back to the Export tab here, you can see the work area is now only 26 seconds in seven frames, so you have some options there. I've seen most of the time you're probably going to stick on the content area because that makes the most sense. Once you've decided on exactly how much of your project you need to export, you're ready to choose your compression settings and export your project. Now, in the next lesson, you're gonna learn more about those compression settings. So make sure to check that out coming out next.


