- Overview
- Transcript
4.3 Adjustment Layers
Adjustment layers are great for making lighting corrections and colour adjustments, but how does that work when the lighting changes throughout the video? We deal with that problem in this lesson.
1.Introduction2 lessons, 03:18
1.1Introduction01:42
1.2Tools and Resources01:36
2.Video Editing Basics6 lessons, 48:31
2.1Importing Video Files09:19
2.2Video Layers and Video Groups06:37
2.3Photo Editing on Videos07:52
2.4Working With Transitions08:31
2.5Designing a Lower-Third10:23
2.6Rendering05:49
3.Create a Cinemagraph5 lessons, 25:42
3.1Capturing the Video04:09
3.2Setting Up07:07
3.3Seamless Movement06:25
3.4Exporting the Animation04:02
3.5Frame Animation03:59
4.Time-Lapse Video4 lessons, 20:52
4.1Importing Numbered Frames05:44
4.2Photo Retouching04:27
4.3Adjustment Layers05:14
4.4Special Effects05:27
5.Conclusion1 lesson, 00:53
5.1Conclusion00:53
4.3 Adjustment Layers
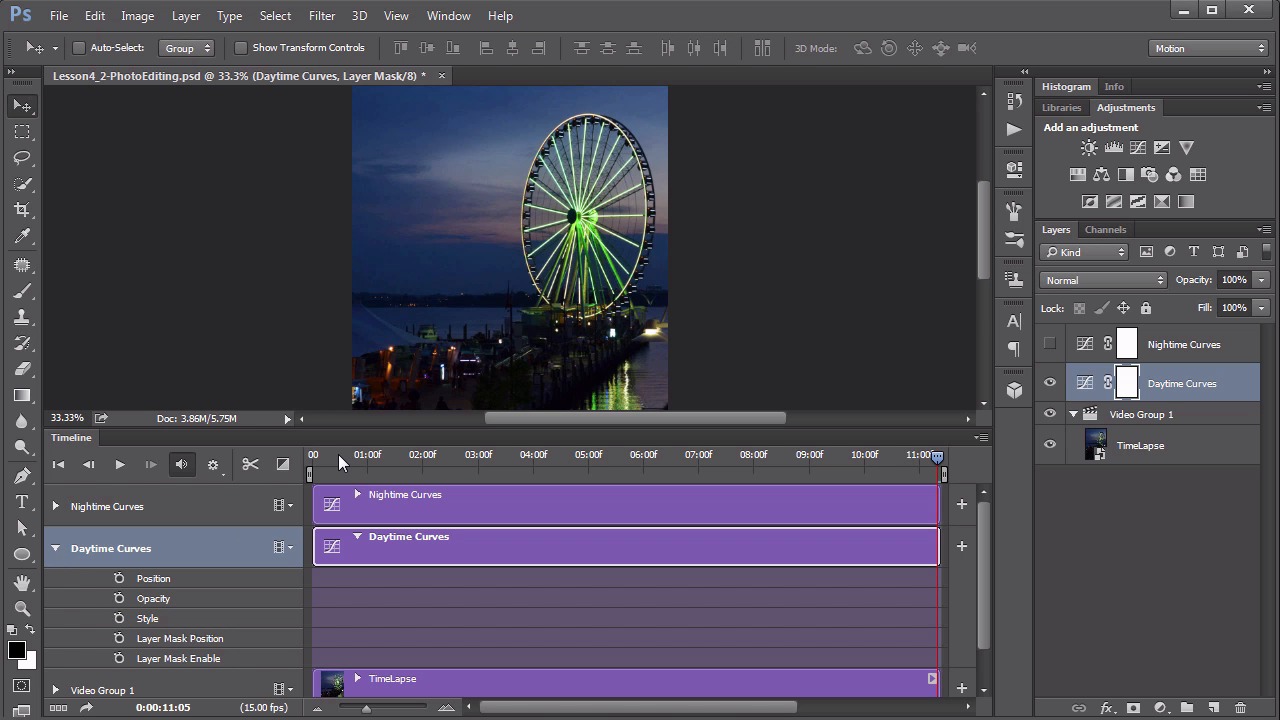
Hello everybody. Welcome back to video editing and Photoshop. This is lesson 4.3, where we take a look at adding some lighting and color adjustments to our time lapse video. Here's where we last left our project in 4.2, where we did some basic photo editing on it. In this lesson, we are going to talk about adding some adjustment layers to address some of the lighting and coloring issues that I have with this overall video. One of the things that is concerning is that it does fade from fully daylight or right before sunset to a nighttime shot. That presents its own particular challenge because any type of a lighting based adjustment layer is going to need to change according to the overall lighting that is available within the scene. We would not expect a single adjustment layer to work on the daylight scene as well as it works on the nighttime scene. Which means we're gonna end up needing to have two of them and then animating the transition. Let's start off by adding a curves adjustment layer to address the daytime scene. In the Adjustments menu, I'll just select a curves layer, now it automatically gets inserted in the video group and it gets clipped to the time lapse. That's not what I want, so I'm gonna drag it outside of the group, so it has its own timeline. And then, just to keep things straight, let's call this the daytime curves. And then on the curves properties, I'm just going to add a couple of edit points along that line, and move them up ever so slightly, just to give a very subtle increase to the lighting of the mid tones, and a bit of the shadows too. Then let's do a similar thing for the night time curves. First, we'll go all the way to the end here to night time scene, add another curves adjustment layer. And this is going to be for the night time, now look near the histogram. This one clearly could use a little bit more help than the day time one could. It's not very well equalized within our luminous levels, so let's pull this top point over to almost to where it meets with the bottom end of that curve, not all the way, but pretty close to it. Cuz we still want it to look like it's nighttime out, we don't want to try to turn it into day. And then a point in the middle, just a little pop up, if you take a look down here in the timeline panel, you can see that both of these curves adjustment layers, are being applied to the entire length of the time-lapse video. That's not what we want, we want the daytime curves to start out at the beginning and fade out over time, and the opposite to be true of the night time curves. And we'll do that by animating the opacity of these adjustment layers. First let's start with the Daytime Curves, I'm gonna hide the Nighttime Curves for the time being, so we get a better indication of how things look. Let's open up the Daytime Curves, go to the very first frame, and hit the stopwatch on the opacity setting because that's what we're going to animate. It automatically puts a keyframe in for the current opacity of this adjustment layer which is 100%, that's what we want then let's go to the last frame and reduce that down to 0. Photoshop automatically puts another key frame in here, so now this adjustment layer will fade out over time. As we scrub through, you can see it updating in its value, depending on which frame we're at. And then we'll do a similar but opposite thing for the night time curves. Again we'll open that up, highlight the opacity, and start this at 0% opacity, and then at the end, that should be at 100%. So now this adjustment layer will increase in its fade, that way we have the nighttime curves adjusting the end of the time, and the daytime curves adjusting the beginning. Now, I've noticed that just after the nine second mark, things tend to start to look a little bit blue in here. It gets a very distinctive blue color cast, so let's use a hue saturation adjustment layer to help remove that. That's the Hue/Saturation here, we're gonna change this to blues and pull down on that saturation of them. Setting this down to -54 does a really good job of removing those blue tones that we were seeing, like on the canopy and on the other white values within the scene. But again, we don't want this applied throughout the entire scene, we only want it where it's needed. So let's animate the opacity of the hue saturation, we'll start with the point that I think it's almost at the worst, that's just after that nine second mark. Right about there, key in the opacity setting, the keyframe is automatically added. And then we'll go to about two seconds before and reduce the opacity of that, and the to the end frame and reduce the opacity again. So that means this middle key frame, it's at 100%, at the first one it's at 0, at the last it's at 0. So it starts being completely invisible, gradually fades in to where the effect needs to be the strongest, and then it fades out. So let's go through and just have a preview of how this looks. You don't even notice the fading of it, and that's exactly what we want. Now that we've applied some lighting and some colorization adjustments. We've only got one lesson left in this project, and that's lesson 4.4 where we talk about some special effects, and some exporting issues.


