
 Lessons: 18Length: 1.7 hours
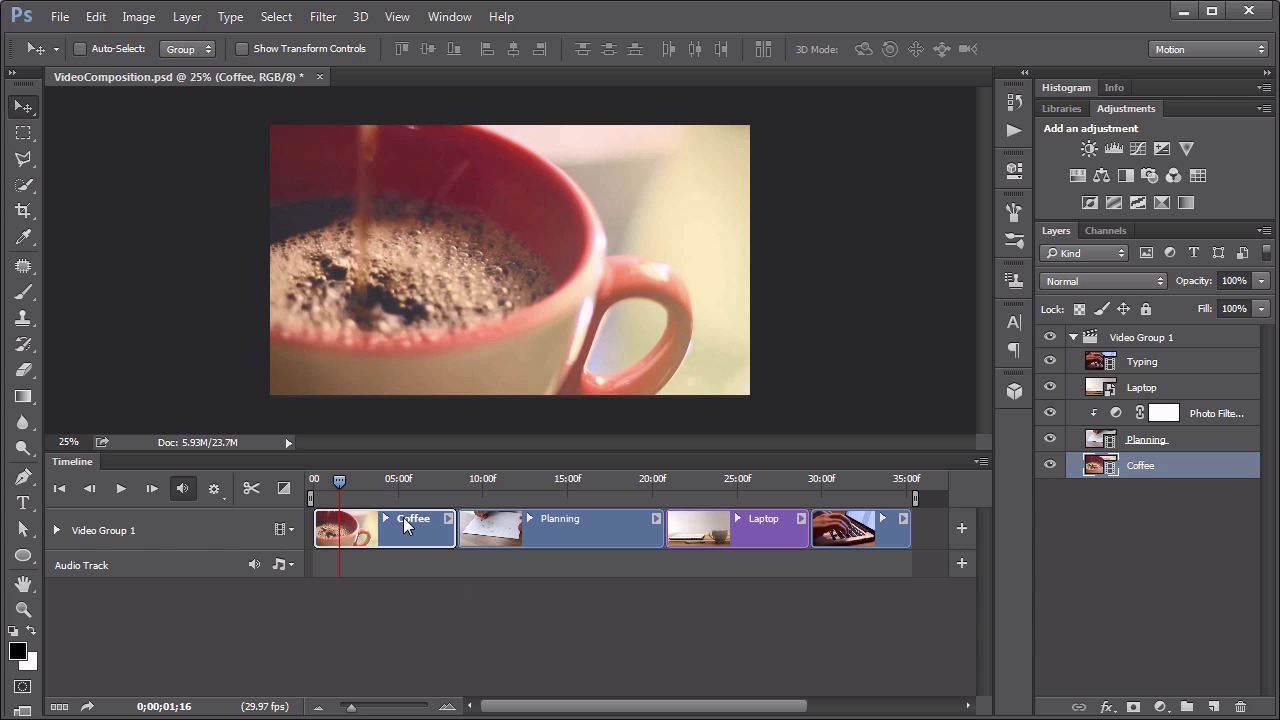
- Overview
- Transcript
2.3 Photo Editing on Videos
All of Photoshop’s regular image-editing tools are still available for video too. This lesson works with various adjustment layers and other photo correction features.
1.Introduction
1.1Introduction01:42
1.2Tools and Resources01:36
2.Video Editing Basics
2.1Importing Video Files09:19
2.2Video Layers and Video Groups06:37
2.3Photo Editing on Videos07:52
2.4Working With Transitions08:31
2.5Designing a Lower-Third10:23
2.6Rendering05:49
3.Create a Cinemagraph
3.1Capturing the Video04:09
3.2Setting Up07:07
3.3Seamless Movement06:25
3.4Exporting the Animation04:02
3.5Frame Animation03:59
4.Time-Lapse Video
4.1Importing Numbered Frames05:44
4.2Photo Retouching04:27
4.3Adjustment Layers05:14
4.4Special Effects05:27
5.Conclusion
5.1Conclusion00:53
2.3 Photo Editing on Videos
Hello everybody, welcome back to video editing in Photoshop. This is lesson 2.3 where we take a look at how to use some of Photoshop's photo editing features on videos. In the course files for this lesson, is this VideoComposition.psd file. This is simply an assembly of those four video clips that we've taken a look at before into a single video group to treat this short clip that looks almost like it's a morning routine. This could be used as an opening for a show or a video series, or something like that. It begins with a cup of coffee being poured, somebody writing out some ideas on a piece of paper. And that goes into opening up a laptop and beginning to type and then a close up shot of the typing. All in all it's a 35 second clip that we're going to edit together, and show some of the editing tools within Photoshop, and how we can use them on a video composition. First of all, in noticing that this laptop is going from left to right, as in the keyboard is facing to the right, is opposite of this final clip where it's facing to the left. That creates a difficult read for the audience, in that it breaks the 180 rule. So we need to flip one of these, so that they're in agreement as far as spatial awareness. Now flipping this one's problematic because you can see the characters on this keyboard. And then they would appear backwards if we were flip this clip. So we end up having to flip this clip by necessity. To do that we need to go to Edit, Transform, Flip Horizontal. Now Photoshop is going to complain that you can't transform a video layer, you have to convert it to a smart object. And that's fine. So we'll do that. Now it gets flipped. And we don't break the 180 rule on these cuts anymore. Very nice. So let's discuss what features in Photoshop are available to edit videos with, especially in the context of editing video. First of all, you need to know that it's a little bit confusing if you try to use anything involving the brush engine because video layers are open for painting. But it may not work like you expect. For example, I've got this coffee video layer here. We can see it in the timeline. I'm gonna use my brush. Now you might expect that you would get the no brush symbol that we would get, say for example when we're over on the smart objects. See, the smart objects you can't paint on. You get this no symbol. But with the video layers, those are fully able to be painted on, which means any of the tools in Photoshop that you can use a brush engine for, you can do that on a video layer. But, watch what happens. Let's just quickly color in this here. Now my brush capacity is way down to 16. Let's increase that up and I'll paint in inside this handle. I don't know why this is just to show something. So we've done that, we've painted on this video layer, where's it go? It's not there. We scrub back through we'll see it will pop right about there, there it is, now it's gone. What's happening is you're actually painting on a single frame within this video. Now that couldn't be an interesting feature if you wanted to hand paint or rotoscope something frame by frame, that's actually a pretty interesting effect, but that's not what we're going for here. And if you don't want to do that, this can be really confusing as to what is going on with the painting features. In general, I discourage any use of painting tools on video layers for that reason. So I'm going to open up my History panel, and just undo those brush tools. So those are not painted on there anymore. So let's talk about some of the things that you can use on video layers. For instance, any of the adjustment layers are perfectly fine to use on video. In fact, I noticed that this planning layer, this little video clip here, is decidedly cooler in color than the rest of the video. So I'm going to add a photo filter to this and just have it on the warming filter and notice that that clips right to that planning video layer. And now I think that looks more consistent with the rest of the video. One of the other things that you can also use on videos are the filters. Now, a lot of the filters don't tend to look really great on video clips, but some of them can do some pretty neat effects. One of the things I like to do is simulate a type of rack focus, especially coming in to a video composition. And to do that I'm gonna create a copy of this first video clip, this coffee clip here. I'm gonna hold down the Alt the Option key while just dragging a copy of that up above the video group. So it shows up here on it's own timeline above our regular timeline. Now I can just go ahead and run a blur filter on this. The problem with that, is that it will only be seen on the very frame that I run that filter on. That's the same problem we have with the painting tools. The way to get around that, is to first convert this to a smart object. So right click, convert to a smart object. So then we can use smart filters on it. Go all the way back to the first frame and we go to Filter, Blur Gallery, Iris Blur. And I like using iris blur as opposed to something like Gaussian blur because I get a really nice light bloom effect, I like that. And I don't want this clear part in the center, I want it all to be blurred, so I'm just gonna drag this part off the frame and it blurs the entire frame. You want a nice deep blur on that. Very nice. I apply that and then we've got this smart object with a blurred video within it sitting on top of the original. If we dial down or we open up the animatable properties here, we see several, well, we see three, Transform, Opacity, and Style. It's really the opacity that I'm concerned with. So I'm gonna click on the little stopwatch here for opacity, and that adds a key frame right here at the front for the current opacity setting, which is 100%. That means it's fully visible. Then I will scrub forward to maybe say about the five second mark. We're still seeing this blur, but because key framing is turned on, it's recording the settings that I use. So if I pull that opacity all the way down to zero, it sets a new keyframe, and then it will actually fade out this blur effect through time. So as the video plays the blur will reduce until it clears up completely. And honestly I don't need the rest of this video clip on here, so I can use the trim tool to actually pull this back a little bit. It's not completely necessary, but it just helps me to keep things tidy. Another interesting feature for animating these video clip layers is if you first turn it again into a smart object, so we've got the planning one, right-click and say Convert to Smart Object. And here on the timeline, if you right-click on it, there's a motion pop-up. So you can actually animate the motion of this. So let's change it from no motion to zoom. So we're gonna go, Zoom in from the center of that clip. Not center time wise, center positionally. So it will slowly zoom in to the central portion of the image. Let's see how that looks. It starts out nice and wide like this and then it starts to zooming in as we go through the clip. Now, how far does it zoom and how fast? Well if you open up the video group player, you can see the key frames that are automatically added under the transform. And if you click on them, you'll be able to tell what that zoom effect is going to. You have to go to that frame and I'm clicking on the planning layer hit Control + T for transformation, and you can see it zooms in to 136%. So it's not actually zooming, it's simulating the zoom by scaling up the video clip. So let's close that back down and now one other really quick effect. On top of this coffee layer, I'm going to add a new layer for the vignette, cuz I like to have a nice little lens vignette around it. And I'll just fill this with white, now white is my current background color, so I'm going to hold down the Control or the Command key and tap Backspace. And I'll go to Filter, Lens Correction, and then, in the lens correction dialog box, go to the custom tab and on the vignette area, pull down the darken part. If I zoom out my preview, you can see what that looks like. Just a subtle effect there. Turn this to multiply so the white disappears, and we get a nice lens vignette. But right now it is only on this portion of the timelines. We need to make sure that we pull it out to cover the entire timeline area. So that means that vignette covers the entire span, all 35 and some odd seconds, of this video clip. That brings us to the end of lesson 2.3. Next lesson, lesson 2.4. We start dealing with some transitions that are built into Photoshop and how to add some custom ones.


