
 Lessons: 18Length: 1.7 hours
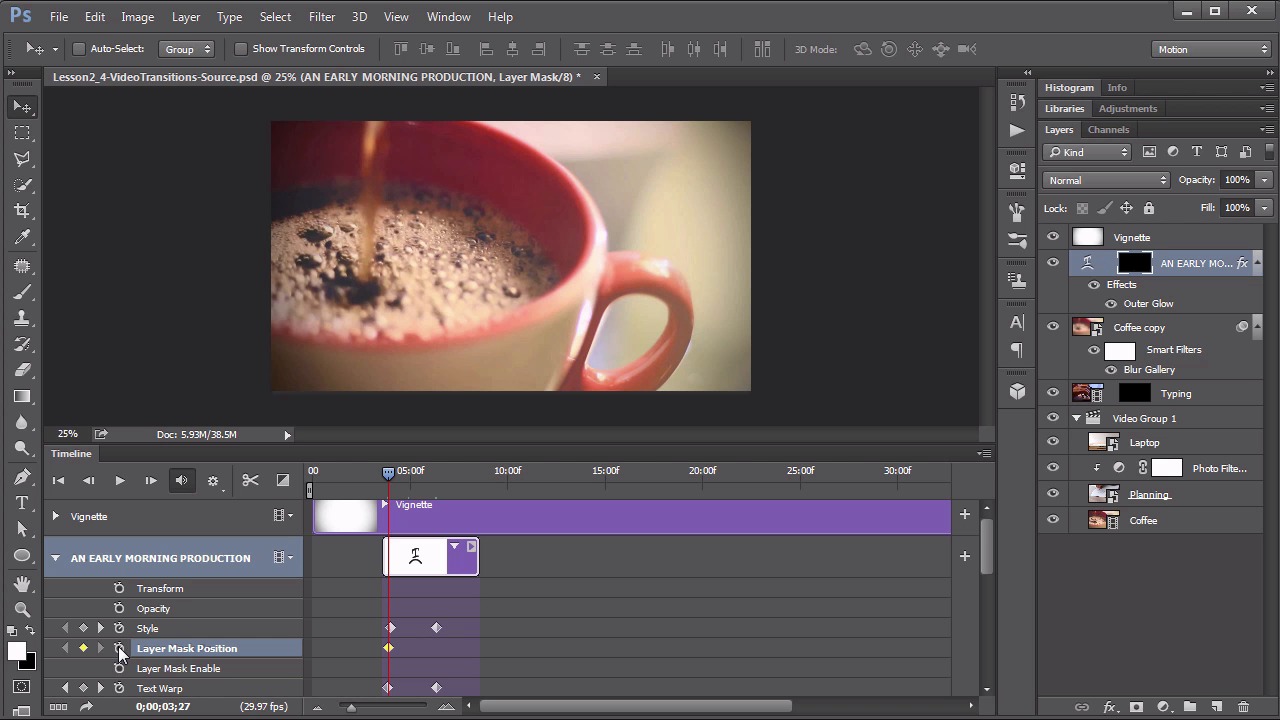
- Overview
- Transcript
2.5 Designing a Lower-Third
In this lesson you'll learn how to use the illustrative capabilities in Photoshop to add flair to the video project.
1.Introduction
1.1Introduction01:42
1.2Tools and Resources01:36
2.Video Editing Basics
2.1Importing Video Files09:19
2.2Video Layers and Video Groups06:37
2.3Photo Editing on Videos07:52
2.4Working With Transitions08:31
2.5Designing a Lower-Third10:23
2.6Rendering05:49
3.Create a Cinemagraph
3.1Capturing the Video04:09
3.2Setting Up07:07
3.3Seamless Movement06:25
3.4Exporting the Animation04:02
3.5Frame Animation03:59
4.Time-Lapse Video
4.1Importing Numbered Frames05:44
4.2Photo Retouching04:27
4.3Adjustment Layers05:14
4.4Special Effects05:27
5.Conclusion
5.1Conclusion00:53
2.5 Designing a Lower-Third
Hello everybody and welcome back to Video Editing in Photoshop. This is lesson 2.5 where we talk about designing a lower third. The term lower third usually refers to animated text, graphics, and titles that appear in the lower third portion of the screen. These are typically used for broadcast video that's used for newscasts or other types of video where the visuals require some sort of caption. It's not that often that you really see them in something like film or television, so much. Technically, you could refer to the animated credits in titles as lower thirds. And that's what we're gonna take a look at now. I'm gonna show you how to animate some text within our scene and even a little bit of title animation towards the end. Now here's where we last left our project back in lesson 2.4, where we added some transitions in. So now we're going to add some animated text. We'll start with the text tool, and I'm using a simple font, the Helvetica Bold at 72 points and it's a black color. Just insert it right here, and we'll do something like An Early Morning Production. Now, let's make sure that this is centered, at least horizontally, by pressing control, or command a, to select the entire canvas. Then with the move tool, we'll use the align horizontal centers icon here. And then control or command d to cancel or deselect that selection. Now if we look at this text layer in the timeline, we see its got the standard three animatable properties, transform, opacity, and style, but there's this new one, this text warp. Text is treated slightly differently in that you can actually animate the warp of it, which does present some very interesting possibilities. First of all, I wanna make sure that the end of our text layer coincides with the end of this first coffee clip video. So I'm gonna move my playhead just to the end of that video clip and make sure that my text layer is aligned with that. Back this up just a little bit, maybe about halfway and hit the stopwatch icon next to the text warp to enable key frame animation. So it's going to end up in this state which is not warped at all. Then I'll go back to the beginning of where the text layer is. In here, we'll got to Edit > Transform > Warp. We'll change the warp pre-set from none, to twist, and actually increase this bend up to 100, so it's twisted all the way up. And if we scrub through, we can see that Photoshop actually animates the unwarping of that text. Gonna go back to that first key frame again. I'm going to add a layer style to this text player to sort of simulate a blur effect on this. Now we'll do that by using the outer glow layer style. Gonna set this to multiply, and the color to black. Increase that size up to somewhere around 40 or 50 and the opacity up nice and high too. So you can see how that sort of simulates a blur affect, there with that twisted up text. And with the style, I will enable the key framing, then go back out to that next key frame and click the outer glow layer style again. And this time bring that opacity all the way down. Photoshop adds a key frame, and now that layer style outer glow will fade as well as the text warp fades. And then let's use an animated mask to reveal the entry of this text. So first I will add a layer mask To the text layer and unclip it. Now I'm focused right here on the mask. The mask is automatically added as fully white, and I want to fill it first of all with fully black. So black is my background color at the moment, so I can hold down the control or the command key and tap backspace. And then I wanna create just a very simple triangular shape using this polygonal marquee tool. Click from that bottom left corner up to the top center to the bottom right corner. I can double click there to complete that shape. And I want to fill this shape with white. White's the foreground color. So, I can hold down the alt or the option key and tap backspace for that. Cancel the selection with control or command D, and you can see our mask here how it's a simple triangle. In fact, if we use the move tool, we can move it down and see how it hides that text. And this way we can animate the text being revealed. But I want it to be much softer of a reveal. So with this still highlighted, I'm going to Filter>Blur>Gaussian Blur. Use a blur of maybe about 34 pixels. Move it all the way down. Now it's fully revealing it which is what I expected because the outside of the portion that I've drawn on is still white. In fact, we can see what the mask is looking like by alt or option clicking on that thumbnail. And in this case I want to grab the entire canvas and fill it with black, then alt click the mask thumbnail again to re-reveal the actual layers. With our move tool now, you can see how it would reveal that text as it gets animated in. So let's animate this. We’ll start with it all the way to the bottom. Go back to the beginning of our text layer and the timeline, enable key framing for the layer mask position, then go to that other key frame, and move the mask up. So now that's also animated, which means that the entry of this text not only gets animated with the mask but also has a style that gets faded out and it’s got a warped effect that also straightens itself out over time. So that's the first animated title in our lower third. I want to create a couple more, and I want them all to have a very consistent type of animation to them. Here's a great trick to do that. Go over here to the layers panel, right click on that animated layer, and say duplicate layer. It asks for a name for the layer, which we'll probably end up renaming, but it creates a duplicate of this and that duplicate also includes all the animation that the original had. So now I've got a second text title that I can move over into later on in my timeline. Let's say I have this one aligning with that, planning stage, so it's right about here. And one of the great things about this is that this text is still live. Even though we've animated, it and added some effects to it, and even warped it, we can easily go back in and change this text, grab the text tool and just click right on in there. We'll change it to the and heavy lead pictures. Now for the sake of time, I'm going to duplicate this once more and change its title to and readjust maybe the positioning along the timeline and on the screen of where these text titles show up. Because that is not really new material, I'm going to pause the recording and show you what it looks like afterwards. So I've got my three animated titles here. I've got An Early Morning Production over the coffee cup and Heavy Lead Pictures over the writing clip, and then Proudly Presents towards the end of that writing clip. I've also added a fade transition to the end of each these to align with the fade out of the clip that they're over. So the title fades along with the visual that's behind it. And then to the end of the clip, I've created two text layers for the actual title of this little video. We'll call it morning routine, and in each or these titles, it's a text layer, and I have a mask associated with it. That mask is nothing more than a simple square that is outlining the area around those titles because I wanna show you yet another way of animating layers along with a mask before we animated the mask but you don't have to animate the mask. If you unclip it from the text layer that it's on, you can actually animate the layer and leave the mask where it is. Now why is that helpful? Let me show you what that does. Let's take this morning text layer, and we know it's fully visible here, so let's open up its animatable properties, and under transform, enable the key frame animation. Now let's go back to the beginning of where that clip is visible, and use our move tool to slide it straight up. You see how it moves outside of that visible area that's defined by the mask? That means it will now slide in as part of its animation. Now I can do the same thing for the routine part too. In fact, I want that to come in directly after the morning word does. So we go to the routine, open it up, enable keyframes on the transform. Move back a little bit because we want that one to be the resting position where it ends up. Make sure that we are on the text layer and not on the mask and move it straight up too. So now as we scrub through this, we should see both of this text layers be revealed by moving down into their masked area and sit over that fade to black from that video layer. Very nice. After that, the only thing there is to add is an audio track. If we scroll all the way down in the timeline here, at the very bottom is this audio track. So we'll use the down arrow here here, and say add audio. In the course files for this lesson, you should find a sunshine.mp3. This is a public domain piece of background music that I wanna add to our effect here. Now it comes in really long, because it's a much longer piece of music than our video is. So, I need to trim it by just moving the end point to just match up with the end of our video. And then I'm gonna right-click on it, and say f ade In by 2 seconds, and fade out by 2 seconds. So now it's time to review the final video. [MUSIC] And that's it for Lesson 2.5 on designing lower thirds and doing some title animation. Now I know I've shown you some fully rendered videos, but I haven't shown you how to render it yet. And actually that's next. Lesson 2.6 is we explore the render video options within Photoshop.


