
 Lessons: 18Length: 1.7 hours
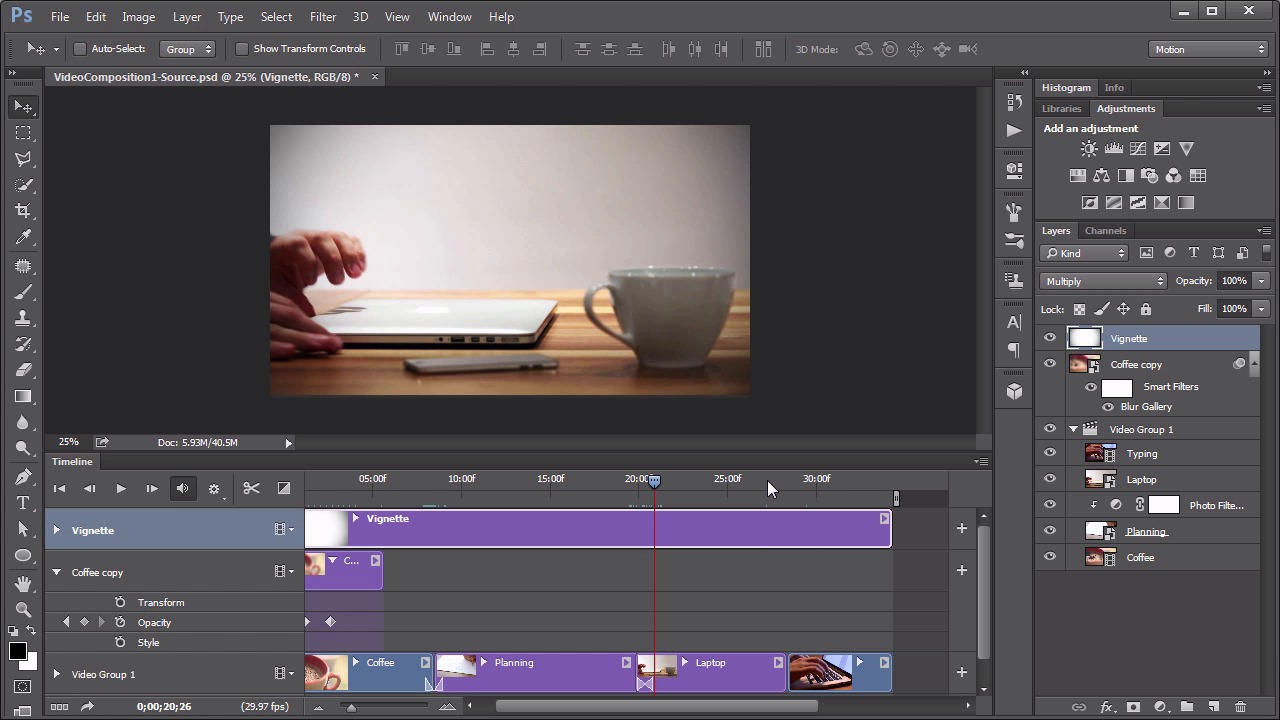
- Overview
- Transcript
2.4 Working With Transitions
Photoshop does include some simple transitions for video. This lesson explores what they are and what they can and can’t do.
1.Introduction
1.1Introduction01:42
1.2Tools and Resources01:36
2.Video Editing Basics
2.1Importing Video Files09:19
2.2Video Layers and Video Groups06:37
2.3Photo Editing on Videos07:52
2.4Working With Transitions08:31
2.5Designing a Lower-Third10:23
2.6Rendering05:49
3.Create a Cinemagraph
3.1Capturing the Video04:09
3.2Setting Up07:07
3.3Seamless Movement06:25
3.4Exporting the Animation04:02
3.5Frame Animation03:59
4.Time-Lapse Video
4.1Importing Numbered Frames05:44
4.2Photo Retouching04:27
4.3Adjustment Layers05:14
4.4Special Effects05:27
5.Conclusion
5.1Conclusion00:53
2.4 Working With Transitions
Hello, everybody, and welcome back to Video Editing in Photoshop. We are now on lesson 2.4 where we take a look at working with the video transitions. So here's where we last left our video composition after last lesson. In this lesson we're going to work with several different types of transitions, and normally you wouldn't have such a wide variety of transitions in a single project. But because I just wanna teach what's available to you here in Photoshop, we are going to have several different ones in here. First of all, the transition options are found here in the timeline, and that's this little box here that's half dark, half light. This is a transition box. It comes with a default set of five different ones. And you can apply these, like it says, just to drag to apply. So let's think about what we see first in our video. Our video opens with this very blurry image of this coffee cup, almost like you're just waking up. Or at least it kind of implies that. So let's start with a fade from black transition. And that is just the Fade with Black. And we pull that down and drop it right here on this Coffee copy layer, this is the blurred layer. And you can see where that transition is. That's this little triangle, and you can adjust Just the duration of it too. I'm gonna keep it at the standard one second or so. Now we did animate the opacity of this layer and I want to start that animation at the end of that transition, so I'm gonna pull this key frame over. So then the way that's gonna work is that that layer will fade in from black. We can see it's starting to reveal itself here, as I slowly scrub through. And once we get the full transition in that's when the opacity of it will start to also fade out. Until we eventually get to a nice sharp image of the layer that's fully below it. That's this video layer down here, the regular coffee layer. And that's how we fade in it from the start. But how do we then fade between two different video clips? Well it's really the same way, but you have to drag it to the center of those two clips. So let's start with a standard fade form the coffee to the planning. Now you can see that each of them have their own little triangle and this indicates that it's going to fade from one to the other. And they can be adjusted individually, so if you wanted the fade out from the coffee to be longer, you can just pull that edge over. You can see how that fade defaults to fading to white. And that's not because we specified it, but it's because that's what shows through from the blank background. So right here at the center point of those two fades together, the Coffee clip is faded out but the Planning clip hasn't started fading in yet. So we get this little frame of white right in between there, and that's what you're seeing there. We can avoid something like that by using what's called a cross fade. And that´s this double triangle icon, here in the transition menu. Let´s pull that over, to right in between the planning and the laptop. Now what happens here, you may have noticed that the entire timeline shortened, just a bit. Because it´s actually going to overlap both of these video clips and fade them from one to the other. Like that. That's a really nice and soft and very subtle transition. That gets used a lot. Whenever you use that though, you have to make sure that the rest of your video is trimmed down to match. It does actually shorten the overall length of the timeline. So the other transitions in the transition menu are really rather self explanatory. That's the Fade With Color and the Fade With White. If you use a fade with color, you have to specify the color here before you apply it. You simply click on the color tip and choose the color that you wish to use. It defaults to a mid tone gray, which is a good option, but you don't necessarily need to use that. You can also change the default duration of it from one seconds to something else. Now those five transitions are not the only options that you have in Photoshop, those are just the preset ones. You can also customize and create your own. Say, for instance, you wanted to have what's known as a white transition. These are not very commonly used and especially in a video set up like this, where we've got some soft fades and everything. A white transition would be rather jarring and kind of stick out of place, but I want to include it because I think it's a good lesson to understand how to create something like that. First of all, let's say we want to create the wipe transition between this laptop clip and the typing clip. So it just wipes from one to the other. Now, we don't have a transition that'll do that automatically here within Photoshop. So what we need to do is animate our own and let's do that first by pulling this typing clip outside of the video group. So we just pull that up until it removes itself from the video group and it's now on it's very own video layer. Then we will overlap it some with that laptop clip. So this will be the transitional area. Let me zoom in a little bit so we can work more directly exactly with that. And the way we're going to do this is with an animated mask. So with the Typing clip selected here, I'm going to add a layer mask. And if you've ever used any type of layer masks in Photoshop before, the way this works is this little thumbnail indicates the visible areas of this layer. So right now, it's all completely white, which means the entire thing is visible. Let's select just a small portion of it, so over here, and we're gonna fill that with black. Black is my background layer at the moment, so I can hold down Ctrl and tap back space, and then Ctrl or command d to deselect. Now that's creating a very harsh transition between these two elements. Let's move our time line back over here so we can see the overlap. You see that solid hard line there? Not exactly what we want for nice white transition. So with this mask still selected, let's blur it a little bit through filter, blur, Gaussian blur.. 17 pixels is what I have. That seems to work okay. It's not a specific, it's not necessarily a specific pixel setting that works. It's just whatever seems to look fairly good here. And then, this is important, you need to unlink the mask from its layer. By clicking on that little chainly guy icon there. See it's gone. That means this mask can be manipulated independently from its layer. Which means we can grab it and we can it actually move it around. Now what's happening here, as we move it over to one side as we get the rest of that area is still filled with white. So I'm gonna move it over, almost all the way to the edge here. Select the rest of this area and fill this with black as well. So what that means is that this mask now has some off canvas pixels that we can pull over. Now hold down the Shift key as I pull it open and make sure that it stays lined up, and we don't see those seams on the top and bottom. So this is what's going to create that white. So we'll start with it completely off to the right, open up the Typing menu and scroll down a little bit here. This Layer Mask Position, that's what we wanna animate. But first, let's make sure that we're at the first frame of it, and we'll hit the little stopwatch, which means we are putting a key frame there. Move our play head to the end of where we want this transition to be, and then we move that mask over, and holding down the Shift key to make sure it goes completely over. And we can scrub through and see how that looks. It may be a little bit too long so I'm going to shorten the transition a little bit by just moving that key frame just a touch. And then to finish it off, let's add a fade with black to the end of that typing clip. So now it's time to generate a good preview of this and you can go all the way back to the front part of it and scrub through or hit the play. Unfortunately, I find my system doesn't work very well while I'm doing a screen capture to also play back an unrendered video. But, before you create even a preview of it you need to make sure all your timeline elements line up. Notice that we shortened it a little bit, so that we could create this overlap with the typing and the keyboard. Which means, our top vignette layer is holding open the timeline, so to speak. So we need to trim that down. Now, I'm gonna go ahead and just render mine out, and then we'll look at the final render and talk through that. So we've got that nice fade from black and then through that rack focus of the early morning coffee with the sort of soft look to that switches to the idea generation where we have that slow pan in that we created before. That transitions through that cross fade. To opening the laptop, starting to type it and then here comes the wipe. And then after this, we will fade to black. And that's it for working with transitions and that brings lesson 2.4 to a close. Next lesson, lesson 2.5, we'll talk about designing a lower third.


