
 Lessons: 18Length: 1.7 hours
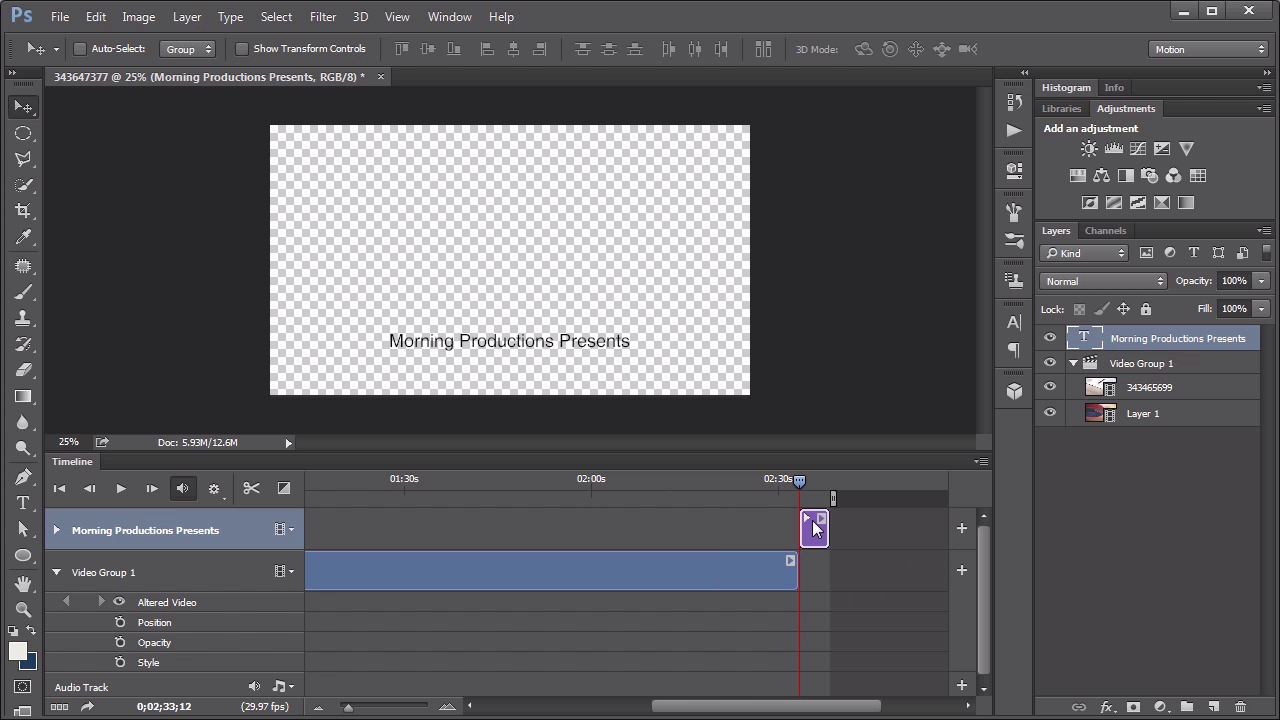
- Overview
- Transcript
2.2 Video Layers and Video Groups
Video layers and video groups: these two terms can be rather confusing. This lesson takes a look at what their differences are and how to work with each.
1.Introduction
1.1Introduction01:42
1.2Tools and Resources01:36
2.Video Editing Basics
2.1Importing Video Files09:19
2.2Video Layers and Video Groups06:37
2.3Photo Editing on Videos07:52
2.4Working With Transitions08:31
2.5Designing a Lower-Third10:23
2.6Rendering05:49
3.Create a Cinemagraph
3.1Capturing the Video04:09
3.2Setting Up07:07
3.3Seamless Movement06:25
3.4Exporting the Animation04:02
3.5Frame Animation03:59
4.Time-Lapse Video
4.1Importing Numbered Frames05:44
4.2Photo Retouching04:27
4.3Adjustment Layers05:14
4.4Special Effects05:27
5.Conclusion
5.1Conclusion00:53
2.2 Video Layers and Video Groups
Hello everybody, and welcome back to Video Editing And Photoshop. We are now on Lesson 2.2, where we take a look at the difference in between video layers and video groups. The reason I'm spending an entire lesson on the difference between video layers and video groups is because they are an important, yet some what confusing distinction. And I wanna make sure that you are clear on understanding exactly what the differences are. I have Photoshop open here and just a single video file. That I just opened here in Photoshop. Now, it came in automatically as a video layer that is within a video group. Which means that that file is represented as a layer here and as a clip here on the timeline. So if we add another video file to this, lets use the plus key here to do that, and we'll bring in this video of the writing. So now it comes in behind the first video, and you can see over here it's still within this video group. So this one solitary video group, some people would refer to this as a pre-composition because it is a way of grouping together multiple video clips into a single timeline. So these clips will not play simultaneously one over the other. They will play end to end. And if you're not aware of how this mechanism works, things can get somewhat confusing fairly quickly. For example, if you wanted to try to have both of these playing together and sort of a split screen idea, you can't do it as long as they're in the same video group. You can move them as far as on the timeline is concerned. You can change their order. But you can't actually make them play at the same time. If you have the video group selected, and you add an adjustment, just for illustration purposes let's add a hue saturation adjustment and pull that saturation all the way down, so we can clearly see what's it's impacting. Well right now this hue saturation adjustment layer is clipped to the writing video clip. Which means we won't see its effect at all on the coffee cup clip, but back here we will see it on the writing one. And also notice on the timeline that adjustment layer has no representation. So you cannot animate anything involved with that adjustment layer as long as it's in this video group. If you unclip it, notice it came in automatically clipped to the top one. We unclip it by holding down the alter the option key and clicking between these two layers. Now, it is having an impact on all of the videos within this group. So even on the coffee cup video. It didn't have this impact before because it was clipped to the writing video layer. But if we pull this completely outside of the video group, so it appears over it as its own layer, it now has a visual representation here within the timeline. Which means now we can edit things like its opacity and its position, and other editable or animatable properties within that layer.. So let's delete this hue saturation adjustment layer that we added previously. And let's say we want to add a text layer for maybe an opening title or credit or something. Now you may have noticed when I started typing it into here the screen went blank. I can't see my videos. What was going on is that the text is included in this video group. Which means it's automatically added to the end of the timeline of this group. That's not necessarily what we want so we need to move it outside of this video group by dragging it out and it still doesn't show up because its timeline is being represented still at the end of those clips. So on the timeline we have to drag it over to make sure it starts where we want it to start. Start about halfway through that first video clip and have its duration go well into the second one. And then if we move our play head, we can see where this appears. And that's really the primary concept you need to understand about video groups and video layers, is that anything that's within a video group including video layers, or text, or adjustment layers, or anything like that, will be included in this same time line. So it cannot have its own independent time line to play alongside of it. Which means if you wanted to do something like, say, a smaller video within here, a picture in picture type effect, let's go ahead and add something in like that. Let's say layer, video layers. New video layer from file. We'll pick the typing video. Now that comes in outside of the video group, because my active layer, when I inserted it, was the text layer. So it came in above that. So now let's edit this, or scale it down. Edit, free transform. It will automatically convert it to a smart object. And then I can move this down. Not necessarily the best clip to put in there, but it's just illustrating a point. And then if we let it play in here, we can see the picture is playing within the picture of the other one. So I'm going to delete that, 'cuz I want to show you one other quick aspect of a video group that's somewhat interesting. Because it works very much like a layer here in the layers panel. You can use most of the layer oriented features. On this which means this video group can actually have a mask. To illustrate that first of all I want to put a new layer outside of the group and all the way at the bottom and then fill this with black. Because let's say we want to change the aspect ratio of this video. We don't want it to letter box. We want it to be more of a four point three perhaps. But I'm not gonna measure that out exactly right now, because I just want to illustrate how this is done. If I take my rectangular marquee tool and just select this middle portion of it, and make sure my video group is the active layer and hit the Add Layer Mask icon, it clips it out, and appears that this black layer is not being shown because it's at the very end of the timeline. So we need to pull that all the way back to the front. And change its duration. There we go. And so now we got those black bars on the side to crop this video down into a new aspect ratio. And that's an easy way to do that within the composition here within Photoshop and not having to do it as an effect later on. Also, if you wanted to, you can even add in layer style to the video group. And this is somewhat interesting. It's kinda unconventional to work this way, but you may find a good use for it. so I got my layers Style box open here, let's use a color overlay and set it as almost a sepia colored, so it almost has a sepia tone to this. Let's change this to multiply, increase the opacity, there we go. That's just a quick and easy way to maybe help visualize what this would look like with an old sepia toned filter on it. I hope that gives you a solid understanding of the differences between a video layer and a video group. And how that you can make those things work in your own projects. Next lesson. Lesson 2.3 we talk about the different photo editing features within Photoshop and how they can apply to video.


