- Overview
- Transcript
3.5 Frame Animation
This lesson is a quick look at the alternative means of creating movement in Photoshop.
1.Introduction2 lessons, 03:18
1.1Introduction01:42
1.2Tools and Resources01:36
2.Video Editing Basics6 lessons, 48:31
2.1Importing Video Files09:19
2.2Video Layers and Video Groups06:37
2.3Photo Editing on Videos07:52
2.4Working With Transitions08:31
2.5Designing a Lower-Third10:23
2.6Rendering05:49
3.Create a Cinemagraph5 lessons, 25:42
3.1Capturing the Video04:09
3.2Setting Up07:07
3.3Seamless Movement06:25
3.4Exporting the Animation04:02
3.5Frame Animation03:59
4.Time-Lapse Video4 lessons, 20:52
4.1Importing Numbered Frames05:44
4.2Photo Retouching04:27
4.3Adjustment Layers05:14
4.4Special Effects05:27
5.Conclusion1 lesson, 00:53
5.1Conclusion00:53
3.5 Frame Animation
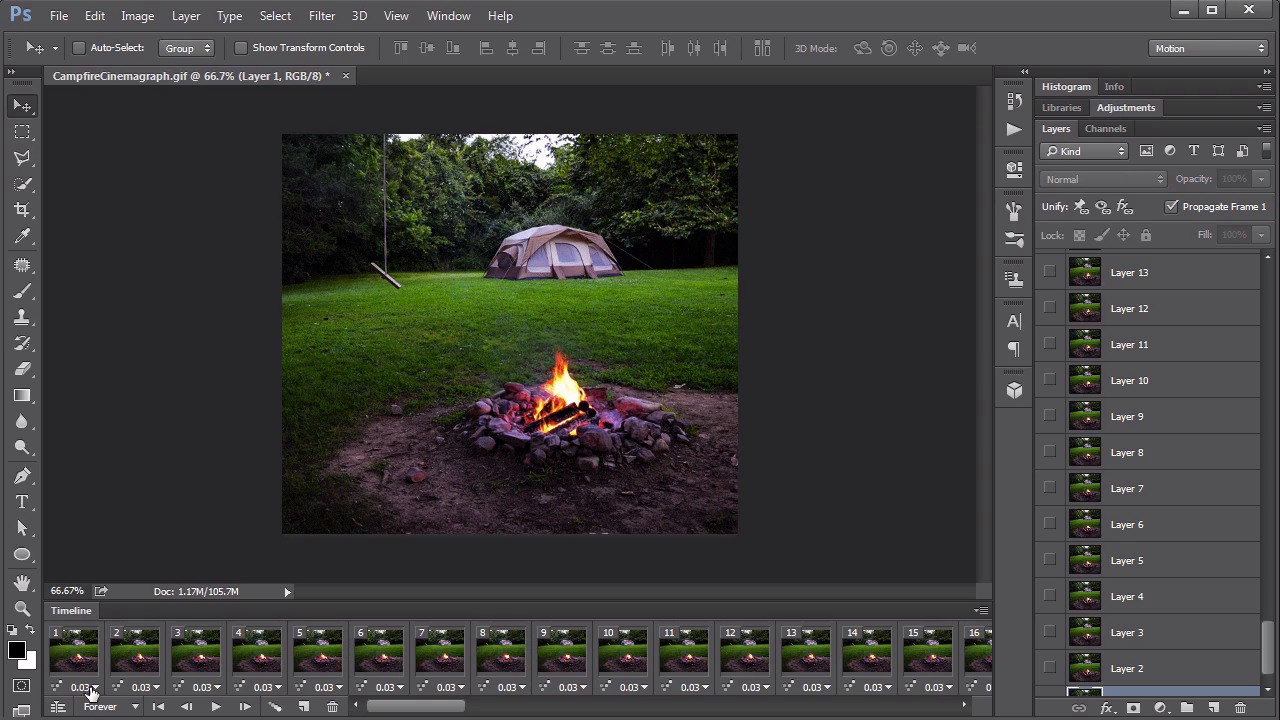
Hello everybody, welcome back to Video Editing in Photoshop. This is Lesson 3.5, where we take a quick look at the differences between video and frame animation. So I've got Photoshop open here and now I'm going to open up that cinemagraph we just created last lesson. That's that animated GIF. So File > Open > CampfireCinemagraph, and I will open it. If you will remember when we created this, we had a fairly complex project that had lots of video layers and adjustment layers and groups in it. This looks nothing like that in Photoshop. This is the animated gif. If you notice here on the Layers panel, there are 90 layers now, and they all look rather similar. There's no video groups, no video clips, no adjustment layers, no masks, nothing. If you open up the timeline, things look a lot different here too. That's because this is a frame animation, that's the other sort of flavor of animation that Photoshop handles. And this has been broken down into individual frames and each frame is a layer. As I go through and click on each frame, notice what happens over here in the Layers panel. Each frame has its own layer. This is a vastly different approach to creating animation than the video clips that we were working with previously. There are ways of converting the video clips to frame animation, but usually you have to create a layer from each frame, then load each layer into it's own frame. Why would you do something like this? Well there are certain benefits to doing things this way. If there was just a single frame, where there is a strange artifact, you could actually go in, find that frame and paint it out. Because each of these frames being in its own layer, makes it kinda handy to do things like that. And because we're dealing with an animated GIF, which is really mostly what you would use a frame animation for, each frame has its own time code. When you're dealing with video, you specify the frames per second for the entire video. For frame by frame animation, each frame has its own time code. So this first frame, this could go for 5.0 seconds and the rest of them can still be at that default, 0.3. In fact, if you feel on our playback of this animation that he fire is moving too quickly, we can slow that down using that time setting. I'm gonna do that by going to this drop down menu here and saying Select all frames. And then changing the second to something other than 0.03. Let's say we want it to be a little bit longer. So we'll say 0.05. And so now all of them are set to 0.05, and in that playback that fire moves slightly slower than before. I should also point out that each frame contains its own setting for visible layers. So, if wanted to say have a text layer or something on top. You would put it up here and you would say it's visible over on top of whatever active frame is actually visible at that point, and it would stay there. But you would then need to also make that text layer visible on all the frames you want it to be. Don't think that each frame can only have one visible layer. That just happens to be the default style that this tends to breakdown to when you create a frame by frame animation. This is a different way of approaching things. Some people feel very comfortable with this. This is very much an older style of creating animation. When they created hand drawn cell animation, this was the way that they approached it. More modern animators tend to not think this way as much, they tend to think more about the video layers and using fades in a very linear process like that. But either way is perfectly acceptable. They each have their strengths and weaknesses, and more importantly, they can both be used here in Photoshop. So that completes lesson 3.5 on taking a look at the differences in-between video and frame animation in Photoshop. It also completes this chapter, Chapter 3, on creating the cinemagraph. And it's convenient that we just went over frame animation, cuz that segways nicely into the last project of this course, and that's creating a timelapse video.


