
 Lessons: 18Length: 1.7 hours
- Overview
- Transcript
3.4 Exporting the Animation
In this lesson you'll learn how to use the Save for Web dialogue and find the best balance between quality and file size.
1.Introduction
1.1Introduction01:42
1.2Tools and Resources01:36
2.Video Editing Basics
2.1Importing Video Files09:19
2.2Video Layers and Video Groups06:37
2.3Photo Editing on Videos07:52
2.4Working With Transitions08:31
2.5Designing a Lower-Third10:23
2.6Rendering05:49
3.Create a Cinemagraph
3.1Capturing the Video04:09
3.2Setting Up07:07
3.3Seamless Movement06:25
3.4Exporting the Animation04:02
3.5Frame Animation03:59
4.Time-Lapse Video
4.1Importing Numbered Frames05:44
4.2Photo Retouching04:27
4.3Adjustment Layers05:14
4.4Special Effects05:27
5.Conclusion
5.1Conclusion00:53
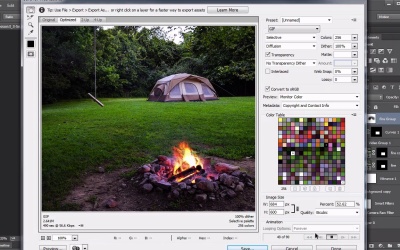
3.4 Exporting the Animation
Hello everybody, and welcome to Video Editing in Photoshop. We find ourselves now on Lesson 3.4, where we are ready to export this animated gif. When we last left our lesson we had just completed making the seemless motion by a nice little trick with two copies of that animated fire and creating a cross fade between them. Now we're almost ready to export this out and explore the different options in creating the animated GIF. Before I do that, I actually want to crop it down a little bit. I think compositionally I wanna get rid of this tree over here. I think that's a little bit of a distraction. So I'm gonna pull that over some. And then I wanna cut in a little bit and even bring down on the sky, mostly just so that that upper third can align with the grass line there. Pull this in so that fire aligns with this right-hand third. Something maybe about like that. I find that to be a much stronger composition than we had before. So, now let's export this. And we're gonna do that through going to File > Export > Save for Web. I know in CC this is labelled as legacy, but it really is the best option for creating animated GIFs. And Photoshop brings up the Save for Web dialog box, and will think hard about creating this preview. Because this is a fairly large file to begin with, this may take a few moments. And once the preview image is done rendering, the first thing you're going to want to do is change the image size. You don't want animated GIFs to be huge because they do tend to really increase in file sizes. For instance this at its raw size is close to 8M, which is a little bit too large for this. So let's the change the height of it to 600px. And that will rerender the actual preview, but it comes out much smaller and easier to manage. Now the advantage of using an animated gif is clearly it can handle animation. And that's this animation down here that you see. Right now it's set to looping options of once. We wanna set that to Forever. And you can see a preview there by clicking the play button. Now, that animation is the primary reason that we need to use a GIF for this. The downside to using it as a GIF is that you're limited to a maximum of 256 colors for this entire image, which is a severe restriction and can create some kinda graininess. And some banding within those colors. Your next step is to try to eliminate as much of that as possible. First thing you wanna do is try the different types of color allotments here, between Selective, Perceptual, and even Adaptive. Depending on your image, each of these is going to result in a slightly different appearance of this color breakdown. Perceptual tends to come out for this image here. Now I do have full dithering on. So that's at a full 100% dithering. If you have zero dithering, it means that the colors don't really blend together and they tend to be kind of blotchy or banded. I'm gonna keep my dithering all the way up. The Transparency isn't necessary, but sometimes when you turn it off, it creates some strange appearances. In this case, it tends to work pretty good without it. Also gonna click the Interlaced, cuz that's sort a helps with the load order of those colors. Web Snap, I'm gonna keep it 0%. It doesn't necessarily need to be web friendly colors. Then let's take a quick preview. I love the motion in that fire, it's nice and seamless like we expected. Things look really, really good. So we'll go ahead and hit Save. I'm calling mine CampfireCinemagraph, and I'll hit the Save button. Something to keep in mind is that once you've saved the image, in order to preview it again, you have to look at it in something that will actually support the animation. So that's usually something like a web browser. And I generally do that by having the web browser open, and then I grab the file from my File Explorer and just drag it over, so we can see it that way. And so now that we've created our cinemagraph, what else is there to talk about here? Well, in Lesson 3.5, I will dig just a little bit into the difference in between video and frame animation.


