
 Lessons: 18Length: 1.7 hours
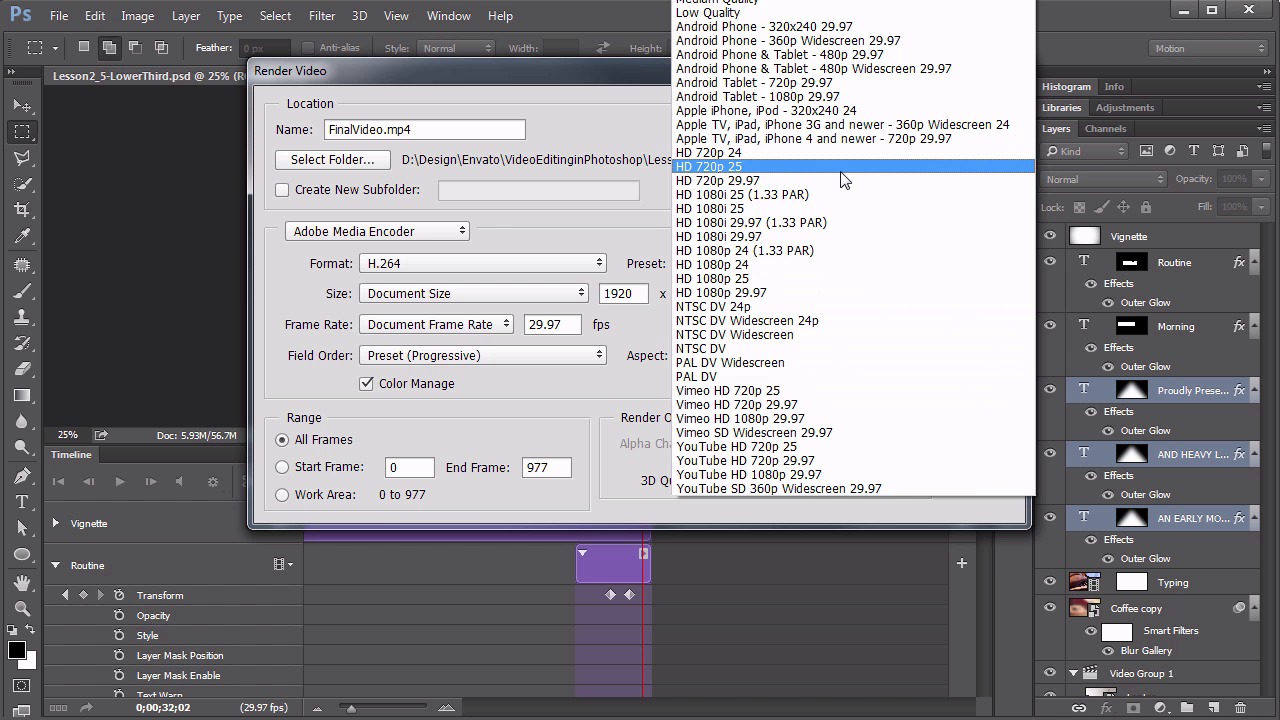

- Overview
- Transcript
2.6 Rendering
There are many ways to output your final video. In this lesson you’ll get a sense of the different options available for export.
1.Introduction
1.1Introduction01:42
1.2Tools and Resources01:36
2.Video Editing Basics
2.1Importing Video Files09:19
2.2Video Layers and Video Groups06:37
2.3Photo Editing on Videos07:52
2.4Working With Transitions08:31
2.5Designing a Lower-Third10:23
2.6Rendering05:49
3.Create a Cinemagraph
3.1Capturing the Video04:09
3.2Setting Up07:07
3.3Seamless Movement06:25
3.4Exporting the Animation04:02
3.5Frame Animation03:59
4.Time-Lapse Video
4.1Importing Numbered Frames05:44
4.2Photo Retouching04:27
4.3Adjustment Layers05:14
4.4Special Effects05:27
5.Conclusion
5.1Conclusion00:53
2.6 Rendering
Hello, everybody, and welcome back to Editing Video in Photoshop. We are now on Lesson 2.6 where we take a look at how to render the video. This is where we last left our video project. Last lesson we created created some lower thirds and a title animation. So now we would be ready to render out the video. What rendering the video means is that you're not just saving this Photoshop file. You'll notice that when you go to File, Save, or Save As, there's no video formats available here. This is all for layered graphic files. So we have to use a rendering, so to speak, to actually create the video file. And what that does is it takes all the information that we've created and all these settings that we've done, and collapses them all into a single video file that you can play back in any type of video player. Now, the render video command is found in several different places. The one that I use the most frequently is this little arrow here at the bottom of the timeline. I'm not sure what this right-facing arrow has to do with rendering, but in any case, that's the render video button. Over here on the top right, this drop-down menu for the timeline also has a Render Video option in there. And, if your timeline's not open, you can go to File Export, there's also a Render Video there. All of these will bring up the same dialogue box. Now, if you haven't launched the Render Video dialogue box before, you may get a progress bar before this window pops up, and that's just Photoshop aligning some preferences to make sure that you can work with some video. Now this Render Video dialog box can seem somewhat intimidating if you've never used it before. There's a lot of settings in here, there's a lot of language that you might not be familiar with, and that can be somewhat intimidating. But I wanna go through and explain what each of these areas do. That way you'll have a greater comfort level when working with rendering your own videos. We'll start up here at the top of the location, now this is all pretty easy. First of all you want the name of the video, let's just call ours FinalVideo. So next is this big central area here that talks about the actual settings for the video. Under this Adobe Media Encoder, there's only two options. There's the Media Encoder, and there's the Image Sequence. Now clearly if we're creating a single video file, we need the Media Encoder because that's not an image sequence. But if you're creating an image sequence, that's what you're going to select that one. And depending on which one you select of these, it changes the available options within this box. We're focusing on the Adobe Media Encoder to create the video. The next thing you wanna specify is the Format. Now, there's only three options here. If you wanna export to QuickTime, that's how you would do that. If you're not doing QuickTime, I recommend you just keep it on this H.264. From there you want to go over to Preset. Now you see high quality is the default. So you may be thinking this preset is only the high, medium, and low quality when in fact there is a lot more in here. And Photoshop does this on purpose. In case that there's a specific platform you are targeting your video for, look for it, within this set of presets. If you can find it, then that's the one you're going to want to pick. In this case, let's say we go to YouTube HD 720p. Now, you may have noticed that when I selected that preset, it changed the size settings for my video. So the preset size dictates that it's 1280 x 720. Now it may have also changed the frame rate if this was set to something different. This is currently set to the Document frame rate, which is 29.97, which should also match the preset frame rate too. Field Order is not a setting you'll need to mess with much, as well as Color Manage. I would recommend leave both of those just on their default settings. Then the Aspect ratio. I recommend leaving it document unless you know for certain you need to change the Aspect ratio. If even the very words Aspect ratio is not something you're familiar with, I would recommend just leaving this in its default state of the Document aspect. After that, we get these two little sub-areas down here at the bottom. The Range is pretty simple to understand. This just means what part of the video do you want to render out? I'm gonna leave mine at all frames cuz I want to render the entire video. But if I wanted to specify a sub-section of the video that's how we would do it. Maybe it's selected as the work area, of course that would need to be done before launching this dialog box. But if you haven't done that and you happen to know the specific frames you want to start and end at, you could use the start frames as well. Then the Render Options really only applies very special cases. For instance, if you have any 3D elements within your scene, you change these to the way you want them rendered. Interactive is the one you see as the 3D preview when you're working with 3D objects. And then there's the Rate Traced Draft and the Rate Traced Final. If you use those it will greatly extend the amount of time your machine takes to render the video. You'll see this grayed out Alpha Channel option here. This is only available if you're rendering in a certain format that actually accepts alpha channels. I believe QuickTime does accept an alpha channel render, in which case this would be available, and you'd be able to specify either a preset channel within the video or a specific color to render that out with an alpha channel. That's useful if you are compositing it in a program like Adobe Premier later on. So in any case, all my settings are set as I like them here. I would just go ahead and hit the render button. Photoshop will start thinking about how to render this video. It eventually will give us a progress bar for exporting it. Now be warned, this will take some time, and there's no visual feedback from when the video is done exporting. It's just this progress bar goes away and you are returned to your Photoshop interface and in that folder you will find a video file. So that concludes lesson 2.6 on how to render the video. That also finishes up chapter two with the overview of the features and basic editing. Next up is chapter three, where we look at creating a cinemagraph.


