
 Lessons: 18Length: 1.7 hours
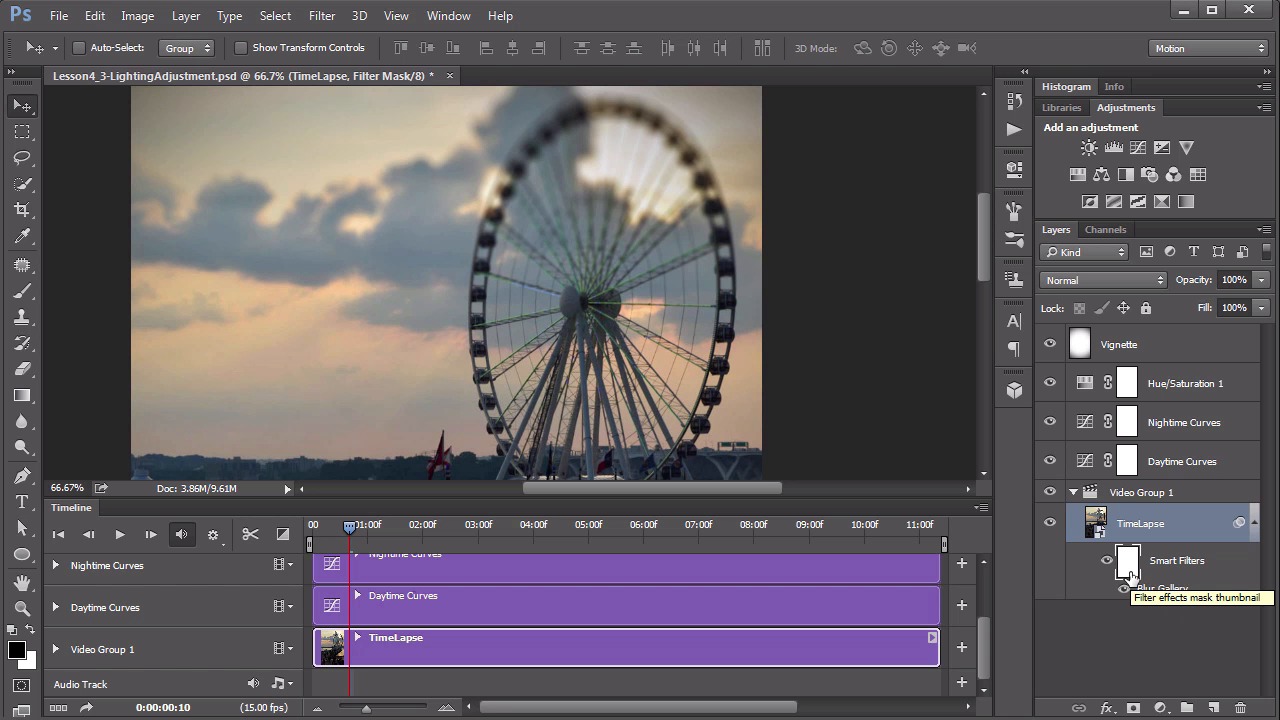
- Overview
- Transcript
4.4 Special Effects
This lesson shows you how to use the Blur Gallery features on the video to create a fun tilt-shift effect.
1.Introduction
1.1Introduction01:42
1.2Tools and Resources01:36
2.Video Editing Basics
2.1Importing Video Files09:19
2.2Video Layers and Video Groups06:37
2.3Photo Editing on Videos07:52
2.4Working With Transitions08:31
2.5Designing a Lower-Third10:23
2.6Rendering05:49
3.Create a Cinemagraph
3.1Capturing the Video04:09
3.2Setting Up07:07
3.3Seamless Movement06:25
3.4Exporting the Animation04:02
3.5Frame Animation03:59
4.Time-Lapse Video
4.1Importing Numbered Frames05:44
4.2Photo Retouching04:27
4.3Adjustment Layers05:14
4.4Special Effects05:27
5.Conclusion
5.1Conclusion00:53
4.4 Special Effects
Hello everybody, and welcome back to video editing in Photoshop. This is lesson 4.4, which is the final lesson on this time lapsed video project. This is about adding special effects and dealing with some export issues. Here's what our project looked like the last time we left it. We added some adjustment layers and animated the opacity of them to deal with some lighting and coloring issues that we found throughout the video. Now we're going to add a couple of minor special effects to it, and then work on exporting this. One of the things I like to add is a vignette at the top. Now I'm going to do that by adding a new layer and calling this vignette. You'll notice that the vignette layer did not get added for the entire timeline, because I wasn't on the very first frame. So I'll need to pull that over to match up with the rest of the animated layers. On this vignette layer I'm going to fill it with white. White's my background color, so I can hold down the CTRL key while I tap backspace. Then I'm going to Filter, Lens Correction, because this is my favorite way to add a lens vignette. If you go the Custom tab, there's this vignette slider here. I can pull that almost all the way to the darken side. Click okay, so it applies that, and then let's change this blending mode to multiply, so the white completely disappears and we just see this slight darkening of the corners. Now it’s a nice effect, both on the end of the video, and at the beginning. It looks equally good. One of the things that is most interesting about working with a video in Photoshop is that the filters are still available to be applied to the smart object that contains the video. For the most part, this isn’t necessarily useful because most of the filters don’t really look good when they’re applied to video. Some of them are actually pretty neat. I'm gonna grab my video TimeLapse here. This is the smart object that’s within the video group. Then let's go to Filter > Blur Gallery > Tilt Shift to add a very subtle tilt shift type of effect to this which almost makes this look like it's a miniature set. You can adjust the extent of those blurs by these horizontal lines that are here. This round handle here will rotate the blur if you wish to do that. And then the central widget increases the strength of it. The settings I chose are pretty close to what the defaults are with the exception of this top boundary. I wanted that to be well above where the ferris wheel is. And my tilt shift blur is set to 15%. If you care to add a slight light bokeh to this, that's also a very interesting effect to add. But I'm keeping mine at 0% for the time being. Now, I like the way that effect looks on this, but I don't like the way it's blurring the very top of the ferris wheel. I think if this actually were a miniature that we were shooting, this blur effect will not be seen predominantly at the top of the ferris wheel. Because it's really the same distance from the camera lens as the bottom of it is, so we need to take that blur away from the top of it but still allow the blur to remain in the cloudy areas in the background there. We can do that by adding a gradient to the smart filet mask. Okay click radio gradient here from foreground to transparent and the foreground color is black. And I’ll actually go right from the center part of this ferris wheel and pull it out to the outside portion of it. And that removes most of it. Might take a brush for the very soft edge and a lower opacity and just touch that up a little bit, too. And that way, that effect is not seen at the top of the ferris wheel, but it is on the rest of it, where it should be. And so with those effects done, let's turn our attention to rendering the video. You'll remember that's through File > Export > Render Video. Now, something that suddenly might become painfully obvious here is that all the presets are in landscape orientation, whereas our video Is portrait orientation. That's because when I set up my camera, the portrait shot really composed a lot better. When I tried it with the landscape orientation of the camera, there was a lot of outside things that were in frame that I didn't really care for. So that's why it chose the portrait orientation here. The video is rarely almost never found to be in portrait orientation. So we end up with a bit of a dilemma then. There's a couple of things that you can do to try to compensate for that. You can either force it to be the portrait, which is one option. You can add in some extended sides to sort of fit this into the center part of the horizontal orientation, or you can zoom in enough So that you have the landscape orientation, zoomed in at the top, and you sort of pan down along the image. None of those really felt good to me. I wasn't really happy with any of those results. So what I opted for is to actually square off this video. So with the crop tool, I'll just pull the bottom portion of it up until it forms a square, and then recompose the portion that's visible within those cropped fields and apply that. Now with the new composition like this, you may wanna go in and readjust the blur gallery settings. You may wanna bring that bottom blur up a little bit. And then with everything squared off nicely, and the filters updated, now lets go back to the render video box file, export, render video. And this time we'll change the size to be the document size, which I've got mine at 600 by 600. Change the pre-set frame rate to the document frame rate. So that should be a 15 frames per second and of course change the name. Then we'll render this out, and when that's get done, we'll take a look at the final product. And so then here is our final rendered result. Keep in mind that this was formed by an image sequence that was then edited in Photoshop to form this finished time-lapse video. And that brings lesson 4.4 to an end. That’s also the last lesson I have over the projects in this course. There is only one video left, and that's the conclusion video where I get to share some final thoughts.


