
 Lessons: 22Length: 3.6 hours
- Overview
- Transcript
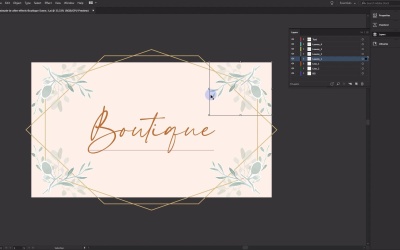
5.1 Boutique Text: Prepare the Artwork
In this lesson, you will learn how to use Adobe Illustrator and Photoshop to prep art for use in After Effects.
Related Links
1.Introduction
1.1Introduction02:55
2.Basics
2.1Keyframe Basics14:03
2.2Reveal Text With Masks and Shape Layers12:08
2.3Basic Text Box Reveal08:57
2.4Bounding Box Reveal11:48
2.5Text Reveal Rectangles: Part 113:02
2.6Text Reveal Rectangles: Part 208:44
3.Burger Logo Reveal
3.1Burger Logo: Prepare the Artwork11:54
3.2Burger Logo: Animate the Layers11:04
3.3Burger Logo: Final Touches10:46
4.Outer Space Intro
4.1Outer Space: Animate With CC Lens09:53
4.2Outer Space: Animating Strokes & Glow Effects13:42
4.3Outer Space: Lens Flares08:44
4.4Outer Space: Noise & Grain12:14
5.Boutique Text Effect
5.1Boutique Text: Prepare the Artwork06:59
5.2Boutique Text: Create the Layout06:14
5.3Boutique Text: Inertial Bounce Expression11:20
5.4Boutique Text: Wiggle Expression06:06
5.5Boutique Text: Layer Control06:07
5.6Boutique Text: Handwritten Text13:07
5.7Boutique Text: Final Touches11:38
6.Conclusion
6.1Conclusion02:09
5.1 Boutique Text: Prepare the Artwork
Coming up in the next few lessons, you're gonna learn how to take some static art here created by a designer in Adobe Illustrator, break it apart, prep it for animation and create something much more dynamic. All right, so we're looking at art that was created in Illustrator by a designer. It's not yet ready for animation. Similar to another lesson in the course where we looked at a burger design, we're gonna have to prep this art for animation. So the first thing that I like to do is come over here to the Layers panel and in the little fly out menu here just come down here to Release to Layers and that's gonna put all of the individual elements on the own layers. So you can see if I undo that previously, you can see the layer colors are all the same. And that means if I were to import this into After Effects, this would be just one flat layer. Now I could rebuild it in After Effects, but it's gonna save me a little bit of time. If I go here and Release to Layers, oops, let me select that layer, Release to Layers. I'm gonna select all these layers, pull them down and kind of put them in their own root directory and delete that top layer there. And then I'm gonna name these. So I'm just going to toggle on the layer visibility. Double click to rename and I'll name this top one Text. And this looks like leaves and lines. And if we drill down here, well, let's deal with that in a second. I think this bottom layer here is just the Background. So, on this middle layer, we have all kinds of junk. We have these individual leaf elements here, which if you look very closely, you can see that these are a tif. So these are a flat layer, and that's not gonna be ideal for what we're going to do in After Effects, but we'll deal with that in a second here. So let's see if we can isolate some of these lines here. I think what we can do is select this layer here, and then come down to Release Layers to Sequence, yep, that'll work, perfect. Then we can take all of these layers here and pull them down, or maybe pull them up above this layer, very good. And then we'll just get rid of this right here, that'll work. And let's figure out what is on each of these layers. Okay, so these two are lines. So we'll call this one Line_1, maybe. And this Line_2 and that layer is nothing. It's got some kind of rectangle and I don't think it's anything, so I'm just gonna delete it. And before we go any further, I'm actually going to just save this as a unique name so that I don't inadvertently mess up the original artwork. Each one of these are the leaves, so I'll just name those Leaves_1, good enough, and I will save this. Now this is pretty good to go as it is. If I were to import this in After Effects, I'll have access to the text and the leaves and the lines in the background and I could do something with that. However, what I would like to do is animate the individual leaf elements here individually. I asked the designer where they got these leaf elements and it happened to be from Envato elements, which is by the way where this font came from as well. And so I have a collection of Photoshop files here and in the Photoshop files are the individual leaf elements. So, what I need to do is open up one of these and figure out what leave elements I need and then export those so that I can kind of rebuild just the leaf elements in After Effects. I think that's gonna be pretty cool. So maybe I'll open up this one that says Leaves.psd, that could be the one that I'm looking for. And let's see here, what are we looking at? Okay, so if I just show hide some of these layers, okay, cool. So this right here is one of the elements that I need. And, I think what I can do is with this layer selected, you can see that this is a smart object, and so it is linked to some other external graphic. And if you double click this, this will actually open up in Illustrator, which is a double bonus because this element is a vector file, which is very good. And so what I wanna do is find the individual leaf layers that I need. There's the second one there. Let's see, I'll double click that and that'll open up in Illustrator. I'll come back to Illustrator in a second here so I can export all of those individually. There's another leaf element that I need, very good. And how about this one right here. Cool, I think that's the fourth one. Let me just increase the opacity. Yeah, that looks right. Okay, so I think there's only four leaf elements in here. There's one that's repeated twice, that kind of very light looking leaf element. So, I have basically everything that I need right now. The only thing that I need to do is maybe just crop these in a little bit to make them easier to work with. If I save them just like this, the Artboard is gonna be quite large in After Effects and that could be annoying. So, I'm just gonna grab the Artboard tool here which is also the keyboard shortcut shift+O. And I'm just going to crop in on these elements here. I may give them just a little bit of wiggle room on the sides, something like that. And then I will save all of these individually. So I'll switch back to the selection tool here, and I've actually already gone ahead and done this. So, I've named them leaf 1, 2, 3 and 4, and I've saved them right here. So I'm not going to go ahead and do that. But it's basically the same thing for all of these other layers. I just take the Artboard and shrink it down and then export it as an Illustrator file and name it appropriately. All right, so, let's just kind of review here. Taking the artwork, I have released them to layers, try to figure out what was, what, and named all of the layers. And so now everything is on its own layer and I saved that. And that right there is a good place to stop for this lesson. If you've been following along, congratulations. Now I know I went pretty fast through a lot of those steps in Illustrator and Photoshop. So if you need another go at it, if you need a little bit more time, go ahead and rewind the video and pause it where you need to so that you can catch up. The next step of the process is to pull all of these things into After Effects so we can begin the process of animating this design. [MUSIC]


