
 Lessons: 22Length: 3.6 hours
- Overview
- Transcript
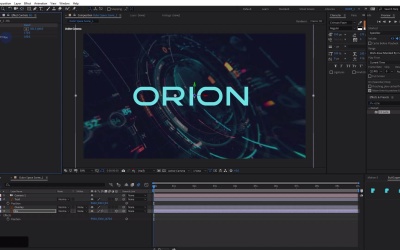
4.1 Outer Space: Animate With CC Lens
In this lesson, you will learn how to prep a space-themed graphic and start to animate it with CC Lens and position keyframing.
Related Links
- Gempire Font (#63d8e5)
- Futuristic Background
1.Introduction
1.1Introduction02:55
2.Basics
2.1Keyframe Basics14:03
2.2Reveal Text With Masks and Shape Layers12:08
2.3Basic Text Box Reveal08:57
2.4Bounding Box Reveal11:48
2.5Text Reveal Rectangles: Part 113:02
2.6Text Reveal Rectangles: Part 208:44
3.Burger Logo Reveal
3.1Burger Logo: Prepare the Artwork11:54
3.2Burger Logo: Animate the Layers11:04
3.3Burger Logo: Final Touches10:46
4.Outer Space Intro
4.1Outer Space: Animate With CC Lens09:53
4.2Outer Space: Animating Strokes & Glow Effects13:42
4.3Outer Space: Lens Flares08:44
4.4Outer Space: Noise & Grain12:14
5.Boutique Text Effect
5.1Boutique Text: Prepare the Artwork06:59
5.2Boutique Text: Create the Layout06:14
5.3Boutique Text: Inertial Bounce Expression11:20
5.4Boutique Text: Wiggle Expression06:06
5.5Boutique Text: Layer Control06:07
5.6Boutique Text: Handwritten Text13:07
5.7Boutique Text: Final Touches11:38
6.Conclusion
6.1Conclusion02:09
4.1 Outer Space: Animate With CC Lens
[MUSIC] In this lesson, you're gonna learn how to animate another premade design from Adobe Illustrator. We're gonna be looking at some 2.5D with an After Effects camera and some interesting techniques to get this to look really fun with some lens flares. All right so, just like in some previous lessons, I'm in Adobe Illustrator and I need to release this to layer. So I'm gonna come over here to the Layers panel in the little fly out menu and choose Release to Layers. Then I'm gonna pull these out of this layer stack here, delete the top layer, and then just rename these. So I'll call this Text. This is Overlay. And this is background, perfect. That was simple, wasn't it? Then I'm going to just save this and I'm gonna take the original file name, just do an _1, press Enter, and then click OK. Then I'm gonna jump over to the After Effects. Now before I get too far in After Effects, let me just save this, Always a good thing to do. Then I'll double click and import my Illustrator file. I'm going to import it as a composition and I'm gonna leave the footage dimension to layer size, perfect. Then I'm gonna double click this composition in the project panel to open it up. So this is what we're looking at here. It's not terribly exciting. It would be pretty cool if I had access to this what I would guess is an After Effects file with all these really cool kind of HUD technology looking stuff. And I could do some fun animation although that would be really complicated. What I have to work with is just a flat image. So to make this look interesting, what I think we'll work is to do some kind of 2.5D, which is the After Effects version of 3D. After Effects can do some more 3D rendering stuff. But when we're dealing with flat planes that have no depth to them, it's really kind of a 2.5D sort of effect, and let me show you how that works. I'm going to take my text layer, and I'm gonna take my background layer, and I'm going to make those 3D by clicking the 3D layer switch right here. If you don't see those, you can press F4 on the keyboard, whoops, I actually pressed F3 so F4 will toggle those layer switches for you there. And then I'm gonna right click here, choose New > Camera, and I'm gonna do a 35 millimeter. I don't need depth of field on, perfect. I'll click OK. Now, if you press C on the keyboard that'll bring up the camera tool. And if you click and drag, that will orbit and you're gonna think well that doesn't look very 3D at all and you are correct. And that's because these layers are in the same 3D position. If we hit P and we bring up the position with the text and the background layer selected, you can see that their z position, so we have x, y, and z, is exactly the same. But if we take the background layer and we come over to the z position and we just push it back in z space by a fair amount like that, whatever that might be, and then we scale this back up, it's gonna look exactly the same. But when we go back to our camera tool, and we orbit again, okay, now it's looking a little bit more 3D. We're getting this kind of perspective shift here or a parallax effect. And that's what we're gonna be going for, that's gonna sell this sort of 3D look. Now on top of that, I'm gonna take my background layer here and I'm going to add a CC Lens which I already have pulled up in my Effects and Presets panel. So I'm gonna drag that over to my background, and that's not what I'm going for. So I'm gonna come over here to the Effects Controls and increase the size. Now, you may notice that when you increase the size, you're gonna say, wow, that's pretty cool looking. And you can use cc lens for some really trippy sort of effects and transitions. In fact, one of the most popular sort of warp transition packs that's been out for a while uses this CC Lens affect to great, well, effect [LAUGH] to create some really cool looking warp-style transitions. It's really cool. So I'm gonna increase the size here. And then I'm going to animate the center to give it this sort of warp looking effect. And that's really gonna sell this sort of 3D parallax effect. In fact, we don't even really have to move the camera or I suppose move anything in 3D. Because if we animate the position of this, so let me undo that and I'll just drop a position keyframe here, pull that out to three seconds. And then I'll just move this over here. And then I'll come over to my background layer. I'll reset the center, drop a keyframe right here, and then just push this maybe like this. If I just do that, it's kind of has a parallax sort of effect. It may work better actually if I move this over to the other side. Let's try that. Yeah, look at that. Your brain is telling you that you are looking at something that has a 3D sort of aspect to it, a 3D perspective, if you will, when it's not at all. I could make these 2D layers and it will essentially look exactly the same. Check this out. I'll just reset the scale and, [LAUGH] It has a 3D sort of effect to it but it's not. It's not in 3D space and it was not using the After Effects camera at all. But we're gonna make it look even more 3D. So I'm just going to reset this here and I'll reset the center. Yeah, okay, great, that's reset. And to this animation, I'm going to add a null object. And I'm gonna make my null 3D, and I think I'm just gonna parent the camera to my null. I enter and name this Cam Control. And then if I pull up the rotation here, I can do some rotation for this and that will essentially orbit the camera around the center. And that's gonna give us a really nice sort of 3D look. It's gonna be a little bit more than what I was doing a second ago. So I think I'm gonna come to about five seconds. And then drop a keyframe on the Y Rotation, come back to the beginning, and maybe do, I don't know, I don't wanna do something too drastic, but maybe ten degrees. And I'm just gonna animate from here to there. All right, so five seconds, I'm also gonna come down to the background layer here, and drop a keyframe on this CC Lens effect for center. And then I'm gonna push this maybe over in this direction. Now, it doesn't look exactly right. But let me see if the motion is right now. Okay, I think that was the wrong way. I think I need to go this way. There we go. I think that's right. I think this has the right look to it. Essentially, the camera is going to do that parallax effect, but in this case, I just wanna use the CC Lens effect to give it a little bit more warping in the edges. So let me see, I will change the view to fit up to 100%. And you'll see that the edges kind of have this warp effect, almost like the background is bent, the way it's kind of pulling out here. And if we adjust the scale or the size rather, that'll become more drastic, although we do wanna fill it a little bit. So you can adjust the size to fill it or you can just scale up the layer if you want to either way. So if I increase the scale of the layer, then I can pull the size down. And that should make this effect a little bit more drastic. Right now, it is pretty subtle. Let's see if that looks any better. It's definitely doing a pretty good amount of warping over here. You can see it particularly in the corners. It's doing a nice warp there. All right, I think that's pretty good so far. So I'm gonna select these keyframes. And I think actually, I'll just take the end keyframes and just ease into them or pressing F9 on the keyboard. Let me just preview what this looks like here. Okay, pretty good, I think also I might want to do a position animation here on this null and I think I'd probably wanna push in on this And then pull back, which will be just a little bit more dynamic. It's not incredibly fancy. And I'm just gonna trim up the composition to the work area there. But I think it works and this is a good place to stop for this lesson. Coming up in the next lesson, we're gonna really punch up this title here with some cool text effects, so check that out coming up next. [MUSIC]


