
 Lessons: 22Length: 3.6 hours
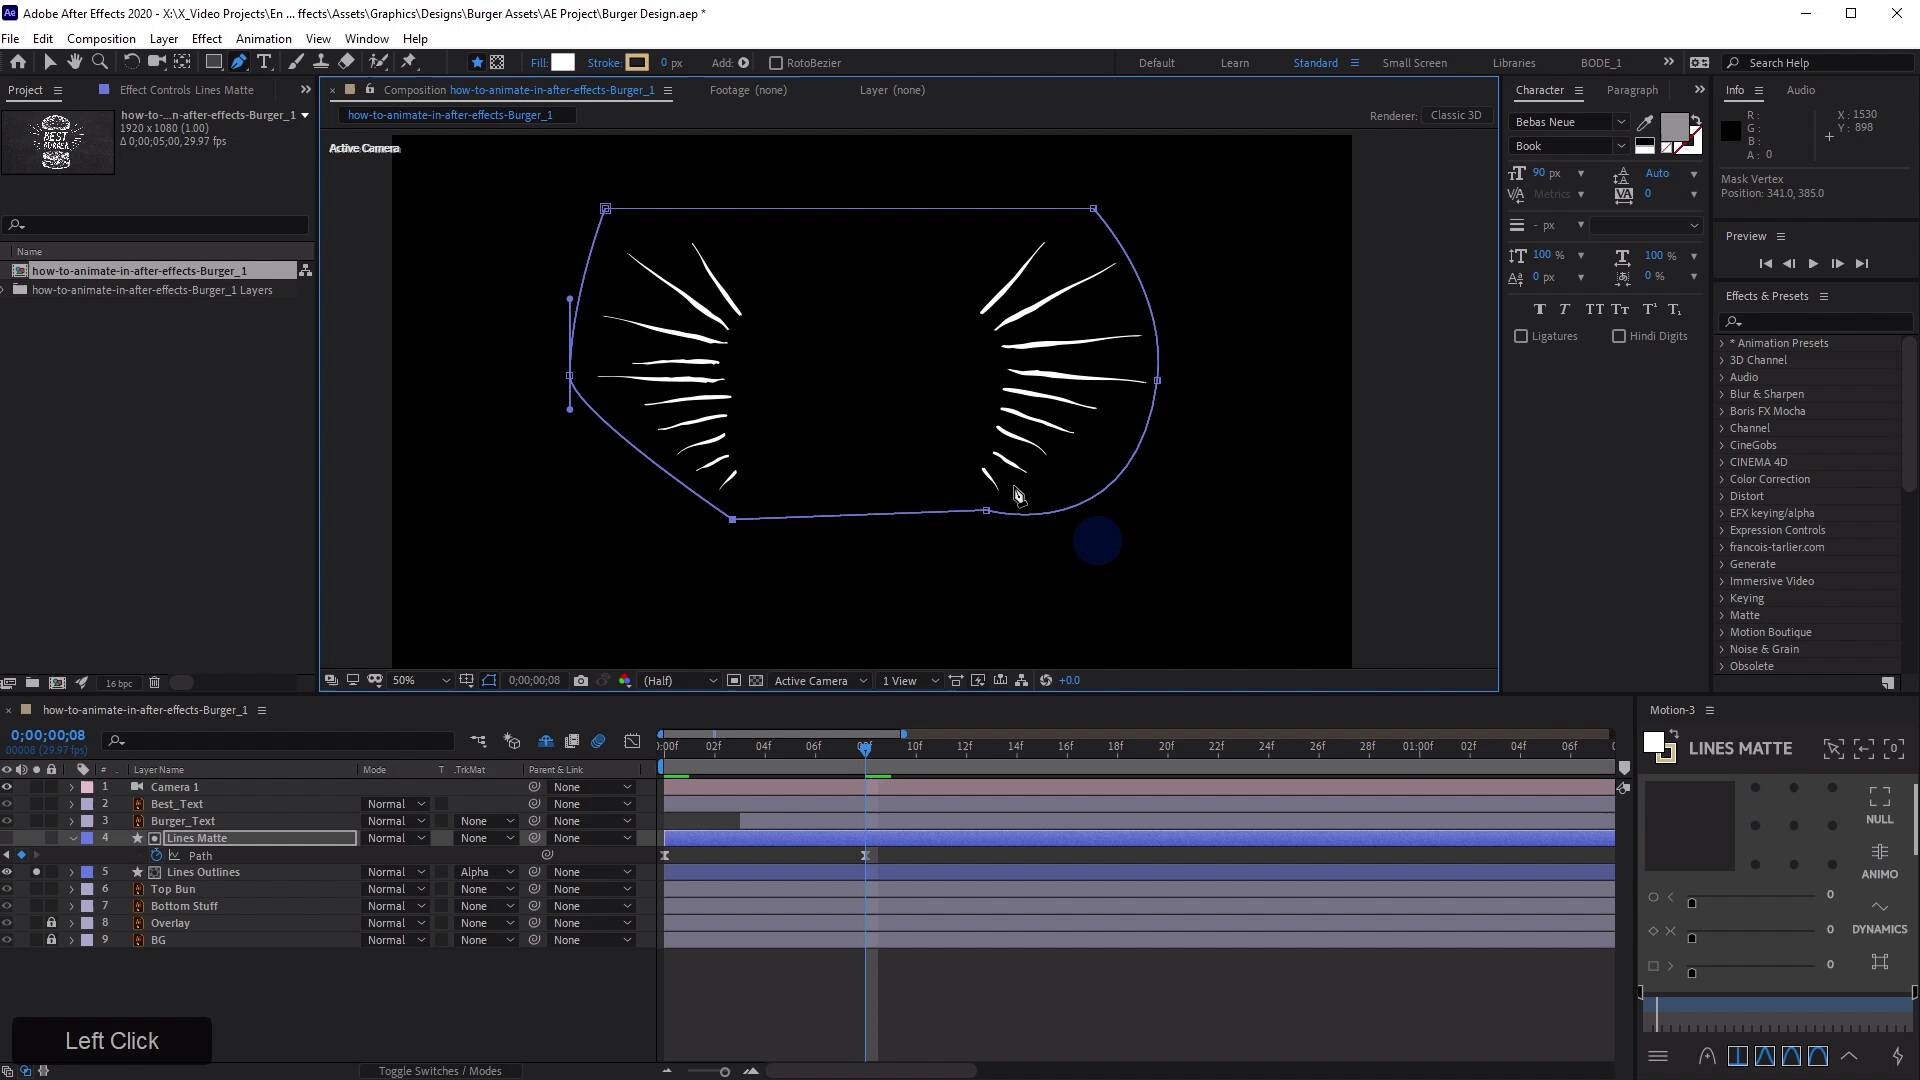
- Overview
- Transcript
3.2 Burger Logo: Animate the Layers
In this lesson, you will learn how to animate the layers that you prepared in the last lesson.
Related Links
- Burger Font (#ffffff)
- Chalk Background
1.Introduction
1.1Introduction02:55
2.Basics
2.1Keyframe Basics14:03
2.2Reveal Text With Masks and Shape Layers12:08
2.3Basic Text Box Reveal08:57
2.4Bounding Box Reveal11:48
2.5Text Reveal Rectangles: Part 113:02
2.6Text Reveal Rectangles: Part 208:44
3.Burger Logo Reveal
3.1Burger Logo: Prepare the Artwork11:54
3.2Burger Logo: Animate the Layers11:04
3.3Burger Logo: Final Touches10:46
4.Outer Space Intro
4.1Outer Space: Animate With CC Lens09:53
4.2Outer Space: Animating Strokes & Glow Effects13:42
4.3Outer Space: Lens Flares08:44
4.4Outer Space: Noise & Grain12:14
5.Boutique Text Effect
5.1Boutique Text: Prepare the Artwork06:59
5.2Boutique Text: Create the Layout06:14
5.3Boutique Text: Inertial Bounce Expression11:20
5.4Boutique Text: Wiggle Expression06:06
5.5Boutique Text: Layer Control06:07
5.6Boutique Text: Handwritten Text13:07
5.7Boutique Text: Final Touches11:38
6.Conclusion
6.1Conclusion02:09
3.2 Burger Logo: Animate the Layers
[MUSIC] In this lesson, we're gonna pick up where we left off in the last lesson, talking about how to animate this best burger design. [MUSIC] Continuing on, we have the text kind of ironed out here. The text is flying in, it's looking pretty cool, I like the way that's coming in here. What I'd like to have happen is, when the best burger hits, I want these lines to kind of fly out, and maybe even do kind of an animated wiggle, so let's look at how to do that. First, what I wanna do is I am going to right-click on the Lines layer, come up to Create, and then Create Shapes From Vector Layer. And then I'll just take this and move it down, I'll maybe put the shy switch on and then lock it, and then hide it. That way, it doesn't get in the way. So by converting this to a shape layer, I now have access to the individual paths here. So there's a few things that I could do with that, and I can do some clever things. But actually, all I really want to do is come down to Contents, and then right across from there, I want to add a Wiggle Paths. And if you don't have any of these shapes selected, or any of the groups selected, it's going to put that Wiggle Paths on the bottom. If it didn't, just find wherever it put the Wiggle Paths, then pull it down to the bottom of the stack. And what that's going to do is it's going to wiggle all of the lines in here. If we just hit play here, you can see what that's going to do. And I'm sure you're thinking, that does not look very good. And you are correct, [LAUGH] that does not look very good, but we can tweak it. What I want to have it look like is the kind of hand-drawn animation thing where it looks like you sort of drew a thing, and then you drew it again, and you drew it again on three different sorts of piece of paper, if you will. And then it sort of animates between them, and it has this really cool animation effect. That's probably not a great way to explain it. But once you see how we're gonna modify it, it's gonna all make sense. I'm gonna switch the points from Corner to Smooth. I'm gonna bring down the detail here, maybe to something really low like, I don't know, 1.5, and then I'll bring down the size to, I don't know, 3. And then I'm going to push up the wiggles per second to 15. And now when I play this, you see, that's what I was talking about. I want this kind of wiggly, kind of animated look here. Might be able to increase the detail, maybe to two or something. If we push it up too much, we're gonna get some weird blobby stuff in here, and that's not gonna look so hot. So I think 1 or 2 will probably work fine, that's looking cool. And then next, I wanna animate these lines coming from kind of the center out. So I'm just gonna solo up the lines here. That'll make things a little bit more snappy. And I think the easiest way to do that is just with a matte layer. They're gonna come out pretty quick, or I'd like them to come out pretty quick, so I can get away with using just kind of a shape layer here. And so I'm just gonna draw one with the pen tool. So I'm just gonna click and drag with no other layer selected, and that's gonna create a new shape layer. And I'll just make a kind of crude shape here. Because I want it to start very close to the inside edge of these lines, kind of like this, without touching them. I can probably get away with making that linear, and then something like this. And then what I'm gonna do is, I am going to dive down into the contents, into the shape, into the path, and put a path keyframe right here. I'm gonna move this keyframe, I'll just move it in the beginning of the layer for now, cuz this is where we're gonna start. And then I'll come maybe, I don't know, let's go eight frames, it'll probably change. And if I double-click on my path here, what I wanna do is just scale it up. And if I hold Ctrl and Shift, I can constrain the proportions, and kinda move everything in a uniform way around the center anchor point. So now it's just gonna go from here bloop, t/o there, it's gonna get nice and fat. And then I probably wanna easy-ease these and then jump in here and modify this curve such that it flies out like this. So pull this handle all the way to the left, pull this one all the way to the left like that. Cool, I'm gonna select the layer, name it Lines Matte, very good. Pull it down above my Lines Outline layer, hit F4 on the keyboard to switch or toggle the modes. And then take my Lines Outline and set it to alpha map. And now, my lines should draw on bloop, just like that, very cool. And we'll go frame by frame here, I just wanna see what's happening. Okay, looks like maybe, Maybe they're coming on a little strong. And I think if we modify this path a little bit, so I'm gonna select the pen tool again. I'll just Ctrl-click so I don't have anything selected, and then I'm just gonna bring these points around. Because I think what I'd like is, I'd like a tighter shape in here. And that way, it'll look like things are drawing on I think a little bit more uniformly. You're just gonna have to take my word on that until you see what this is going to look like. So I'm just gonna try and keep this matte as tight as I can around these lines. And let's see how that looks. I like that, that's cool, all right, very good. So I'm gonna unsolo my Lines Outline. And I wanna line this up for right when the burger sort of hits. The best burger, so somewhere in here, I want it to start flying out, right about there. And I can also turn motion blur on, like this. So let's see what this looks like at this point. Very cool, not too bad. The other thing that I'd like to have happen is I'd like this burger to start kinda from a closed, well, not exploded position, and then kind of explode up just before the text gets there. So to do that, I'm actually going to just change the color of this text here so that I can keep track of it and then move all of this down the timeline just a little bit. And then I'm gonna take my burger buns here, and right about here, I'm gonna drop a position keyframe. All right, and then I'll go back to the beginning here, and I think what I'd like is, I'm gonna move this burger bun down, and move this burger bun up. And we have a little bit of a problem, because you may have not realized it before this point, but this illustrator graphic is just basically outlines. So there is no kind of background fill in each one of these elements. That's something that we can fix, so definitely stay tuned for that. But I think for the amount of frames this is gonna be on, it's not a big deal at this point in time. I'm gonna have it start here and kinda fly out like this, and make room for this burger to fly in. I'm just gonna hit F9 on the keyframes here. Hit this button here, which will fit all graphs to view, so I can just see these a little bit bigger. And then I'll just give these a little bit of a curve here like that. I think that looks good. The timing is not perfect, like I said before, so I think I'm gonna slide this stuff forward. Perfect, yeah, just like that. I want it just sliding out of the way, boom, just like that. Now I think the effect that I would like to see is I'd like the top bun and the bottom kind of burger stuff here to continue to basically expand. So to do that, what I'm gonna do is I'm going to create a new null object. And I prefer to have the anchor points in the center of my null layer. So I did the Ctrl+Alt+Home and then Ctrl+Home to kind of recenter that up there. And so what I'm gonna do is, I'm going to drag this up here. And then I'll hold Ctrl, and if I'm close to the anchor point on that top bun, it should snap right there. And I'm just gonna name this null right down here, I'm gonna hit Enter on the keyboard and name this Top Bun Cont, is my abbreviation for controller. I'm gonna bring that down here, put it right above the top bun. I may even select both of these and change them to fuchsia so I can keep track of the layers. And then I'm gonna take the top bun layer and parent that to this top bun controller. That way, after this initial move, I can really easily create some secondary motion by just animating this null. So I'm gonna use the keyboard shortcut Alt+Shift+P and Alt+Shift+R to drop in a position and a rotation keyframe. And then I will go to the end of the timeline, move this up a little bit, and maybe rotate it a little bit like that. Now I'm going to go to my solids here and just drag down another null. I don't necessarily have to make another one. It's kind of a pet peeve of mine to keep my projects as tight as possible. I like to just keep using the same null over and over. So I'm just gonna make this null an adjustment layer, and that will essentially make it transparent. And then, I'm going to come right down here and hold Ctrl again, and just snap the anchor point to my Bottom Stuff layer. I'll rename this to Bottom Stuff Cont for controller, and then parent my Bottom Stuff layer to my null here. And then I'm gonna do the same thing to this null. I'm gonna hold Alt+Shift, and then hit P, and then R to drop a position and a rotation keyframe. I'll go to the end of the timeline, and this time, I'm gonna push the burger down. And then I'm just gonna rotate it maybe opposite of what I had before. Okay, so let's look at what I have right now. I'm just gonna fit to view, maybe make this a little bit bigger. All right, let's check this out. I love it, I think it looks so cool. That's a good place to stop for this lesson. Make sure to check out the next lesson, where you're gonna learn how to put some final touches on this animation. [MUSIC]


