
 Lessons: 22Length: 3.6 hours
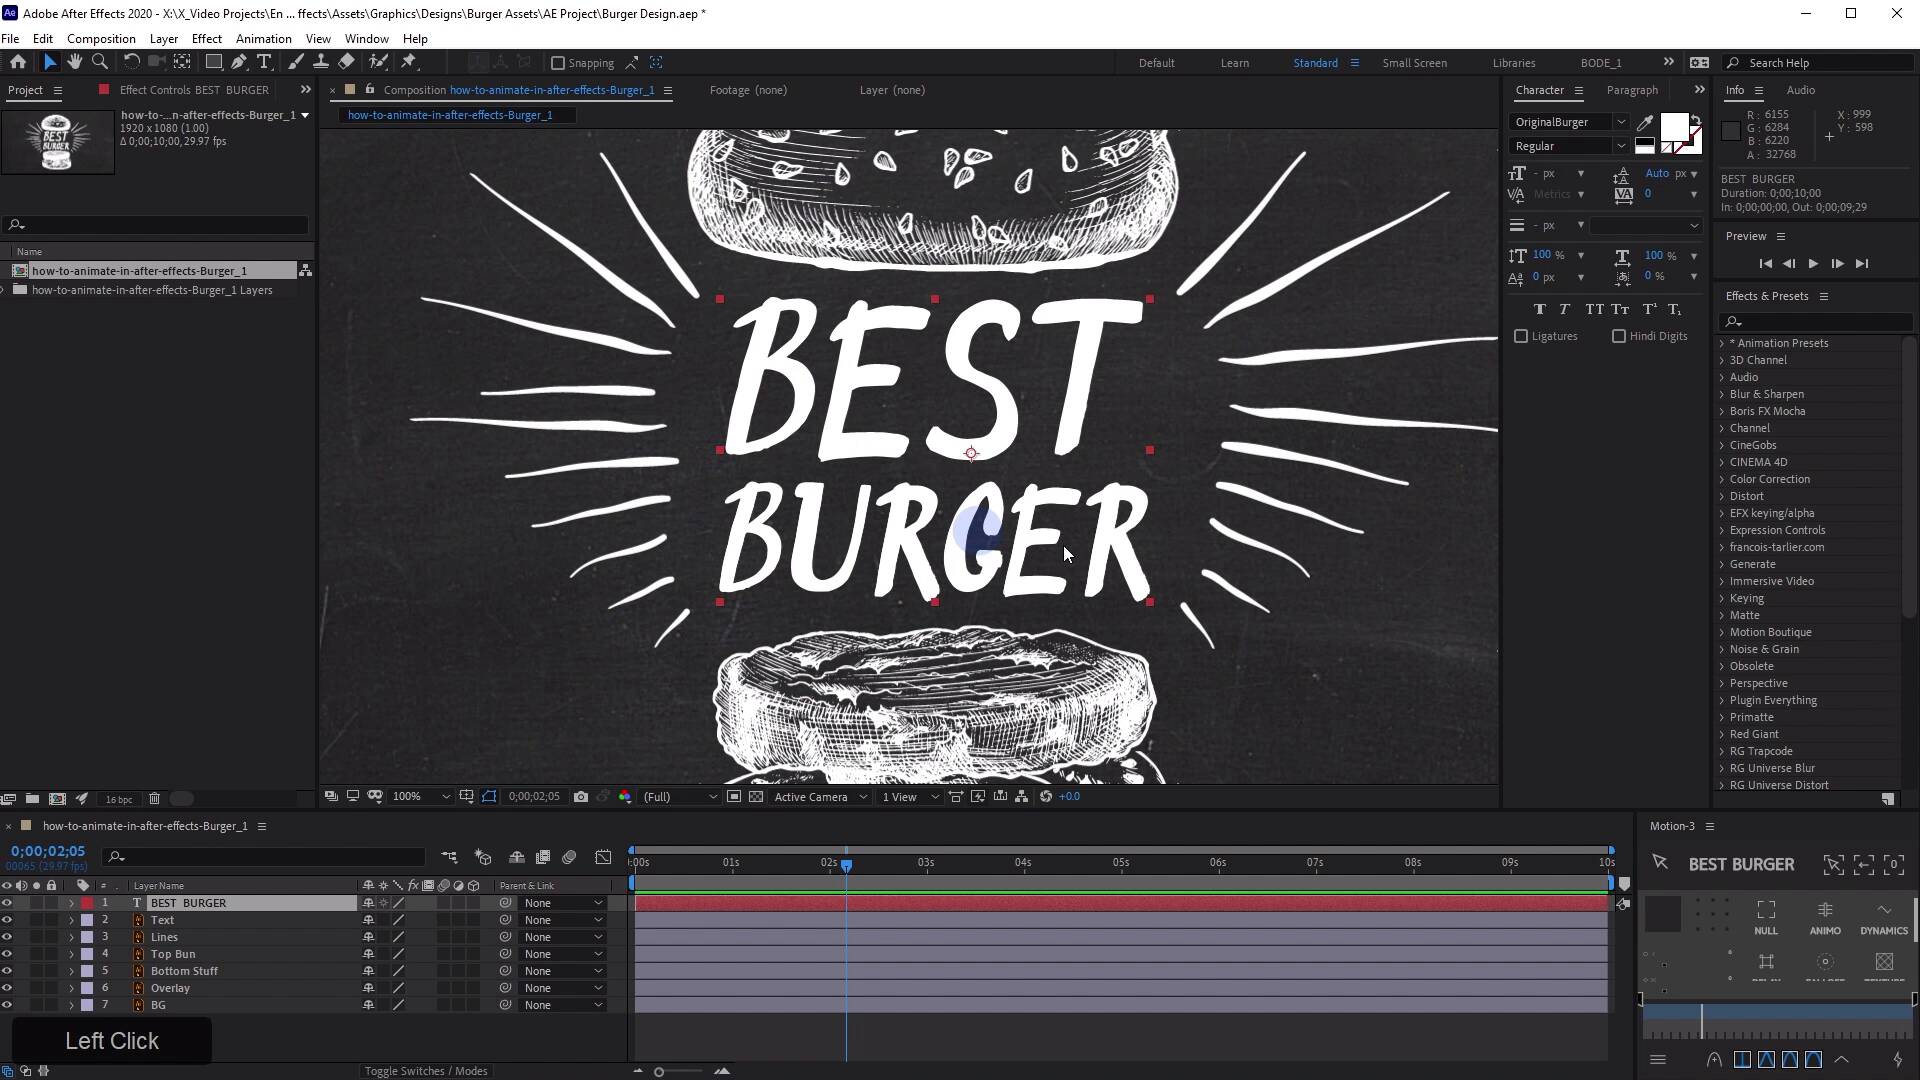

- Overview
- Transcript
3.1 Burger Logo: Prepare the Artwork
In this lesson, you'll learn how to prep artwork created by a designer and get it ready for use in After Effects.
Related Links
- Burger Font (#ffffff)
- Chalk Background
1.Introduction
1.1Introduction02:55
2.Basics
2.1Keyframe Basics14:03
2.2Reveal Text With Masks and Shape Layers12:08
2.3Basic Text Box Reveal08:57
2.4Bounding Box Reveal11:48
2.5Text Reveal Rectangles: Part 113:02
2.6Text Reveal Rectangles: Part 208:44
3.Burger Logo Reveal
3.1Burger Logo: Prepare the Artwork11:54
3.2Burger Logo: Animate the Layers11:04
3.3Burger Logo: Final Touches10:46
4.Outer Space Intro
4.1Outer Space: Animate With CC Lens09:53
4.2Outer Space: Animating Strokes & Glow Effects13:42
4.3Outer Space: Lens Flares08:44
4.4Outer Space: Noise & Grain12:14
5.Boutique Text Effect
5.1Boutique Text: Prepare the Artwork06:59
5.2Boutique Text: Create the Layout06:14
5.3Boutique Text: Inertial Bounce Expression11:20
5.4Boutique Text: Wiggle Expression06:06
5.5Boutique Text: Layer Control06:07
5.6Boutique Text: Handwritten Text13:07
5.7Boutique Text: Final Touches11:38
6.Conclusion
6.1Conclusion02:09
3.1 Burger Logo: Prepare the Artwork
In this lesson you will learn how to take a design made by a designer and prep it for work in After Effects. So at some point in your After Effects/ animation journey. You're gonna be given a sets or full-on designs from a designer or some other third-party and these will not always be ready to animate the way they are. Sometimes they need a little bit of massaging in either Adobe Illustrator or Photoshop to be able to get them ready to work with an After Effects and that's the case here. So this design was provided for me. And all of these assets came from Envato elements. But if I were to import this illustrator file, which is what this is, into After Effects the way it is now, it would import as a flat layer, so I wouldn't have access to all of these individual elements, the text, the little burger bits here, the speed lines, the background, everything would be flat. And so there's not a whole lot I could do with it to make it very interesting. So you're gonna learn how to take this from illustrator and kind of prep it for After Effects. And this is a very useful sort of thing. It's the kind of thing that you do a lot when you're working with larger teams. So the first thing that I would do is in Illustrator if you don't have the Layers panel pulled up, come over here to window and make sure you pull up the Layers panel. And then if you select your top layer here, what you can do is you can click on this fly over here. And for whatever reason, it's off the screen. So I'm gonna pull it over like this. And you're gonna choose Release to Layers Sequence. What that's gonna do is that's going to essentially take all of those elements that are built into this layer and put them on their own layer. And then we can just pull them down so that they're on their own individual layers, you can see that the colors changed. And now if I were to import this into After Effects, just like it is right now, we'd have access to all the individual layers. That's basically what you need to do. But let's go a little bit further and make this a little bit better. I'm just gonna save this really quick so I have a separate file here. Just gonna put underscore one on it. And then what I like to do is go through the layers and name them now because when I import them into After Effects, I can rename the layers. However, if I move the Illustrator file and I need to relink it in After Effects, naming the layers in the file is going to be a big help. So I just turn on and off the eyeball here and figure out what is on which layer and then I'm just gonna label them. If you double click on the name here, you can just rename that. So I'm just gonna call this lines and that's the top bun right there. And this is the bottom stuff. And then we have this overlay layer. And we have the background sometimes if you if you double click just to the right of the name, it'll bring up the layer options. You can also use that change the layer color as well. So that's very good, I can save this. Next I wanna import those assets. So I'm just gonna double click in the Project panel here, bring up the import window, and I'm going to navigate to where that Illustrator file is the underscore one is the one that I have renamed, the layers and I'll click Import to bring that in. And then I'll get a dialog box here and I have a couple of options. I wanna make sure that I choose composition instead of footage. Footage of bringing in a flat file, compositional, I'll bring in all of the layers and then underneath footage dimensions, I like to have layer size as opposed to document size. Layer size makes the bounding box of the individual layers fit around the layers instead of being the entire size of the document. And I'll click OK and we'll bring that in. I'll double click to open up that composition. And I'll just give this a second to preview, all right, so there we go. We have it in After Effects, and things are looking pretty good. I have access to all of the individual layers, very nice. And I can start animating this. Now I'm gonna give this a little bit of a treatment similar to a project that I worked on for a US company called smashburger. Smashburger is an American fast food casual hamburger restaurant chain. They have 370 locations in 37 states and nine countries. I ended up working on one of the pitch videos and they won the account. So they are the agency of record. So I think what I'm gonna do is, I'm gonna get this text here to kind of fly in from behind the viewers perspective. And kind of smash in here and then have these lines kind of animate out. Have the burger maybe fly apart. So let's get to work on animating this. I'm gonna select the text here. And I have a couple of options for working with the text. I can work on it just like it is with this text layer here or I can go back over to Illustrator. And I can select the text, grab the text tool here and just select the text. Copy it jump over to After Effects, hit Ctrl T, bring up the text tool and then just paste it. And then even though I wasn't selected on the right font or the right font size or any Anything like that, it's actually going to be pretty much exactly what I need to be able to place in here for whatever reason the spacing on this is not quite right. So I'm going to hold Alt and then use the left arrow to bring this over to line it up, right. So if there's anything kind of Interesting or clever that I wanted to do with the text animator in After Effects, that's how I could get the text to come over and be the exact same size and more or less the same placement very, very quickly. But I think for simplicity's sake, I'm going just work with the vector layer here. Now like I mentioned before, this font original burger came from Envato elements, and you can find it right here. It's a great looking font. But I'm gonna get rid of the text layer and I'm just going to work with the vectorized text layer right here. So I'm going to create a mask around this. I'm going to hit Q to bring up the rectangle tool and just draw a rectangular mask around the word BEST. And it'll just kind of size that up. Sometimes if the masks aren't centered around the layers, it just gives me anxiety. And I'm gonna rename the layer to best text. And then I'm gonna duplicate it CTRL+D, hit ENTER on the keyboard and rename this Burger Text. And then on the Burger Text layer, we're just gonna double click My Mask. Grab the top of the transform handle here, and just pull it down for the burger part right here, and then just kinda resize that for this word right down here. I'll click away and that mask looks fantastic. If I select both of these layers and then do Ctrl Alt Home, that will recenter the anchor points in the middle of the layers, and that looks great. So what I wanna do for the animation portion of this, I wanna have these fly in .So you may be thinking a scale animation would work and indeed, it will. So with my best text layer selected, I'm going to hit s to bring up the scale. I'm going to click The Stopwatch to enter Insert a key frame on maybe eight frames. And by the way, let's just check the composition settings here. I actually didn't even look to see what the resolution was of the project, but it is looking good. It's 1920 by 1080 and it came in and we're working at 29.97. That's something good to kind of work out before you get too far down the road here. I think actually, we can make this just a five second animation. We'll make this pretty quick. So I have my scale key frame here at frame eight. I'm gonna go back to the beginning, and I'm just gonna scale this up just an absurd amount like that, so I can't see it. And if I play this, let's see what's gonna happen, okay, all right. So it looks like it kind of starts slow, and then it gets like, whoa. It goes from here to there. In one frame, and if you're wondering why it gets kind of janky looking here, that's because we need to turn on the continuously rasterize button right here. And we can probably do that for all of these layers. In fact while I'm at it I'm gonna take these two layers right here, and I'm just gonna lock them to prevent me from messing with them. You can see once I toggled on that continuously rasterized but in there now, this looks nice and smooth, but the motion is kind of weird. I wanna make some more room here so that you can see. I'm gonna select my keyframes, right click on them, go to keyframe assistant and then choose exponential scale. what that'll do is that will make the scale if we look at the graph editor here, check this out. Now our scale has this kind of exponential curve to it. And if we play it back, now it's looking a little bit nicer. It's coming in. I think more like More how you would expect it to kind of fly in. And we can adjust this to make it longer or shorter by selecting all of these key frames, and then holding down alt, grabbing the last key frame and pulling and dragging. And what this will do is basically compress all of those key frames to make this animation shorter or faster. So that's one way that you can do it another way, which is somewhat similar, is we can add a 3D kind of virtual camera in here. So I'm going to right click and go to New camera. I'm gonna make this 35 millimeters. I don't need depth of field on and just click OK. It's gonna tell me, hey, you don't have anything 3D in here and I'm just gonna click OK. That's totally fine, because I'm gonna make my two text layers 3D, and I'm gonna show you a slightly different method to get the same kind of motion with less key frames. So instead of animating the scale, what I'm gonna do is animate the position So at about the same spot, frame eight, I'm gonna drop a position key frame, when it come back to the beginning and then I'm just gonna fly my text out in the z axis here, or in the z direction. You can see it kind of looks like it's going a little bit off to the left there. So I'm just gonna bring that down and maybe even pull it down in the y axis. As well. Let's see what that looks like. Very cool. Let's just make it shorter. I like that. Just keep it linear. We'll keep it We'll keep it cool and linear for now, I want to do the same thing with my burger text. I'm gonna come right here and I'll use the keyboard shortcut to drop a position keyframe. I'll come back to the beginning and fly my text out towards the camera and maybe kind of centered up a little bit more. And then what I want to do is I'm actually going to pull my burgers layer down below my best text layer. And then push it down the timeline, just a hair like that. Maybe I'll, enable motion blur here. That looks pretty cool. Very cool. Maybe offset at one more frame and then push this one out just a little more. So we don't see it on the first frame. Cool. I think that looks fantastic. So the text is looking pretty good right now. And it's time to move on to some of these other elements. And I'm gonna show you how to do that coming up in the next lesson.


