
 Lessons: 43Length: 6.5 hours
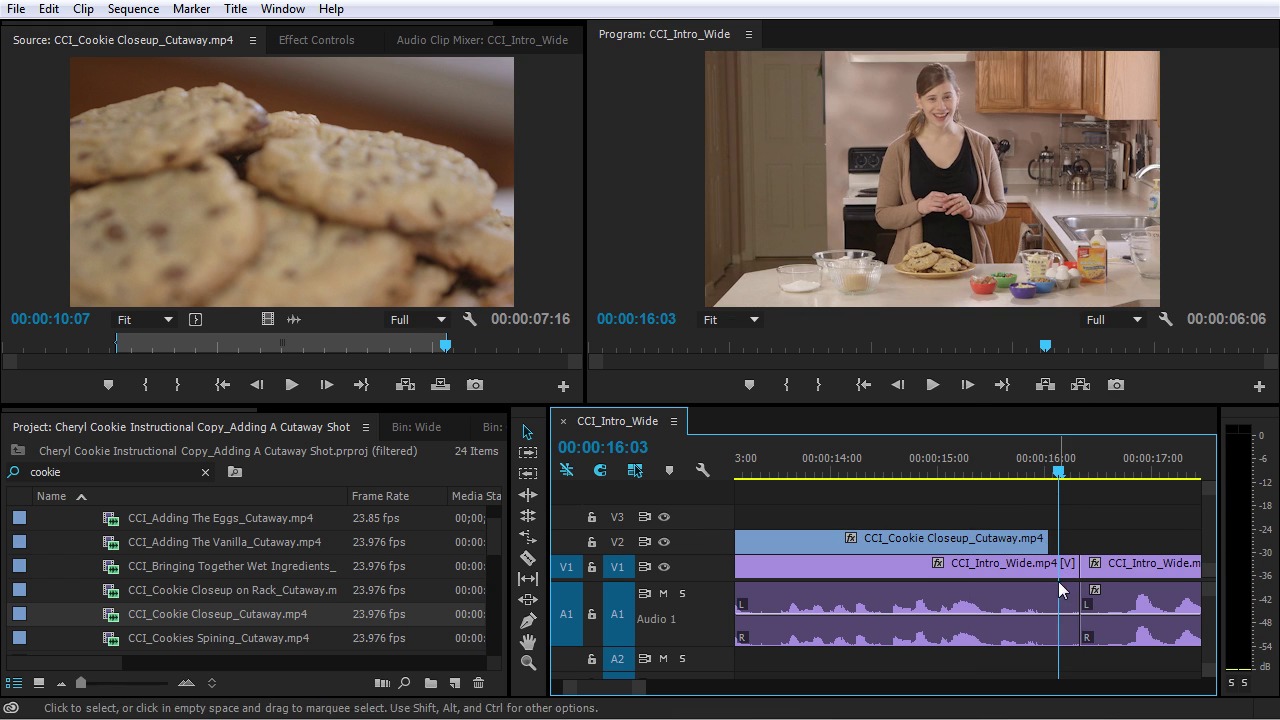
- Overview
- Transcript
5.1 Adding a Cutaway Shot
In this lesson you will learn how to add illustrative cutaway shots to your video!
1.Introduction
1.1Introduction01:12
1.2What You Need07:14
2.Getting Started
2.1File Structure06:07
2.2Quick Tour of Premiere Pro11:14
3.Set Up Your Project
3.1Import09:55
3.2Organize08:39
4.Editing Basics
4.1Creating a Sequence10:07
4.2Cuts06:26
4.3Subclips06:46
4.4Editing in the Timeline, Part One11:27
4.5Editing in the Timeline, Part Two07:19
5.Beyond Basic Editing
5.1Adding a Cutaway Shot10:06
5.2Building on the Basic Edit, Part 107:09
5.3Building on the Basic Edit, Part 209:09
5.4Audio Transitions11:22
6.Fine-Tuning the Look and Sound
6.1Video Effects10:48
6.2Master Clip Effects10:47
6.3Adjusting the Volume of Your Tracks09:46
6.4Audio Effects11:17
6.5Adding Titles11:16
6.6Exporting12:10
7.Conclusion
7.1Conclusion02:33
8.Frequently Asked Questions
8.1FAQ Introduction01:22
9.Sharing
9.1Dynamic Link to After Effects12:44
9.2Exporting to HEVC for Faster Sharing Online06:39
9.3How to Export ProRes Video and Other Professional Formats07:17
10.New Audio Workflows
10.1Using the Essential Sound Panel for Dialogue: Part 111:58
10.2Using the Essential Sound Panel for Dialogue: Part 206:35
10.3Using the Essential Sound Panel for SFX and Ambience07:59
10.4Using the Essential Sound Panel for Music08:35
10.5Send Audio to Audition for Editing From Premiere Pro13:59
10.6Mixing Audio With Killer Effects Inside Premiere12:57
11.Essential Graphics Panel
11.1Use the Essential Graphics Panel to Create Basic Titles12:30
11.2Use the Essential Graphics Panel to Create a Motion Graphic Title in Premiere13:23
11.3Make Your Own Templates for the Essential Graphics Panel03:51
11.4How To Use Title Templates in the Essential Graphics Panel: Part 107:14
11.5How To Use Title Templates in the Essential Graphics Panel: Part 207:09
11.6How To Use Transition Templates in the Essential Graphics Panel08:26
12.Real-World Projects
12.1Use Proxies for Faster Editing13:42
12.2Create Multiple Camera Shots From a Single Camera10:56
13.New Features
13.1Using the Freeform View09:36
13.2Use Auto-Reframe to Crop Your Video09:36
13.3How to Work With Captions13:41
5.1 Adding a Cutaway Shot
In this lesson, you will learn how to add illustrative cutaway shots to your video. So a cutaway shot or a B-roll shot, is footage that's inserted to help illustrate a point to help tell a story or to hide things like a zoom, a camera shake, or something else that you don't want the viewer to see. In this case, I'm going to use a cutaway shot to do two things. It's going to help illustrate what Cheryl is talking about. And it's also going to help hide this transition here that we've created from the first part of the take to the last part of the take when she gave a stronger delivery of those last few lines. So to help make this a little easier, I've created a little PDF here with a shot list in the order that we will be assembling these clips. And you can find these PDF along with the rest of the downloaded files for this course. So you can see right up at the top it says, CCI_Intro_Wide, and then I have another shot listed called CCI_Cookie_Closeup_Cutaway. So let's jump back to the project and locate that file. The easiest way to do that is to just search for it. So let me search cookie and see what comes up here. In the cutaway folder I see, yeah, right here, Cookie_Closeup_Cutaway. So if I double-click this, it's gonna open up in the source monitor. And let me scrub along here and see what we have, all right? There's a little kind of rack focusing, a slow little tilt, and then a little bit of a rack focus, and then a kind of nasty zoom out, and some more kind of shaky camera stuff. I think I can probably grab a portion of this footage here, probably right here after this initial focusing takes place. So I'm gonna mark an in point with I on the keyboard, and then I'm gonna scroll along here. I'll mark an out point right before this snap zoom happens, by pressing O in the keyboard. Now what I want to do is add this cutaway here so that it ends right on this edit. So what I could do is position my playhead right on that edit by holding Shift and then that playhead will snap right to that edit. Then over here in the source monitor, I'm just going to drag the video only right into my sequence. And now I have something like this. Let me play it right before this cutaway happens. >> It can be daunting trying to find just the right recipe, not flat, not too dry, delicious flavor, picture perfect, and best of all, easy. Hi. >> When Cheryl was talking about the attributes of the cookie, this gave a nice illustrative shot for the viewer to look at. It also helped hide this nasty transition that we had before, and now it's looking more natural. Because now that the viewer is looking at a different shot, you really can't tell that we're switching to a different take. Now there is some weirdness going on in the audio there where you can hear kind of some weird things going on with the breath, but that's something that we can fix later. So I'm going to zoom in here, and I'm also going to expand this audio one track here, so I can see the audio waveforms. And this will help me with the timing on where I want this clip to start. So I want this clip to start right when Cheryl starts talking about the attributes of the cookie. So let me just scroll along here >> The right recipe, not, the right recipe. >> So right about here, I think. >> Just the right recipe, not flat >> And I also want this clip to start maybe just as the camera is moving, because if I started right here, watch what the camera does. >> Just the right recipe, not flat. >> It just kind of sits and hovers for a second, and I think that's just a little bit confusing. So I'm going to make a little edit to this in point here by just using the trim tool And when I do, the program monitor is showing me exactly where the new start frame is going to be. So if I scrub slowly, I can see right here, the camera is just starting to move. So I'm just gonna scootch just maybe a couple of frames back. And that's where I want this new start point to happen right here. >> Not flat. >> Not flat. >> Maybe even a few frames after that. >> Flat, not too dry. >> Yeah, right about there, it looks pretty good. And now I'm gonna pull that clip so that it starts right between the end of this word, and the start of when she says, not flat. >> Right recipe, not flat. >> So right about here. >> Right recipe, not flat, not too dry, delicious flavor. >> Now you see, there's a little bit left over here where we run out of frames on this clip here, and it cuts back to this camera, and then there's that weird transition again. So let's see if we can fix that. There may be some more frames here that we can sneak out of this clip. Nope, there actually isn't. So, I can probably adjust this edit point here, maybe just pull it back a hair. So, I'm going to hold CTRL and then do ripple at it right back to here. >> Best of all, easy. Hi, my. >> Did you hear that? What I did was, I essentially move the edit point so that this clip starts right about the time when Cheryl was going to take a breath in this clip. So when it cuts back to this camera. >> Hi. >> We see a small little breath and it looks and sounds pretty natural. Let me play that again for you. >> And best of all, easy. Hi, my name is Cheryl Ziegler. >> So let me play the whole thing right from the beginning. I'm going to press home on my keyboard. >> Okay, thank you. >> And apparently something got goofed up with the beginning of the shot. So let's fix that as well. I'm going to hold CTRL here and just scroll to right about here. I don't want to catch her in the middle of kind of opening her mouth for that first breath. >> Have you ever had a recipe for chocolate chip cookies? >> And I think what I'll probably do is add a little bit of a fade from black in the beginning of this clip that'll kind of transition in from that. A little bit awkward breath that's happens there. So let me put the playhead back at the beginning, and let's play this down. >> Have you ever had a recipe for chocolate chip cookies that left something to be desired? It can be daunting trying to find just the right recipe, not flat, not too dry, delicious flavor, picture perfect, and best of all, easy. Hi, my name is Cheryl Ziegler. And in this video, I'm going to show you how to make big bakery style chocolate chip cookies. >> I'd say that's pretty good. So there's a little bit of weirdness I think at the end of this clip here. It doesn't quite flow exactly the way I'd like into the next clip. It just kind of hangs out and goes out of focus, and to my eye, it looks a little bit weird. So what I might do is just trim this back a hair until the cookies are just a little bit more in focus, and then slide the clip down. When I do that though, now the in point of the clip is not going to be lined up where I want. So I wanna get back there and adjust the in point for this cookie close up cutaway here. To make that navigation a little bit easier, what I can do is come over here and toggle on the track targeting for video two. Then I can press the up arrow, and that will jump the playhead to the previous edit point on all the targeted tracks. So if I press the up arrow again, it's going to go to the next edit point here because video one is also targeted. If I press the down arrow, is going to go to the next edit point as the next edit point later in time or to the right, but only on the targeted tracks. If I press the down arrow again, you can see it lands right here. But if I take targeting off a video two when I press up, now it's going to jump right back to the beginning because this is the previous edit point of the targeted track which is video one and audio one, and also audio two and audio three, but there's nothing on there. So I'm gonna enable track targeting for video two. And then from this point, I'm gonna press down. And now what I need to do is adjust the beginning of this track here so that it comes in right here. So I'm gonna trim this back, and now check out what I have. >> Not flat, not too dry, delicious flavor, picture perfect, and best of all, easy. >> Now, this still looks a little bit weird to me. So I'm going to zoom back in here. And another thing that I can do is take it right from just before the camera starts moving, and then I can just stretch the clip out. And to do that, I'm gonna grab the rate stretch tool, which is R on the keyboard. You can also see it's right over here. And now what I can do is grab the end of this clip. What the rate stretch tool does is shortens or lengthens clips by either speeding them up or slowing them down, respectively. But it leaves the in and the out points unchanged, which means I didn't change where this clip was coming in, I only changed how long it was happening. So it's basically filling in some of the space between those frames so that I can get this nice start point that I was looking for before. Let's see what it looks like. >> The right recipe, not flat, not too dry, delicious flavor, picture perfect, and best of all, easy. Hi, my. >> That looks pretty good to me. I got the nice in point that I was looking for and it was just the right movement for my eye. I got the right out point where it was just still barely in focus on those cookies, and then it cut to this later take where Cheryl was delivering the end of the intro, and it was a little bit stronger of a performance. And again to do that, I used the rate stretch tool, which is R on the keyboard. I'm going to press V to go back to the selection tool here. So this is looking pretty good, but we're not quite done yet. In the next lesson, you will see how to use all the basic skills you've learned so far to build out the first few minutes of this instructional video. So check that out. Coming up next


