
 Lessons: 43Length: 6.5 hours
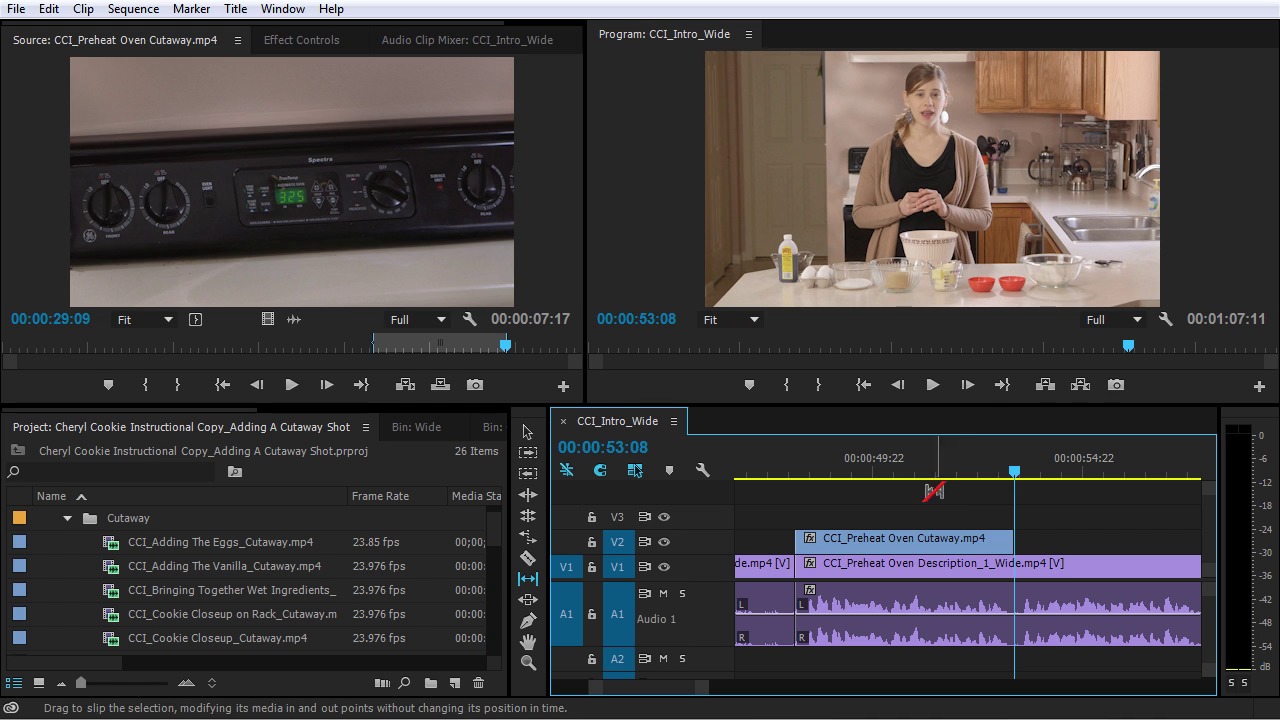
- Overview
- Transcript
5.3 Building on the Basic Edit, Part 2
In this lesson you will learn how to put together a few more shots in this instructional video!
1.Introduction
1.1Introduction01:12
1.2What You Need07:14
2.Getting Started
2.1File Structure06:07
2.2Quick Tour of Premiere Pro11:14
3.Set Up Your Project
3.1Import09:55
3.2Organize08:39
4.Editing Basics
4.1Creating a Sequence10:07
4.2Cuts06:26
4.3Subclips06:46
4.4Editing in the Timeline, Part One11:27
4.5Editing in the Timeline, Part Two07:19
5.Beyond Basic Editing
5.1Adding a Cutaway Shot10:06
5.2Building on the Basic Edit, Part 107:09
5.3Building on the Basic Edit, Part 209:09
5.4Audio Transitions11:22
6.Fine-Tuning the Look and Sound
6.1Video Effects10:48
6.2Master Clip Effects10:47
6.3Adjusting the Volume of Your Tracks09:46
6.4Audio Effects11:17
6.5Adding Titles11:16
6.6Exporting12:10
7.Conclusion
7.1Conclusion02:33
8.Frequently Asked Questions
8.1FAQ Introduction01:22
9.Sharing
9.1Dynamic Link to After Effects12:44
9.2Exporting to HEVC for Faster Sharing Online06:39
9.3How to Export ProRes Video and Other Professional Formats07:17
10.New Audio Workflows
10.1Using the Essential Sound Panel for Dialogue: Part 111:58
10.2Using the Essential Sound Panel for Dialogue: Part 206:35
10.3Using the Essential Sound Panel for SFX and Ambience07:59
10.4Using the Essential Sound Panel for Music08:35
10.5Send Audio to Audition for Editing From Premiere Pro13:59
10.6Mixing Audio With Killer Effects Inside Premiere12:57
11.Essential Graphics Panel
11.1Use the Essential Graphics Panel to Create Basic Titles12:30
11.2Use the Essential Graphics Panel to Create a Motion Graphic Title in Premiere13:23
11.3Make Your Own Templates for the Essential Graphics Panel03:51
11.4How To Use Title Templates in the Essential Graphics Panel: Part 107:14
11.5How To Use Title Templates in the Essential Graphics Panel: Part 207:09
11.6How To Use Transition Templates in the Essential Graphics Panel08:26
12.Real-World Projects
12.1Use Proxies for Faster Editing13:42
12.2Create Multiple Camera Shots From a Single Camera10:56
13.New Features
13.1Using the Freeform View09:36
13.2Use Auto-Reframe to Crop Your Video09:36
13.3How to Work With Captions13:41
5.3 Building on the Basic Edit, Part 2
In this lesson, I'm gonna continue working on the next few shots in the sequence and you are gonna learn exactly how they're put together. All right, let's see what is coming up next here. Now I have Preheat Oven_Cutaway, Preheat Oven Description, one Preheat Oven Description_Wide. So I think there's two shots that have Preheat Oven Description and there's also a Cutaway shot. So, let me look at what that is. Let's start with the Preheat Description 1. So I'm gonna clear the search bar here. Now pull up preheat oven description_1. >> Okay, no problem, okay. Before you start assembling the ingredients preheat your oven to 325 degrees. This temperature is a little bit lower than the standard 375 degrees, cuz we're making extra large cookies. So we wanna take the low and slow approach. We want the cookies to be perfectly baked on the outside and not extra brown while the inside gets the perfect texture as well. >> Okay, let's check out this other clip here CCI Preheat Oven Description_Wide. >> Because we're making larger cookies, you'll wanna take the low and slow approach. We want the middle of these cookies to be a perfect golden brown before the edges get too dark. >> So I think I like the beginning of this clip here because she says, >> Before you start assembling the ingredients. >> She says before we start assembling the ingredients, and that makes more sense to me. So I'm gonna get this added to my sequence here. >> Sorry to, >> Start right here, >> Before you start assembling the ingredients pre heat your oven to 325 degrees. >> But I really don't like how she ends this clip. >> But we want the cookies to be perfectly baked on the outside and not extra brown, while the inside gets the perfect texture as well. >> It just sounds a little bit weird. So. >> I'll approach. >> I think I can cut it right after she says low and slow approach. >> We wanna take the low and slow approach. >> So I'm gonna mark an out point there and then add this to my sequence. Then I'm gonna pull up the CCI prehab and wide. >> We wanna take the low and sllow approach. >> And then I think I can pick up this clip right here because I liked the end bit of this clip a little bit better. So I'm gonna mark an endpoint. >> We want the middle of these cookies to be a perfect golden brown before the edges get too dark. >> And I think that's what I want, right there. So I'm just gonna add that right here. >> This temperature is a little bit lower than the standard 375 degrees because we're making extra large cookies, so we wanna take the low and slow approach. We want the middle of these cookies to be a perfect golden brown before the edges get too dark. >> So that sounds pretty good. But again, we have this weird transition here between this clip in this clip right here. So I know I can glue some of that back together with a cutaway shot because I did see that there was a preheat oven cutaway. Here we go. Low that in the source monitor here. Looks like there's two takes of this. All right, so we can probably pick it up right here. And then and right there. So I'll just add this right to the beginning, right after the ingredients shop. >> Before you start assembling the ingredients pre heat your oven to 325 degrees. This temperature is a little bit lower than the standard 375. >> And I think I can probably trim it so that we come back to her right after she says 325 degrees. But I wanna make sure on this clip. >> Standard 325 degrees. >> That she sets the temperature and she pulls her hand away. So what I can do is I'll just trim up the end here. So I'm gonna hit Y on the keyboard and I'm gonna change to the Slip tool. Well the Slip tool is going to allow me to do, is leave the start of the clip set here and the end of the clip here, but it'll allow me to slide the footage in between these two boundaries. So essentially, I'll be changing the in point and the out point at the same exact time but I will leave the duration of this clip exactly the same. So what I wanna see is the end of the clip here, I wanna see her hand just leaving the knob. So I'm gonna click and drag to the left here. On the left hand side it's showing me the start frame and on the right hand side it's showing me the end frame. So I think I can go right about there. Let me see what that looks like >> Before you start assembling the ingredients pre heat your oven to 325 degrees. This temperature is a little. >> I'll switch back to the selection tool here. I think that was pretty close. I may extend this out by just a few frames. >> 65 degrees. This temperature is a little bit. >> And I think that works pretty well. >> So we wanna take the low and slow approach. We want the middle of these cookies to be a perfect golden brown before the edges get too dark. >> According to the shortlist, I don't have any other shots listed that we're planning for this shot, but let me see if I can find another shot to patch, that little edit point together. I have a shot listed here, Cookie close up on rack cutaway. Lemme take a look at that. I say we got a camera going into the cookies on the rack. Nice little close up here with these two cookies, I think that would actually work really well. She's talking about the level of doneness on these cookies. So I might pick an endpoint right here. And then picking outpoint point right here and see if that works to slot in here. Let me check this out. >> We want the middle of these cookies to be a perfect golden brown before the edges get too dark. >> Well, okay, that's not gonna work super great. Let me just slide it back and then extend this to the left a little bit. >> We want the middle of these cookies to be a perfect golden brown before the edges get too dark. >> I think that works pretty well. I don't wanna have this clip go when the camera starts moving back to the right. Let's see if I can pull this a few frames this way. See if this works. >> We want the middle of these cookies to be a. >> I don't think that works. So I'm gonna double click this media clip and that's gonna bring it back up in the source monitor here. And now I can actually make adjustments to the in and the out point here in the source monitor. And that will change what's happening with this clip in the sequence. I think I might be able to actually pick it up right here when the camera starts moving right. So I'm gonna grab right in the middle here with his hand tool is and just slide this over. And then over here that's going to update in the sequence. >> We want the middle of these cookies to be a perfect golden brown before the edges get too dark. I like that, that looks pretty good. Now you can see there are some more shots in the list but I am gonna let you work on those on your own. Let me just play this down from the beginning. >> Have you ever had a recipe for chocolate chip cookies that left something to be desired. It can be daunting trying to find just the right recipe. Not flat, not too dry, delicious flavor, picture perfect and best of all easy. Hi, my name is Cheryl Ziegler and in this video I'm going to show you how to make big bakery style chocolate chip cookies. First, let's go over the ingredients. You will need two cups of all purpose flour, half a teaspoon of baking soda, half a teaspoon of caustic salt, three-quarters of a cup of melted butter, one cup of packed brown sugar, half a cup of white sugar, one egg and one egg yolk, a tablespoon of vanilla extract, and two cups of chocolate chips. Before you start assembling the ingredients, preheat your oven to 325 degrees. This temperature is a little bit lower than the standard 375 degrees because we're making extra large cookies. So we wanna take the low and slow approach. We want the middle of these cookies to be a perfect golden brown before the edges get too dark. >> All right, so playing that back, there was a few things that I saw in there. Right at the end here, I think I could add just a little bit more space because it felt like she rushed into the second line here. >> The low and slow approach. We want. >> So I'm just gonna do a ripple edit and push this out just a hair. >> We want the middle of these cookies to be- >> And it actually works pretty well. >> We want the middle of these cookies to be a perfect golden brown before the edges. >> There's also some audio transitions here that are not super smooth. And that's something you're gonna learn how to fix coming up next.


