
 Lessons: 43Length: 6.5 hours
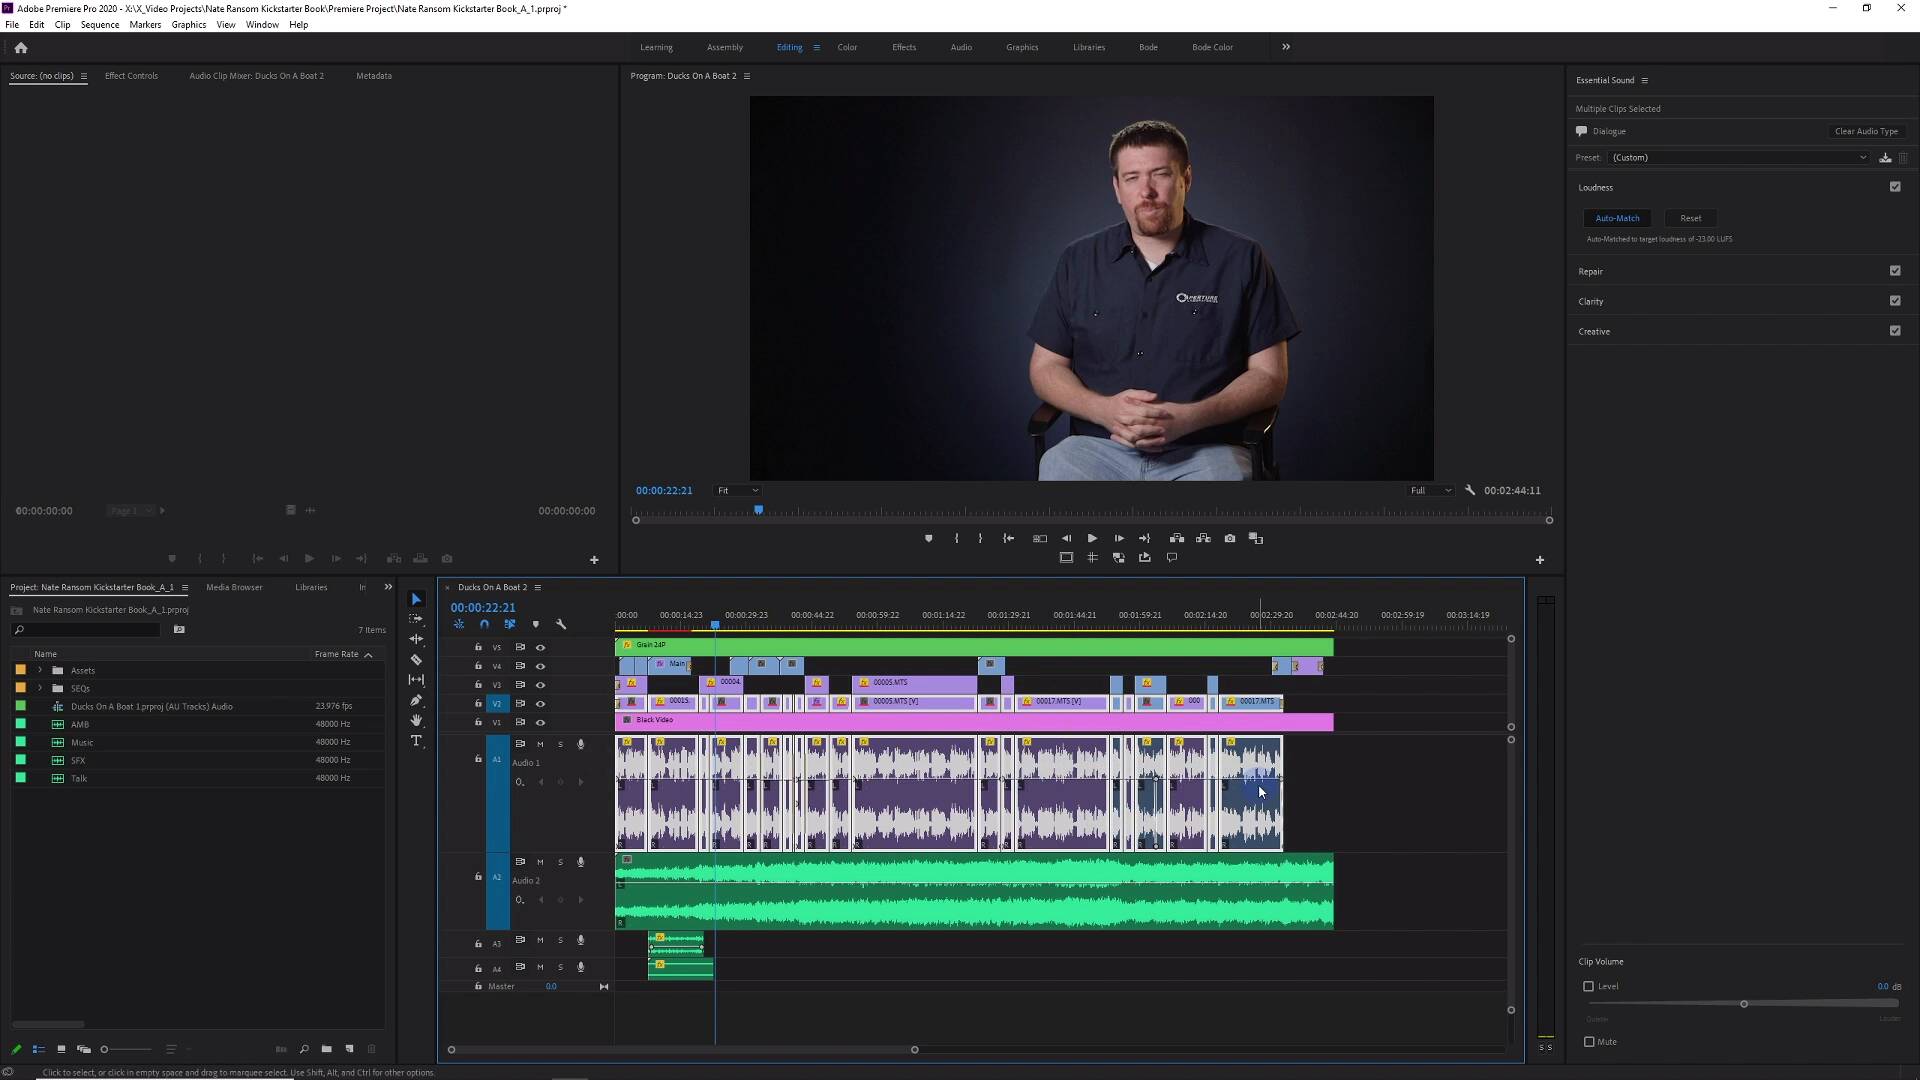

- Overview
- Transcript
10.1 Using the Essential Sound Panel for Dialogue: Part 1
In this lesson, you will learn how to use the Essential Sound Panel to clean up and treat your dialogue.
1.Introduction
1.1Introduction01:12
1.2What You Need07:14
2.Getting Started
2.1File Structure06:07
2.2Quick Tour of Premiere Pro11:14
3.Set Up Your Project
3.1Import09:55
3.2Organize08:39
4.Editing Basics
4.1Creating a Sequence10:07
4.2Cuts06:26
4.3Subclips06:46
4.4Editing in the Timeline, Part One11:27
4.5Editing in the Timeline, Part Two07:19
5.Beyond Basic Editing
5.1Adding a Cutaway Shot10:06
5.2Building on the Basic Edit, Part 107:09
5.3Building on the Basic Edit, Part 209:09
5.4Audio Transitions11:22
6.Fine-Tuning the Look and Sound
6.1Video Effects10:48
6.2Master Clip Effects10:47
6.3Adjusting the Volume of Your Tracks09:46
6.4Audio Effects11:17
6.5Adding Titles11:16
6.6Exporting12:10
7.Conclusion
7.1Conclusion02:33
8.Frequently Asked Questions
8.1FAQ Introduction01:22
9.Sharing
9.1Dynamic Link to After Effects12:44
9.2Exporting to HEVC for Faster Sharing Online06:39
9.3How to Export ProRes Video and Other Professional Formats07:17
10.New Audio Workflows
10.1Using the Essential Sound Panel for Dialogue: Part 111:58
10.2Using the Essential Sound Panel for Dialogue: Part 206:35
10.3Using the Essential Sound Panel for SFX and Ambience07:59
10.4Using the Essential Sound Panel for Music08:35
10.5Send Audio to Audition for Editing From Premiere Pro13:59
10.6Mixing Audio With Killer Effects Inside Premiere12:57
11.Essential Graphics Panel
11.1Use the Essential Graphics Panel to Create Basic Titles12:30
11.2Use the Essential Graphics Panel to Create a Motion Graphic Title in Premiere13:23
11.3Make Your Own Templates for the Essential Graphics Panel03:51
11.4How To Use Title Templates in the Essential Graphics Panel: Part 107:14
11.5How To Use Title Templates in the Essential Graphics Panel: Part 207:09
11.6How To Use Transition Templates in the Essential Graphics Panel08:26
12.Real-World Projects
12.1Use Proxies for Faster Editing13:42
12.2Create Multiple Camera Shots From a Single Camera10:56
13.New Features
13.1Using the Freeform View09:36
13.2Use Auto-Reframe to Crop Your Video09:36
13.3How to Work With Captions13:41
10.1 Using the Essential Sound Panel for Dialogue: Part 1
[MUSIC] In this lesson, you're going to learn about the Essential Sound panel and how you can use it to punch up and clean up your dialogue for better mixes. [MUSIC] I have a really simple project to open here. And before we jump into the Essential Sound panel, which you can see over here, I just wanna play a little bit of this project for you. So that you can get an idea of where we're starting from in terms of the mix and where the dialogue is at. And in this lesson, we're gonna be talking mostly about how to treat dialogue or kind of talking tracks. And then in the next lesson, you're going to be learning about how to use the Essential Sound panel for treating your music, sound effects, and ambience. So I'm gonna go back to the beginning here. >> Hi everyone, my name's Nate Ransom. And I wanted to tell you about a project that my brother in law, Chris and I have been working on for the past several months. The project is a children's book that we've titled Ducks on a Boat. And we're looking for some input from the community and a little help getting over the finish line as far as publishing costs. So one of the things we really think is exciting about this book and this project that we're doing is the characters that we've come up with. We've started with the idea of ducks. >> All right, I think that's good enough. So you can hear there are a few issues that need to be addressed. And this is a simple project. I have all of my dialogue stuff here, which is just, it's really a monologue. But I call it kind of a talk track, right? This is where all the talking lives. It's just one person speaking throughout this, then I have a music track. I have some sound effects of some ducks and some water kind of ambience down here. And that's pretty much it. It's all really simple but you can tell that we have kind of a level problem with the dialogue. It starts off and it it seems like it's about the right level or volume, if you will. And then it gets too quiet and then the music comes up, seemingly on its own. It's actually in the track that the track kind of builds and gets louder with its intensity, and then it sort of obscures the dialogue. And that's something that definitely needs to be addressed. And I'm going to do that with the Essential Sound panel. Now, if you haven't brought this up before, you can come right up here to the menu, go to Window and Essential Sound and that will pop up. There is also a dedicated audio workspace which you can click if you have your workspace bar up here. And I'll just reset this to the saved layout. That's something you can use as well. I actually don't really like the audio workspace. That doesn't really work for me. So I'm just gonna go back to editing with the Essential Sound panel opened here. So the way that this works is in your timeline, in your sequence, you select the clips that are the dialogue, right? So I'm selecting all of these clips here and I don't have to select all of the video portions because a few of them are unlinked from the video. It doesn't really matter. I'm only concerned with the audio here. I'm going to select all of those and then tag them by clicking this button as dialogue. And when I do, it's going to open up this very specific toolset here that is geared towards dealing with audio. I'm just gonna collapse these. There's four main sections. We have Loudness, Repair, Clarity, and Creative. Each one of the sections actually has loudness. And I think it's probably the most useful out of all of them. Because a lot of times you're dealing with clips and they're recorded at various levels, or maybe the camera has some kind of auto gain thing. And leveling out your clips is an important part to making this sound great. So all I need to do is click this auto match button and you can see in the timeline here what's going to happen. All of these now are loudness matched to have the same loudness. Now loudness is a much more advanced process of analyzing the sound over time. And it has much more to do with how we perceive loudness, rather than what is the loudest sample in each one of these clips. Dealing with the loudest samples in each one of these clips is more of a peak normalization process. And that doesn't do nearly as good of a job as loudness matching, which the Essential Sound panel handles really well. So now with just that one operation, I'll play the first few seconds to this. >> Hi everyone, my name's Nate Ransom. And I wanted to tell you about a project that my brother in law, Chris and I have been working on for the past several months. The project is a children's book that we've titled Ducks on a Boat. And we're looking for some input from the community and a little help getting over the finish line as far as publishing cost go. So one of the things we really think is exciting about this book and it's- >> So already, we're in a lot better spot than we were just a few minutes ago. It's not perfect, the music needs to be addressed, but we're gonna look at that in the next lesson. So I should say at this point, if you ever deselect your clips like I just inadvertently did, you can get back to this selection you had with all of your dialogue clips by just clicking this button over here in the Essential Sound panel. And that'll select everything that you have tagged with dialogue. You can also clear the audio type right up here. If you've selected something that you don't wanna be grouped with all this other stuff, you can clear the audio tag and that will get rid of that and it'll reset everything. It'll pull all the effects off in the loudness matching, so I'm just going to undo that. Now we're reset to where we were before. I should also point out that you can work on individual clips here. And you can address those differently than how you are addressing all of the clips that you have tagged as dialogue. That becomes a little bit more complicated because there's no way to identify which specific clips have different settings applied. So in general, I prefer to just set them all the same, and then come up with a different way to address individual clips that need more or different attention. So the next section down here is Repair. If you wanna do something really simple and really common, which is to denoise your dialogue tracks. Maybe there was some ambient noise in the room, wind noise, could be the air handler in the room, or a loud refrigerator, or some kind of appliance. Or maybe it's electronic noise, noise that the microphone itself produced, or maybe the recorder, noise in the preamp. Almost everything that you've recorded out in the field could use maybe a little bit of denoising. And there's the option to do that right here. And the default values for all of these is around five. And when you apply this reduce noise and you play your clip, listen to what happens. >> Project that we're doing is the characters that we've come up with. We've started with the idea of ducks, but introducing them into different scenarios where they can learn lessons. The first book that we're actually focusing on is this idea that the ducks have found a boat, and this is something new to them. >> So what you're hearing is at the beginning of each clip, the denoising effect, which by the way, I don't know if you noticed. But this little effects indicator here has turned green on all the clips. And that is because all of these clips if you click on them and then go to the effects controls, they now have an audio effect applied to them. And so this denoise effect that is applied individually to each one of these clips is sort of analyzing the audio to try and figure out where the noise is and then doing some magic to basically get rid of it. And at the beginning of each clip, it sounds muffled as the denoising effect is sort of analyzing the audio. And so I had thought that this way to work was not really effective because you would have this thing that happened every time you played at the start of a clip. >> I have a few young kids and I've been really excited. >> It sounds bad. But what I found out is after experimenting with this more is that what you need to do is actually play this whole thing through, ideally your whole sequence through at least twice. Because on the second playthrough, I guess the analyzation has been done, and it works a lot better. >> Introducing them into different scenarios where they can learn lessons. The first book that we're actually focusing on is this idea that the ducks have found a boat. And this is something new to them and they're very excited by it. But what happens when they actually become too- >> So you hear that muffly spot right there? Listen to what happens when we play it a second time. >> And they're very excited by it. But what happens- >> And a third time. >> New to them and they're very excited by it but what happens when they actually become too dependent on the boat? >> So it's not perfect and it requires a few playthroughs of your entire sequence which, to be honest, does not work with my workflow. But this is a pretty effective way to denoise your clips. I do think that the default value of five is probably a little aggressive. And you might want to experiment with moving it down to maybe be two to three and a half, maybe four region for things with kind of light noise in the background. If it has moderate to high noise, you are gonna have to jack this up pretty high. But I think all of the default values are maybe just a hair too aggressive for these repair functions here. But again, your mileage may vary. It could be that the type of clips that you are working with, all the default values work fine. These tools right here for dealing with audio repair issues and that could be reducing reverb, which is a really common thing. De-essing, which is addressing the harshness that you might get in certain microphones pointed in a certain way with certain people. Not every microphone has a real harsh sound, but sometimes you hear footage that just sounds really harsh with S's and sibilant sounds. So the DeEsser can jump in there and help you. I'm not gonna demo all of these. You can do that on your own. But just know that the default values on some of these are maybe a little bit aggressive. All right, let's jump down to the next section here. And actually, I'm just gonna pull off the reduce noise for now. In fact, I actually need to reselect all my clips because I only had one clip selected and so taking the reduce noise effect off that one clip now gives us this warning. And it tells us that some of the clips have some stuff enabled and others don't and basically not all the settings are the same. Now again, like I mentioned before, if you're working on individual clips, you may need to do that. You may have one clip that needs more noise reduction. So you have to select that one individually and make an adjustment, hello, make an adjustment on that like that. But when you go and select all of your clips, it's going to say, hey, not all the clips have the same setting. So if you want them to, you're going to have to basically move this slider and as soon as you move the slider, all of those effects update to have the exact same settings. That's definitely something that you should know about the Essential Sound panel. But for now, I'm going to take this off, and we can disable the whole Repair section completely. And with that, I think it's a good place to end for this lesson. Now, there are still a few more things to talk about as it relates to dialogue and the Essential Sound panel. But for that, you're going to have to check out the next lesson. [MUSIC]


